| |
Turtlebot Ubuntu Installer
Description: Using and Regenerating the Turtlebot Ubuntu InstallerTutorial Level: BEGINNER
Using the Turtlebot Ubuntu Installer
The Turtlebot installer is designed to install Ubuntu 10.04 and the Turtlebot ROS packages on the official turtlebot laptop, the Asus EEE 1215N. Using the installer with other laptops may work, but is unsupported.
To use the installer you will need an empty 2GB or bigger USB flash drive; this process will erase your drive and turn it into a bootable USB installer.
Download the ISO image from location
- Create a bootable USB installer from this ISO image.
- Insert your USB drive into your computer running Ubuntu.
Launch the "Startup Disk Creator" tool on Ubuntu (System -> Administration -> Startup Disk Creator)
- If the ISO you downloaded does not appear in the list of source disk images, click other and find it.
- Make sure that your ISO is selected. This does not happen automatically if you use the "Other" button.
- Select the partition that corresponds to your USB drive.
- Click "Make Startup Disk"
- Enter your password when prompted
- When finished, unplug your USB drive
- Power off your turtlebot laptop.
- Plug your bootable USB drive into your turtlebot laptop
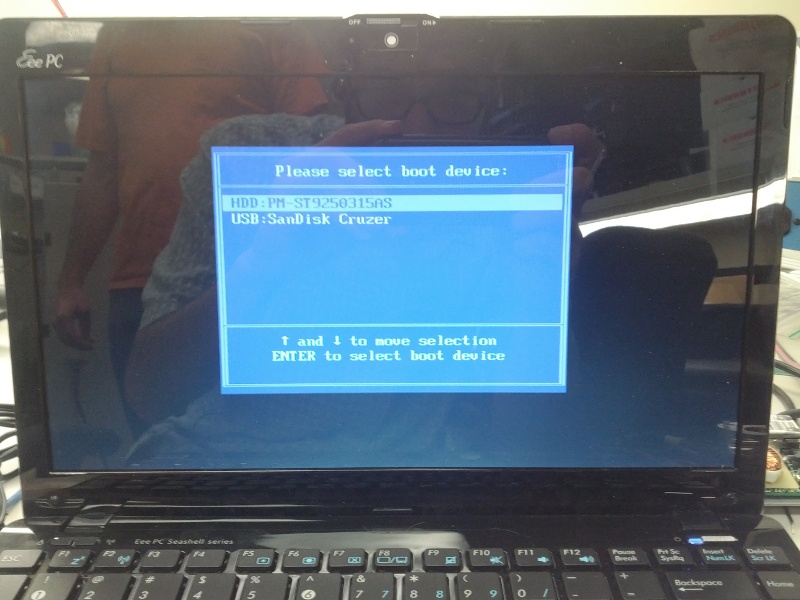
Power on your turtlebot laptop. Depending on your version of the laptop press Delete or ESC as soon as you see the BIOS splash screen. This will take you to a screen will the title Please select boot device and lists both laptop harddrive and USB drive. The screen should look something like:
 Bigger
 - Select your USB drive as the boot device and press enter
- Wait for the installer to load. It may take a few minutes.
- Push the "Install Ubuntu 10.04.3 LTS" button
- Follow the install directions. Recommended settings:
- On "Prepare disk space" select "Erase and use the entire disk"
- On "Who are you," you MUST enter "turtlebot" for "What name do you want to use to log in?"
- Wait for the installer to finish, and click reboot.
How to regenerate the Turtlebot Installer
Download the desktop install ISO for the version of ubuntu that you want to use. The current installer is based on Ubuntu 10.04 64-bit. Here is a list of Ubuntu ISOs
- Install UCK.
sudo apt-get install uck
- Run UCK
uck-gui
Select the languages you want to support (use 'en' for english). Here is a list of 2-letter codes descriptions
- Choose desktop environments. At a minimum, you should select gnome
- When prompted, locate the ubuntu ISO you downloaded earlier
- Enter "Turtlebot" as the name for your CD
- Select YES to customize this CD manually
- Select YES to delete all windows-related files. These are unnecessary since we are building an installer.
Read information, then click Close and switch to terminal to enter your login password for current system (same password you would be using for sudo)
- Wait. The unpack process will take 10-100minutes.
- Once previous is complete, a GUI prompt will be displayed. When prompted, choose to run a console application to customize your CD
Download the customization script. Read it and make any necessary updates, for example to upgrade to a newer kernel, wireless drivers or a newer version of ROS.
Open a new terminal (not in the UCK chroot environment) and copy the customization script to ~/tmp/remaster-root. You may need to use sudo. Also, note the ~ in ~/tmp.
- In the UCK chroot terminal, run the customization script:
chmod u+x turtlebot.sh
./turtlebot.sh
- Exit the customization terminal. You will see a window appear prompting for the next step to take; ignore it for now.
- Open a normal terminal and navigate to ~/tmp/remaster-root
- Do 'sudo rm -rf root/.gconfd'. Do 'sudo ls -a root' to confirm that there are no gnome-related configuration directories still floating around. Remove them if they still exist.
- Go back to the UCK window and select "Continue Building".
- Wait for the installer to finish. Move your competed image to its final location and give it a more meaningful name.
- Celebrate! a 6-pack of Beer is recommended.


