


Show EOL distros:
Nox
Contents
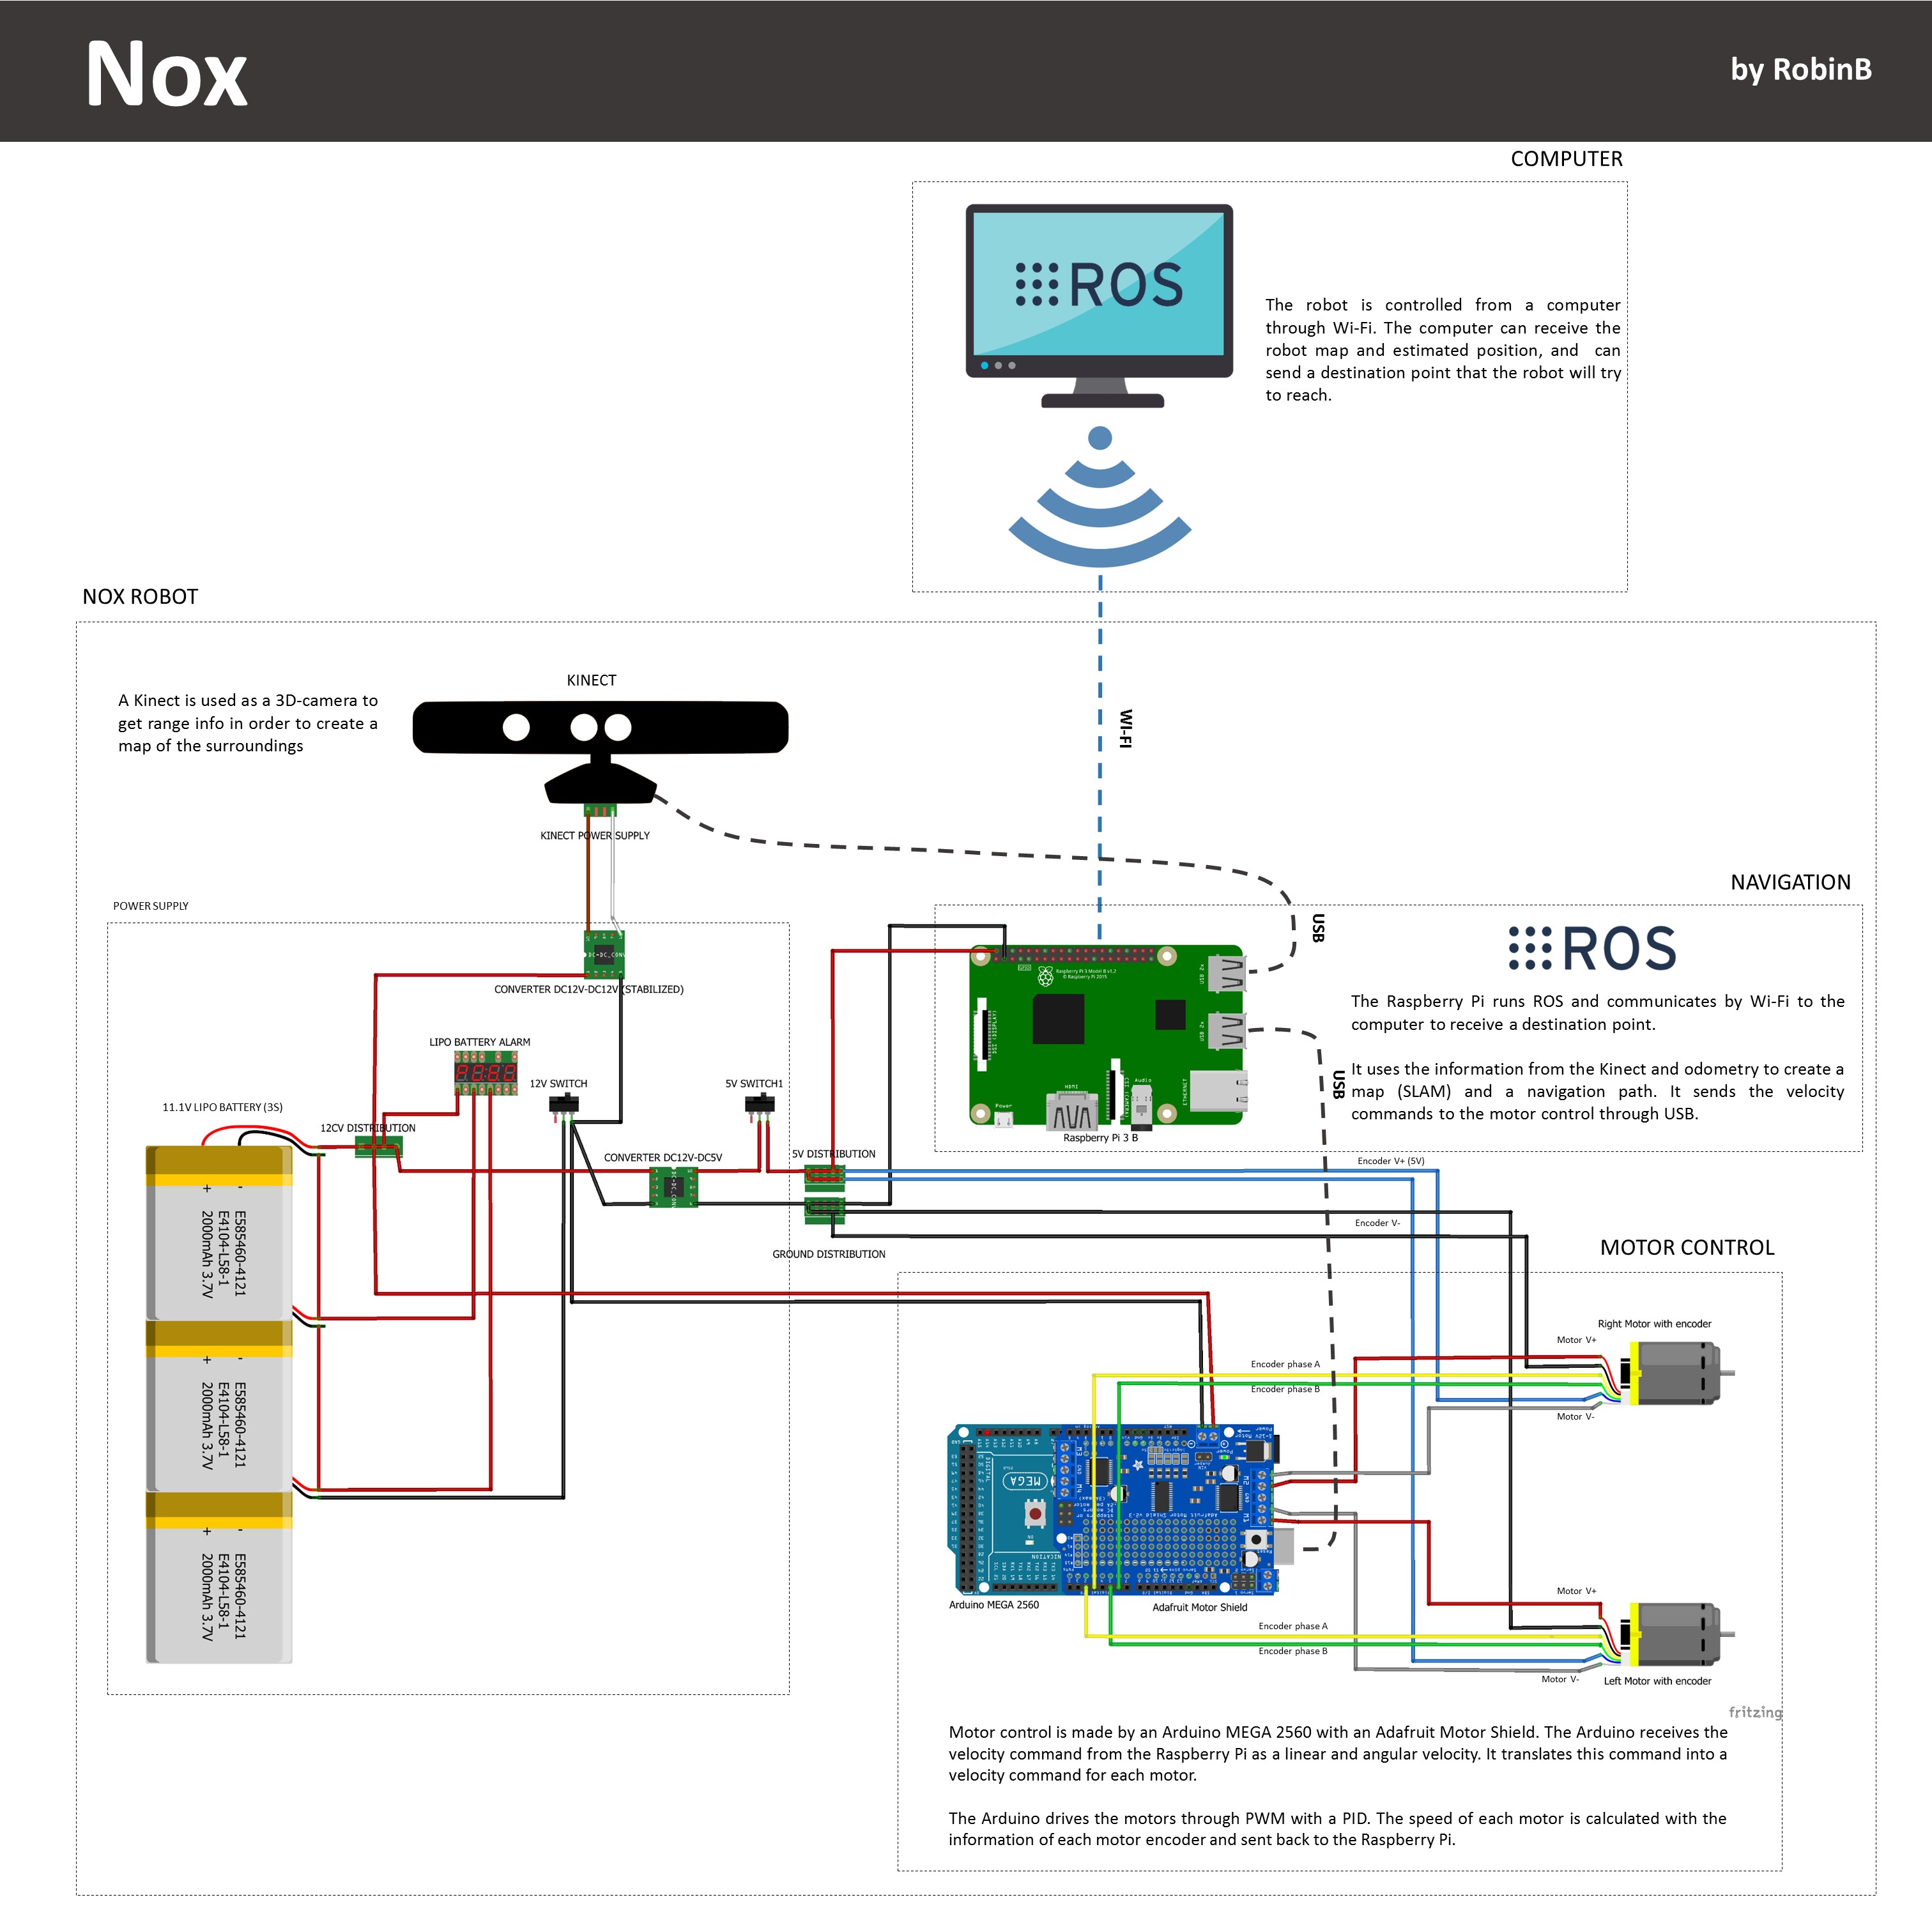
Nox is a DIY differential drive robot which uses SLAM (gmapping) with a Kinect to navigate in its environment. It is powered by ROS running on a Raspberry Pi 3 Model B and an Arduino Mega controlling two DC motors with encoders.
Packages and more (CAD model,...) are available on the Nox github. A functional schematic of the robot and its components is available here.
Hardware

Nox is a low-cost robot built with simple hardware, allowing for easy replication. It is a differential drive robot with the motors placed on the same axis. The base is made of wood with two caster wheels for support. The rest of the structure is made mainly of wood and metal brackets, easy to find in any DIY retail store. On the rear part of the robot plates can be stacked to put the electronic boards on. More information on making the robot (such as components used) can be found in the Hackster page of the project.
The robot contains:
- Kinect 360 camera
- Raspberry Pi 3 Model B
- Arduino Mega 2560
- Adafruit Motor/Stepper/Servo Shield for Arduino v2
- 2 Geared 12V DC Motors with Encoders
- 3S Battery
- Power Converter DC-DC 5V 10A
- Power Converter DC-DC 12V
Software
Nox software is divided into three packages:
nox_description: the package includes the URDF description of the robot and the associated CAD files for display in RViz. The launch file "nox_rviz.launch" launches the joint and robot state publisher as well as RViz to display the model.
nox: the package includes the base controller node "nox_controller.cpp". This node converts velocity command data into proper command data for the robot (according to the robot kinematic model) and sends it to the Arduino Mega (through ROSSerial). It also computes the odometry (with the encoder data and according to the robot kinematic model) from data received from the Arduino Mega. The package also includes several launch files used to start the navigation (see "How to use Nox" below).
Arduino: the arduino node receives the command order from the base controller node and commands the motor speeds. It also sends back the encoder data needed for the odometry to the controller node through ROSSerial.
How to use Nox
Installation
These tutorials assume that you are comfortable with ROS and the catkin build system. Please familiarize yourself using the ROS and catkin tutorials.
Download the github package:
git clone git@github.com:RBinsonB/Nox_robot.git
Place the "nox" and "nox_description" folders in "your_catkin_workspace/src" on both your computer and the Raspberry Pi and run:
catkin_make
- Upload the Arduino sketch located in the Arduino folder ('motor_controller_v2_AFMS.ino') to the Arduino Mega 2560.
Running Nox
In order to navigate Nox you will need to start two launch files using SSH and ROS nodes over network.
Connect to Nox Wi-Fi
There are two options for communicating with Nox:
- Create an Ad-Hoc network with the Raspberry Pi and connect to it with a computer to send SSH commands
- Connect the Raspberry Pi and the computer to the same network to send SSH commands
The Raspberry Pi network configuration isn't included here and the choice and implementation of the connection is left to the user.
Once connected and before launching any ROS command the Raspberry Pi has to be synced to the computer. Run the following command in SSH on the Raspberry Pi (remplacing 'ip_address_of_the_computer' with your computer's IP address):
sudo ntpdate ip_address_of_the_computer
You can also setup the ntpdate or use chrony to do that automatically.https://github.com/RBinsonB/Nox_robot#2-start-the-odometry-and-motor-control
Start the odometry and motor control
In the Raspberry Pi, use the following command to start the main program:
roslaunch nox nox_bringup.launch
It will launch the serial controller node connected to the Arduino, the Kinect node, the odometry calculation node and the joint state publisher. If this step succeded you should see the side light of the robot going from a series of three quick blinks to a slow "breathing-like" type of blinking.
Start the navigation
Path planning calculation and mapping are done on your computer and you have to launch a launch file from your computer. Before doing so, assure yourself that you exported the ROS master from the Raspberry Pi (modify the command to suit your own setup):
export ROS_MASTER_URI=http://localhost:11311
You can then launch:
roslaunch nox nox_slam.launch
It will launch the move_base node and RViz. By using the "2D Nav Goal" arrow you can give a goal for the robot to reach. Alternatively, you can use the ROS teleop keyboard to control the robot:
rosrun teleop_twist_keyboard teleop_twist_keyboard.py
Nox
Contents
Packages untested on ROS Lunar.
Nox is a DIY differential drive robot which uses SLAM (gmapping) with a Kinect to navigate in its environment. It is powered by ROS running on a Raspberry Pi 3 Model B and an Arduino Mega controlling two DC motors with encoders.
Packages and more (CAD model,...) are available on the Nox github. A functional schematic of the robot and its components is available here.
Hardware

Nox is a low-cost robot built with simple hardware, allowing for easy replication. It is a differential drive robot with the motors placed on the same axis. The base is made of wood with two caster wheels for support. The rest of the structure is made mainly of wood and metal brackets, easy to find in any DIY retail store. On the rear part of the robot plates can be stacked to put the electronic boards on. More information on making the robot (such as components used) can be found in the Hackster page of the project.
The robot contains:
- Kinect 360 camera
- Raspberry Pi 3 Model B
- Arduino Mega 2560
- Adafruit Motor/Stepper/Servo Shield for Arduino v2
- 2 Geared 12V DC Motors with Encoders
- 3S Battery
- Power Converter DC-DC 5V 10A
- Power Converter DC-DC 12V
Software
Nox software is divided into three packages:
nox_description: the package includes the URDF description of the robot and the associated CAD files for display in RViz. The launch file "nox_rviz.launch" launches the joint and robot state publisher as well as RViz to display the model.
nox: the package includes the base controller node "nox_controller.cpp". This node converts velocity command data into proper command data for the robot (according to the robot kinematic model) and sends it to the Arduino Mega (through ROSSerial). It also computes the odometry (with the encoder data and according to the robot kinematic model) from data received from the Arduino Mega. The package also includes several launch files used to start the navigation (see "How to use Nox" below).
Arduino: the arduino node receives the command order from the base controller node and commands the motor speeds. It also sends back the encoder data needed for the odometry to the controller node through ROSSerial.
How to use Nox
Installation
These tutorials assume that you are comfortable with ROS and the catkin build system. Please familiarize yourself using the ROS and catkin tutorials.
Download the github package:
git clone git@github.com:RBinsonB/Nox_robot.git
Place the "nox" and "nox_description" folders in "your_catkin_workspace/src" on both your computer and the Raspberry Pi and run:
catkin_make
- Upload the Arduino sketch located in the Arduino folder ('motor_controller_v2_AFMS.ino') to the Arduino Mega 2560.
Running Nox
In order to navigate Nox you will need to start two launch files using SSH and ROS nodes over network.
Connect to Nox Wi-Fi
There are two options for communicating with Nox:
- Create an Ad-Hoc network with the Raspberry Pi and connect to it with a computer to send SSH commands
- Connect the Raspberry Pi and the computer to the same network to send SSH commands
The Raspberry Pi network configuration isn't included here and the choice and implementation of the connection is left to the user.
Once connected and before launching any ROS command the Raspberry Pi has to be synced to the computer. Run the following command in SSH on the Raspberry Pi (remplacing 'ip_address_of_the_computer' with your computer's IP address):
sudo ntpdate ip_address_of_the_computer
You can also setup the ntpdate or use chrony to do that automatically.https://github.com/RBinsonB/Nox_robot#2-start-the-odometry-and-motor-control
Start the odometry and motor control
In the Raspberry Pi, use the following command to start the main program:
roslaunch nox nox_bringup.launch
It will launch the serial controller node connected to the Arduino, the Kinect node, the odometry calculation node and the joint state publisher. If this step succeded you should see the side light of the robot going from a series of three quick blinks to a slow "breathing-like" type of blinking.
Start the navigation
Path planning calculation and mapping are done on your computer and you have to launch a launch file from your computer. Before doing so, assure yourself that you exported the ROS master from the Raspberry Pi (modify the command to suit your own setup):
export ROS_MASTER_URI=http://localhost:11311
You can then launch:
roslaunch nox nox_slam.launch
It will launch the move_base node and RViz. By using the "2D Nav Goal" arrow you can give a goal for the robot to reach. Alternatively, you can use the ROS teleop keyboard to control the robot:
rosrun teleop_twist_keyboard teleop_twist_keyboard.py
Nox
Contents
Packages untested on ROS Melodic.
Nox is a DIY differential drive robot which uses SLAM (gmapping) with a Kinect to navigate in its environment. It is powered by ROS running on a Raspberry Pi 3 Model B and an Arduino Mega controlling two DC motors with encoders.
Packages and more (CAD model,...) are available on the Nox github. A functional schematic of the robot and its components is available here.
Hardware

Nox is a low-cost robot built with simple hardware, allowing for easy replication. It is a differential drive robot with the motors placed on the same axis. The base is made of wood with two caster wheels for support. The rest of the structure is made mainly of wood and metal brackets, easy to find in any DIY retail store. On the rear part of the robot plates can be stacked to put the electronic boards on. More information on making the robot (such as components used) can be found in the Hackster page of the project.
The robot contains:
- Kinect 360 camera
- Raspberry Pi 3 Model B
- Arduino Mega 2560
- Adafruit Motor/Stepper/Servo Shield for Arduino v2
- 2 Geared 12V DC Motors with Encoders
- 3S Battery
- Power Converter DC-DC 5V 10A
- Power Converter DC-DC 12V
Software
Nox software is divided into three packages:
nox_description: the package includes the URDF description of the robot and the associated CAD files for display in RViz. The launch file "nox_rviz.launch" launches the joint and robot state publisher as well as RViz to display the model.
nox: the package includes the base controller node "nox_controller.cpp". This node converts velocity command data into proper command data for the robot (according to the robot kinematic model) and sends it to the Arduino Mega (through ROSSerial). It also computes the odometry (with the encoder data and according to the robot kinematic model) from data received from the Arduino Mega. The package also includes several launch files used to start the navigation (see "How to use Nox" below).
Arduino: the arduino node receives the command order from the base controller node and commands the motor speeds. It also sends back the encoder data needed for the odometry to the controller node through ROSSerial.
How to use Nox
Installation
These tutorials assume that you are comfortable with ROS and the catkin build system. Please familiarize yourself using the ROS and catkin tutorials.
Download the github package:
git clone git@github.com:RBinsonB/Nox_robot.git
Place the "nox" and "nox_description" folders in "your_catkin_workspace/src" on both your computer and the Raspberry Pi and run:
catkin_make
- Upload the Arduino sketch located in the Arduino folder ('motor_controller_v2_AFMS.ino') to the Arduino Mega 2560.
Running Nox
In order to navigate Nox you will need to start two launch files using SSH and ROS nodes over network.
Connect to Nox Wi-Fi
There are two options for communicating with Nox:
- Create an Ad-Hoc network with the Raspberry Pi and connect to it with a computer to send SSH commands
- Connect the Raspberry Pi and the computer to the same network to send SSH commands
The Raspberry Pi network configuration isn't included here and the choice and implementation of the connection is left to the user.
Once connected and before launching any ROS command the Raspberry Pi has to be synced to the computer. Run the following command in SSH on the Raspberry Pi (remplacing 'ip_address_of_the_computer' with your computer's IP address):
sudo ntpdate ip_address_of_the_computer
You can also setup the ntpdate or use chrony to do that automatically.https://github.com/RBinsonB/Nox_robot#2-start-the-odometry-and-motor-control
Start the odometry and motor control
In the Raspberry Pi, use the following command to start the main program:
roslaunch nox nox_bringup.launch
It will launch the serial controller node connected to the Arduino, the Kinect node, the odometry calculation node and the joint state publisher. If this step succeded you should see the side light of the robot going from a series of three quick blinks to a slow "breathing-like" type of blinking.
Start the navigation
Path planning calculation and mapping are done on your computer and you have to launch a launch file from your computer. Before doing so, assure yourself that you exported the ROS master from the Raspberry Pi (modify the command to suit your own setup):
export ROS_MASTER_URI=http://localhost:11311
You can then launch:
roslaunch nox nox_slam.launch
It will launch the move_base node and RViz. By using the "2D Nav Goal" arrow you can give a goal for the robot to reach. Alternatively, you can use the ROS teleop keyboard to control the robot:
rosrun teleop_twist_keyboard teleop_twist_keyboard.py
