| |
Model your application with the Pilz Manipulator Module PRBT
Description: Model your first application including an object from a stl file and a table, on which the Manipulator Module PRBT is mounted and move the robot in this virtual environment.Keywords: PRBT, URDF
Tutorial Level: BEGINNER
Next Tutorial: Move your robot with the Pilz Industrial Motion Planner
Note: Please be aware that the Pilz command planner has moved to MoveIt and http://wiki.ros.org/pilz_robots and http://wiki.ros.org/pilz_industrial_motion are unmaintained. These tutorials are outdated and might or might not work dependent on the ROS distro.
Contents
Introduction
ROS offers standardized interfaces and components for the integration of complex algorithms. Different robot arms can inter-operate easily with 3D-sensors and enable you to implement challenging applications.
This tutorial is intended for everyone interested in the Pilz Manipulator Module PRBT and the pilz_robots ROS packages. It guides you through modelling your first application including an object described by an stl file and a table, on which the PRBT is mounted. In a virtual environment, you can move the robot manipulator around using the mouse. Once you completed this tutorial, you are able to model your own machine layout and test, if a PRBT manipulator placed inside the application can reach your machine.
You can also control a real robot manipulator with the same procedure but we limit this tutorial to a virtual environment.
The files of this tutorials are also available for download from GitHub/pilz_tutorials. But we recommend to create the files on your own during this tutorial.

Prerequisites
In order to complete this tutorial, you need the following:
A workstation or a Virtual machine (VM) with Linux Ubuntu 16.04 LTS and ROS kinetic installed.
Or Ubuntu 18.04 LTS and ROS melodic installed.Basic command line knowledge (see e.g. in the ROS-I training Using the terminal) For ROS-commands, every section below contains the links to corresponding tutorials
Completed the first ROS tutorial create a catkin workspace
Install Pilz robot package
The 3D-model of the PRBT manipulator and configuration for an empty planning environment is available in packages ready to install using apt. Update your package list and install the pilz_robots meta-package in a terminal:
Show EOL distros:
sudo apt update
sudo apt install ros-kinetic-pilz-robots
sudo apt update
sudo apt install ros-melodic-pilz-robots
This installs the prbt_support and prbt_moveit_config and prbt_ikfast_manipulator_plugin packages. To test the successful installation (and your ROS environment) you can run:
roslaunch prbt_moveit_config moveit_planning_execution.launch
To stop the application, press Ctrl+c in the terminal.
If you want to use the real robot directly without modelling an application, you can skip this tutorial and have a look at the configuration options on our Readme on Github. The next steps of this tutorial place the robot on a table and demonstrate how you can model your custom application.
Create your application ROS package
For the configuration and launch files describing your application, create a package (Create ROS package):
cd ~/catkin_ws/src
catkin_create_pkg pilz_tutorial prbt_moveit_config
This command generates a folder, where you place the files later on. pilz_tutorial is your package name specifically for this application.
Load the stl file
Create a new directory for the model files and a subdirectory meshes for the CAD data:
cd ~/catkin_ws/src/pilz_tutorial
mkdir -p urdf/meshes
Please download the file PNOZ.stl and save it in the meshes folder you just created.
Describe the robot and its environment
To describe the robot manipulator and its environment, create a configuration file:
cd ~/catkin_ws/src/pilz_tutorial/urdf
gedit my_first_application.xacro
Copy the following content into the my_first_application.xacro file and save it:
   1 <?xml version="1.0" ?>
   2
   3 <robot name="prbt" xmlns:xacro="http://www.ros.org/wiki/xacro">
   4
   5   <!-- macro definition of pilz lwa -->
   6   <xacro:include filename="$(find prbt_support)/urdf/prbt_macro.xacro" />
   7
   8   <!-- coloring from the stl file -->
   9   <material name="yellow">
  10     <color rgba="1 1 0 1"/>
  11   </material>
  12
  13   <!-- coloring from the table -->
  14   <material name="grey">
  15     <color rgba="0.75 0.75 0.75 1"/>
  16   </material>
  17
  18   <!-- instantiate the robot -->
  19   <xacro:prbt prefix="prbt_"/>
  20
  21   <link name="table">
  22     <visual>
  23       <origin rpy="0 0 0" xyz="0 -0.45 -0.03"/>
  24       <geometry>
  25         <box size="0.6 1.2 0.05"/>
  26       </geometry>
  27       <material name="grey"/>
  28     </visual>
  29   </link>
  30
  31   <link name="pnoz">
  32     <visual>
  33       <origin rpy="1.5708 0 0" xyz="0 -0.5 0"/>
  34       <geometry>
  35         <mesh filename="package://pilz_tutorial/urdf/meshes/PNOZ.stl"
  36           scale="0.001 0.001 0.001"/>
  37       </geometry>
  38       <material name="yellow"/>
  39     </visual>
  40   </link>
  41
  42   <joint name="table_joint" type="fixed">
  43     <parent link="table"/>
  44     <child link="prbt_base_link"/>
  45   </joint>
  46
  47   <joint name="pnoz_joint" type="fixed">
  48     <parent link="table"/>
  49     <child link="pnoz"/>
  50   </joint>
  51
  52 </robot>
For the syntax and options please refer to the URDF and xacro documentation. The robot name can be chosen arbitrarily; we name it prbt to be consistent with the moveit_config files we include unchanged later on:
3 <robot name="prbt" xmlns:xacro="http://www.ros.org/wiki/xacro">
The following line includes the robot model PRBT as macro, so that you can simply instantiate the robot afterwards:
6 <xacro:include filename="$(find prbt_support)/urdf/prbt_macro.xacro" />
19 <xacro:prbt prefix="prbt_"/>
Now you start modelling the environment. For a simple table, you can use a box geometry with size in x-/y-/and z-direction. The origin-tag moves the box so that the manipulator isn't centred.
To connect the table with the robot you add a joint between the Frames: table and prbt_base_link
The file can be enhanced with CAD-models and more environment structures using stl or dae files. The following lines show the inclusion of a PNOZ described by an stl file.
For a more detailed description refer to the URDF tutorial Building a visual Robot. To connect the PNOZ with the table you add a joint between the frames: table and pnoz.
Create a launch file to start up the robot environment
cd ~/catkin_ws/src/pilz_tutorial
mkdir launch
gedit launch/my_application.launch
To tell the ROS system which programs (nodes) it should start, it needs a launch file: launch/my_application.launch (copy and save)
Show EOL distros:
   1 <?xml version="1.0"?>
   2 <launch>
   3
   4   <arg name="sim" default="true" />
   5
   6   <!-- send urdf to param server -->
   7   <param name="robot_description"
   8     command="$(find xacro)/xacro --inorder '$(find pilz_tutorial)/urdf/my_first_application.xacro'"/>
   9
  10   <include file="$(find prbt_moveit_config)/launch/moveit_planning_execution.launch">
  11     <arg name="load_robot_description" value="false"/>
  12     <arg name="sim" value="$(arg sim)"/>
  13   </include>
  14
  15 </launch>
   1 <?xml version="1.0"?>
   2 <launch>
   3
   4   <arg name="sim" default="true" />
   5
   6   <!-- send urdf to param server -->
   7   <param name="robot_description"
   8     command="$(find xacro)/xacro '$(find pilz_tutorial)/urdf/my_first_application.xacro'"/>
   9
  10   <include file="$(find prbt_moveit_config)/launch/moveit_planning_execution.launch">
  11     <arg name="load_robot_description" value="false"/>
  12     <arg name="sim" value="$(arg sim)"/>
  13   </include>
  14
  15 </launch>
The first <param> loads the robot model you created in the previous section. It tells xacro, to parse the file urdf/my_first_application.xacro and publish it onto the parameter server, where it is available for all other programs. Then you include the moveit_planning_execution.launch file which loads the default configuration from the prbt_moveit_config package and starts the RViz visualization tool. If you need further modifications, please have look at the package documentation or the code on Github.
Run the visualization in RViz
Execute the launch file from a terminal to startup the application:
roslaunch pilz_tutorial my_application.launch
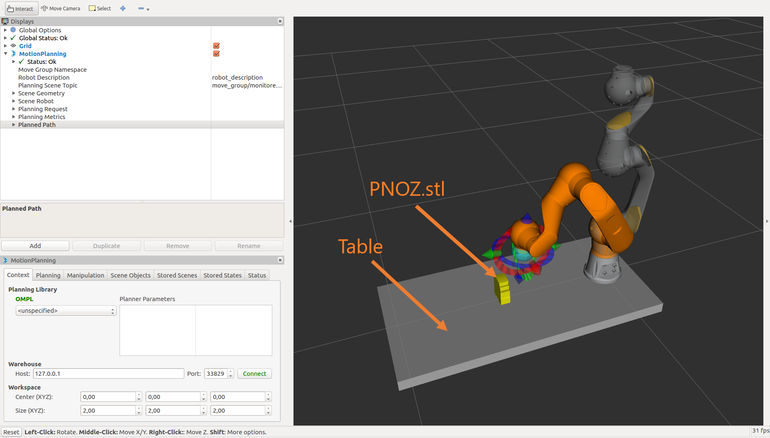
Now you should see RViz started with the robot manipulator mounted on a table as shown in the following picture. For all options including camera placement and editing the view, see the RViz user manual.

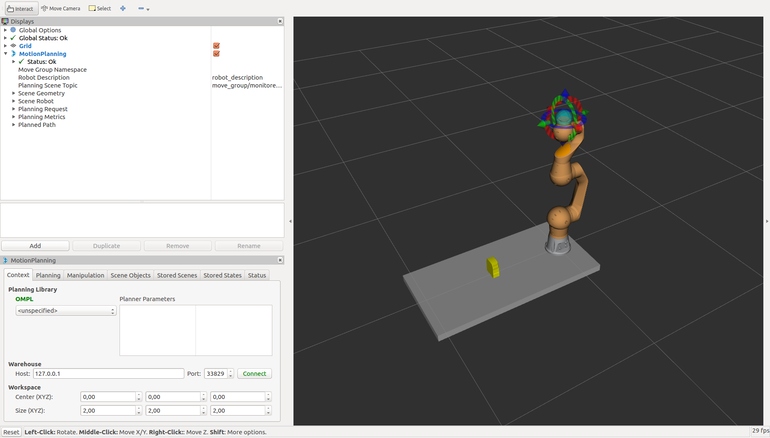
The moveit motion planning plugin is enabled in the prbt_moveit_config default configuration. It puts a marker at the flange to move the robot manipulator. Drag the blue sphere to your desired position:

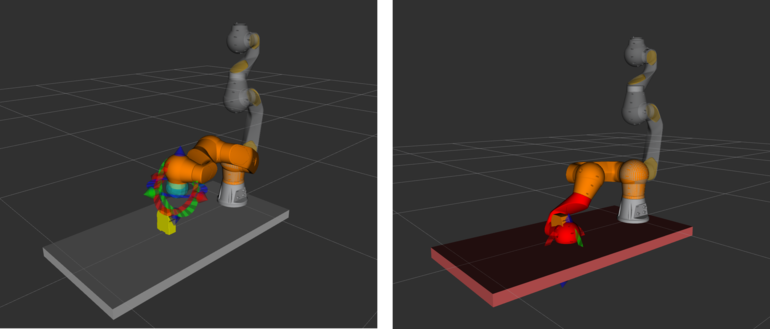
If you want to move the flange in a certain Cartesian direction, use the arrows. If you move the robot into a pose, where one link collides with the table, the kinematics module automatically tries to re-orient the arm out of the collision. If it cannot avoid the collision, the corresponding links turn red.
Conclusion
In this tutorial, you have learned to edit a xacro URDF file to model your robot application and to write a launch file that includes other launch files to start moving a robot manipulator inside your custom environment model.
In the next tutorial, you will learn to move your robot with the Pilz command_planner


