| Note: This tutorial assumes that you have completed the previous tutorials: Collecting object model data and grasp demonstrations. |
| |
Generating object models
Description: This tutorial will explain how to create object models from collected grasp demonstrations, as well as how to visualize and remove grasp demonstrations and models.Tutorial Level: BEGINNER
Prerequisites
For this tutorial we will use the rail_pick_and_place metapackage, which can be installed as follows:
$ sudo apt-get install ros-<distro>-rail-pick-and-place
Replace '<distro>' with the name of your ROS distribution (e.g. indigo).
Alternatively, you can install the latest code from the repository at https://github.com/WPI-RAIL/rail_pick_and_place.
This tutorial also assumes that you have already collected some grasp demonstrations with the rail_grasp_collection package, as described in the Collecting object model data and grasp demonstrations tutorial.
Generating Models with the rviz Plugin
The rail_pick_and_place_tools package, included in the rail_pick_and_place metapackage, provides rviz plugins to aid in the full object model generation process. To launch the rviz visualization, use the following (note that the model_generation_backend launch requires parameters to be set as described in the Collecting object model data and grasp demonstrations tutorial):
$ roslaunch rail_pick_and_place_tools model_generation_backend.launch
$ roslaunch rail_pick_and_place_tools model_generation_frontend.launch
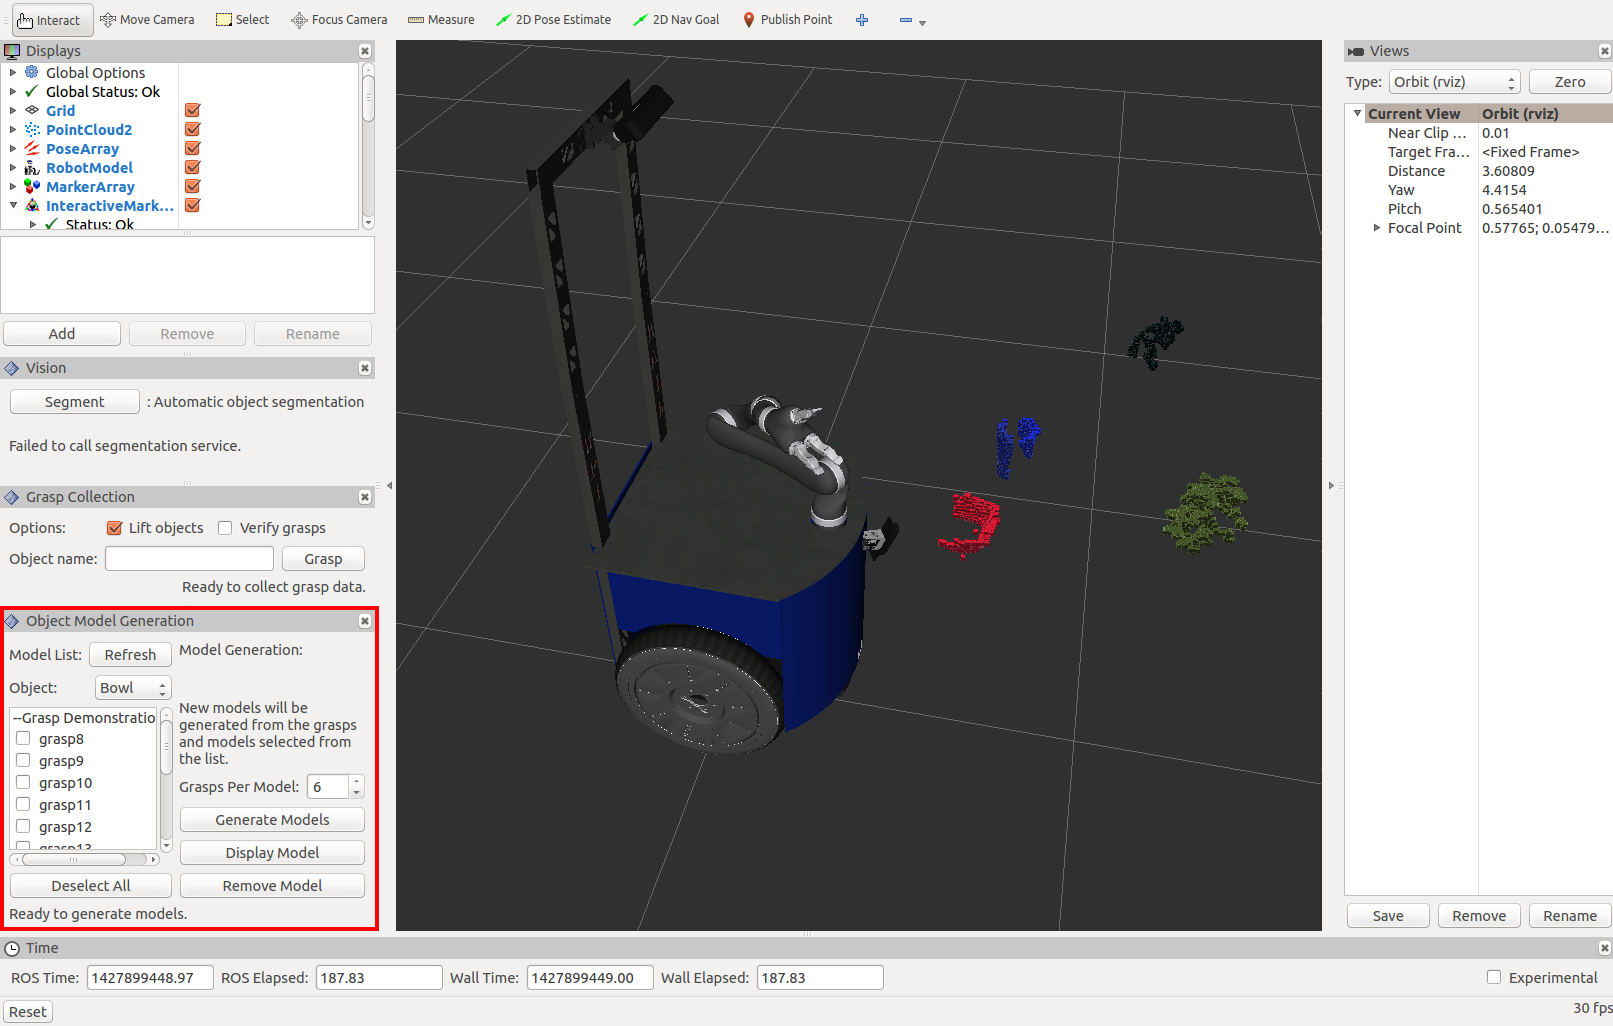
This will bring up an rviz window that should look similar to the image below. The left panel contains vision, grasp collection, and model generation functionality. This tutorial will focus on the model generation panel, highlighted in red.
Grasp demonstration and object model generation interface:

Functionality of the model generation panel:

Model Generation
The object model generation process has four steps.
Select an object type using the object dropdown menu. The menu is automatically populated with all of the unique object names found in the grasp database, from both the grasp demonstrations and object models. Note that the Refresh button will repopulate the dropdown menu. Once an object is selected, all of its grasp demonstrations and object models will be shown in the demonstration and model check list.
Select the checkboxes of the grasp demonstrations you would like to use to generate models. Note that you can also select previously generated models along with grasp demonstrations, in order to build on existing models, by simply clicking on their checkboxes as well. Note that the Deselect All button will reset all of the checkboxes in the list.
Optionally adjust the Grasps Per Model parameter to limit the maximum number of grasp demonstrations used to build each model. This can help prevent object models from becoming oversaturated with point cloud data, which can affect the point cloud registration process.
Click on the Generate Models button to call the model generation action. This will run in the background and use a point cloud registration algorithm to combine grasp demonstrations into object models. The model generation algorithm provides feedback, which is shown in the panel as it is running. Once model generation is complete, any new models will be stored in the database and automatically added to the model list in the object model generation panel.
Viewing and Deleting Grasp Demonstrations and Object Models
The object model generation panel also contains Display Model and Remove Model buttons. These will act on the currently highlighted grasp demonstration or object model (to highlight a demonstration/model, click on its name in the model check list rather than clicking on the checkbox).
Display Model will show the grasp demonstration or object model point cloud and grasp(s) in the main rviz window. You may want to disable the robot model, as it can block your view of the point cloud. Displayed grasp poses are aligned on the x-axis of the end effector frame, with the base of the arrow positioned at the origin of the frame.
Displayed grasp demonstration:
Displayed object model:


Remove Model will delete the grasp demonstration or object model from the database. Use this to remove any incorrect grasp demonstrations or poorly formed object models. This action cannot be undone, however, so make sure you definitely want to delete the highlighted demonstration/model. Clicking the remove button will bring up a confirmation dialog to prevent accidental model deletion.
Remove model confirmation dialog:

Support
Please send bug reports to the GitHub Issue Tracker.


