| Note: This tutorial is targeted for ROS 1.3+, if you want to use it with ROS 1.2, you'll have to apply the patch contained below. This tutorial assumes that you have completed the previous tutorials: Beginner Tutorials. It also assumes a basic understanding of Objective-C, XCode, and Interface Builder. |
| |
Setting up an XCode Project
Description: This tutorial show how to create a basic native OSX application for ROS.Keywords: XCode, Cocoa, OSX
Tutorial Level: BEGINNER
Contents
Creating a ROS XCode Project
Before You Begin
ROS Packages and XCode Projects
When working with ROS and xcode it is important to remember to always create the xcode project first. This is due to the fact that xcode creates a new directory when it creates a new project. Once you have created the xcode project cd to its parent directory and make your xcode project a ROS package by using roscreate package and the “--xcproj” option like so:
roscreate-pkg --xcproj PROJECT_NAME
Where PROJECT_NAME is the name of the xcode project you just created. This will create the additional files necessary for ROS to recognize it as a package and it will allow your xcode project to be built when rosmake is called. This feature will be part of ROS 1.3+, but if you want to get your hands on it early checkout this patch. Otherwise you can still create your packages manually.
Objective-C++
Using ROS within objective-c is possible only through the use of a subset of both languages which is known as objective-c++. This allow us to call c++ functions within objective-c methods and vice-versa. We can also use c++ objects as variables in objective-c classes and the reverse is true as well. A full listing of the feature and limitations of objective-c++ can be found here. It is suggested that you read this document before doing any further objective-c++ development.
Building a Simple Application
We are going to build a simple application which displays the messages received from the talker node which was created in a previous tutorial.
Setup the Project
Lets create a new XCode project we're going to select the cocoa application template and call it cocoa_tutorial. Make sure you save it somewhere on your ROS_PACKAGE_PATH. Now cd to the directory were you placed the project and run the following:
roscreate-pkg --xcproj cocoa_tutorial roscpp std_msgs
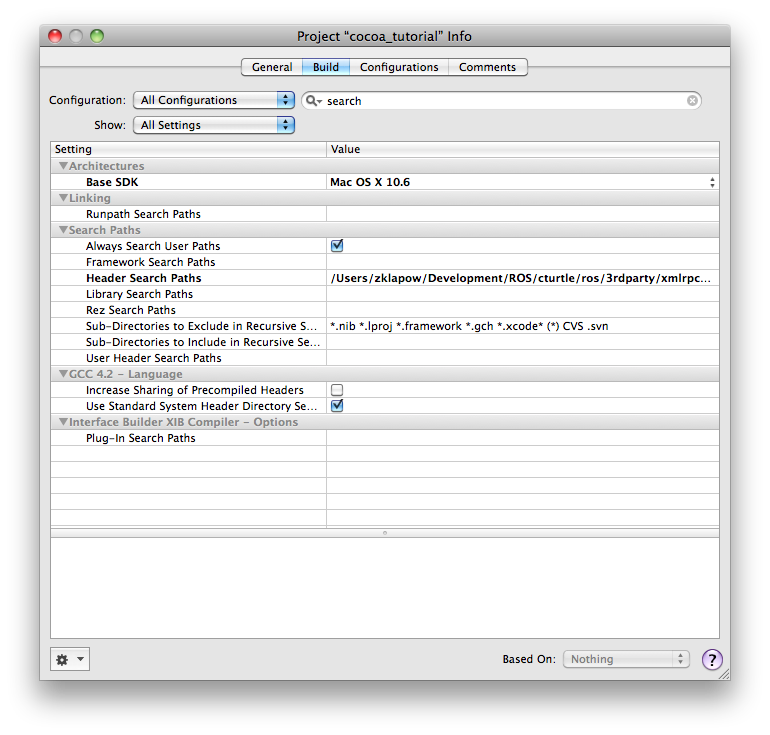
Now that we have created our package we need to configure our xcode project to find ROS. Open your xcode project. Go to Project>Edit Project Settings. Open the build settings tab.

Now we must modify our library and header search paths such that XCode can find the necessary files. For this application, add the following entries in your header search paths:
PATH_TO_ROS/std_msgs/msg_gen/cpp/include
PATH_TO_ROS/core/roslib/include
PATH_TO_ROS/core/roscpp/include
PATH_TO_ROS/core/rosconsole/include
PATH_TO_ROS/3rdparty/xmlrpcpp/src
/opt/local/include
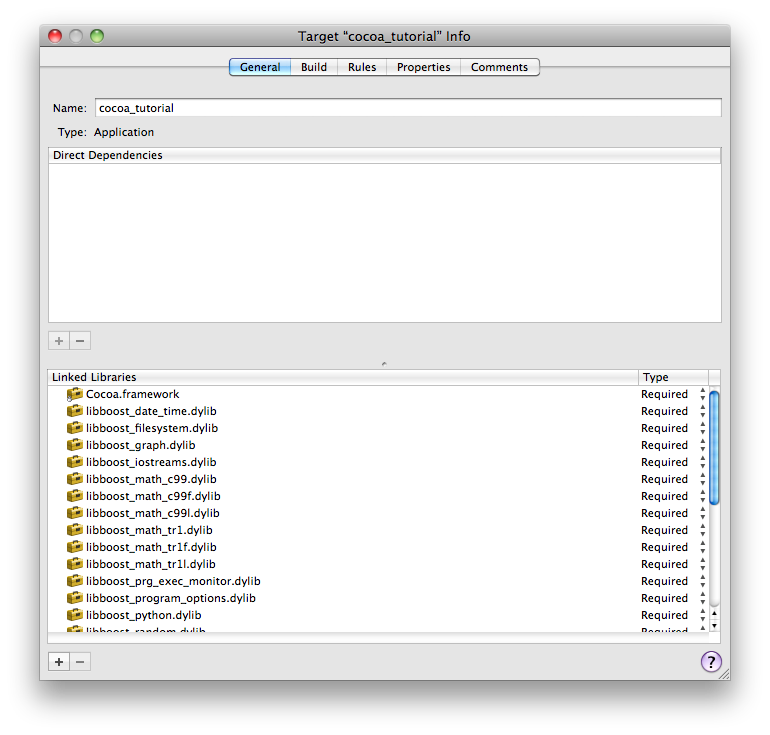
This includes all the necessary headers for both ROS and any system dependencies of ROS installed by MacPorts. Should you add any dependencies to your project you must also add the include directories for those packages to the search paths. The last thing we must do is provide XCode the libraries it needs to link our app against. Expand the targets section in the Xcode browser and open the inspector for the cocoa tutorial application.

We are now going to add a few entries to the linked libraries section, so click the plus button. Find all of the libboost* libraries and add them(hint: use shift+click to get them all at once). Now click the plus again, but this time go to add other. Navigate to you ROS installation and add the following libraries:
PATH_TO_ROS/core/roslib/lib/libroslib.dylib
PATH_TO_ROS/core/roscpp/lib/libros.dylib
PATH_TO_ROS/core/rosconsole/lib/librosconsole.dylib
PATH_TO_ROS/3rdparty/xmlrpcpp/lib/libXmlRpc.dylib
As with the header search paths before, should you make use of any other packages in your application you must add their libraries here. The final step to seting up you project is to point it at the correct ROS_MASTER_URI, as your application does not inherit any of your environment variables. So expand the executables section of your xcode project select the application and open the inspector. To set environments variables we must go to the arguments tab. Set ROS_MASTER_URI to http://localhost:11311.
Important Notes
File Extensions
First and foremost we must discuss file extensions. All the source files we use from now(apart from headers) on must have a .mm extensions. So a good place to start would be to change the extensions on the standard files that xcode generates. The .mm extension is for Objective-C++ and forgeting to put it on a file can cause a lot of headaches.
ros::init
Next, it is easiest to call ros::init from main, in main.mm. However if for some reason you need to call is somewhere else you will need to have the following i you header:
This allows you to call ros::init like so:
1 ros::init(*_NSGetArgc(), *_NSGetArgv(), NODE_NAME);
Building the Application
Now That we have our project all set up, lets get down to business.
Main
If you have not done so already open your cocoa_tutorial project, expand the "Other Sources" group and add the following to main.mm.
This is a very simple main function all it does is initialize our ROS node and start the application. If that compiles successfully, then you are good to go and ROS is working properly, if not you may need to go back and debug a bit.
Interacting with ROS
In order to interact with ROS, which is written in c++, in cocoa, which is written in objective-c, we must build a wrapper.
The Code
Now we are going to build an NSThread subclass that will handle the ROS subscription for our node. So add a new NSThread subclass and call it ROSThread. Add the following to ROSThread.h:
   1 #import <Cocoa/Cocoa.h>
   2 #import <Foundation/Foundation.h>
   3 #import <ros/ros.h>
   4 #import <std_msgs/String.h>
   5 #import <string>
   6
   7 //Wrapper class to deal with c++ interaction
   8 class SubscribeHelper {
   9 private:
  10     void cb(const std_msgs::StringConstPtr& msg);
  11     ros::NodeHandle n_;
  12     ros::Subscriber s_;
  13 public:
  14     SubscribeHelper();
  15     std::string str;
  16 };
  17
  18 @interface ROSThread: NSThread {
  19 @public
  20     NSString* str;
  21 @private
  22     SubscribeHelper* helper;
  23 }
  24 @property(nonatomic, retain) NSString* str;
  25 @property(nonatomic)SubscribeHelper* helper;
  26
  27 @end
And the implementation in ROSThread.mm:
   1 #import "ROSThread.h"
   2
   3 @implementation ROSThread
   4
   5 @synthesize helper;
   6 @synthesize str;
   7
   8 - (void)main {
   9     self.helper = new SubscribeHelper;
  10     while(TRUE) {
  11         ros::spinOnce();
  12         self.str = [[NSString alloc]initWithUTF8String:self.helper->str.c_str()];
  13         NSLog(@"I heard: [%@]",self.str);
  14     }
  15 }
  16
  17 - (void)dealloc {
  18     // Clean-up code here.
  19     [str release];
  20     [super dealloc];
  21 }
  22
  23 SubscribeHelper::SubscribeHelper() {
  24     s_ = n_.subscribe("chatter", 1, &SubscribeHelper::cb, this);
  25 }
  26
  27 void SubscribeHelper::cb(const std_msgs::StringConstPtr& msg) {
  28         //Store the recieved msg
  29     str = msg->data;
  30 }
  31
  32 @end
The Code Explained
Lets take a closer look at what we have just written.
Here we import all the header files we are going to need in our application.
Next we define a c++ wrapper class which will handle the callback and store what is received. By making an instance of this class a member variable of our objective-c class we allow objective-c code access to the data.
Lastly we declare our objective-c ROSThread class which is very simple subclass of NSThread, which an NSString to store the received data, and a SubscribeHelper to receive that data.
Now lets have a look at ROSThread.m
This just imports the header and has the standard objective-c declarations for ivars.
Here we have the main function for our thread. This is simply creates our SubcribeHelper, and then loops forever, getting the string from the SubscriberHelper each time.
Here we have the standard object-c dealloc method.
This is the constructor for the SubscribeHelper object, which will get called from our main function. All we do here is subscribe to the topic "chatter".
Finally we have the callback which receives the message and assigns its data value to the SubscribeHelper's str, which is then assigned to ROSThread's str in main. And thus we've created a bridge between ROS and objective-c. And this point you should be able to build and run your application. To test it out start up a roscore run the talker node from the previous tutorial, and then run the app. When you check out the console you should see it echoing talker's output.
The Interface
Now we are going to bring each of the bits of our application together in order to create an interface to display the information received via ROS.
The Code
The first thing we need to do to build our interface is modify our cocoa_tutorialAppDelegate.h:
   1 #import <Cocoa/Cocoa.h>
   2 #include "ROSThread.h"
   3
   4 @interface cocoa_tutorialAppDelegate : NSObject <NSApplicationDelegate> {
   5     NSWindow *window;
   6     IBOutlet NSTextField *label;
   7     ROSThread *s_;
   8 }
   9
  10 @property (assign) IBOutlet NSWindow *window;
  11 @property (nonatomic, retain) IBOutlet NSTextField *label;
  12 @property (nonatomic, retain) ROSThread *s_;
  13
  14 - (void)update:(NSTimer *)theTimer;
  15
  16 @end
Next wee need to define the implementation that will update the interface in cocoa_tutorialAppDelegate.mm:
   1 #import "cocoa_tutorialAppDelegate.h"
   2
   3 @implementation cocoa_tutorialAppDelegate
   4
   5 @synthesize window;
   6 @synthesize label;
   7 @synthesize s_;
   8
   9 - (id)init {
  10         if(self = [super init]) {
  11                 s_ = [[ROSThread alloc]init];
  12                 [s_ start];
  13
  14                 [NSTimer scheduledTimerWithTimeInterval:0.1 target:self selector:@selector(update:) userInfo:nil repeats:YES];
  15     }
  16     return self;
  17 }
  18
  19 - (void)update:(NSTimer *)theTimer {
  20         [self.label setStringValue:self.thread.str];
  21 }
  22
  23 - (void)applicationDidFinishLaunching:(NSNotification *)aNotification {
  24         // Insert code here to initialize your application
  25 }
  26
  27 @end
An Explanation
Lets first examine the cocoa_tutorialAppDelegate.h file:
Here we import the standard cocoa header and our custom ROSThread class.
   4 @interface cocoa_tutorialAppDelegate : NSObject <NSApplicationDelegate> {
   5     NSWindow *window;
   6     IBOutlet NSTextField *label;
   7     ROSThread *s_;
   8 }
   9
  10 @property (assign) IBOutlet NSWindow *window;
  11 @property (nonatomic, retain) IBOutlet NSTextField *label;
  12 @property (nonatomic, retain) ROSThread *s_;
Next we define the interface for our class, and properties for our variables. Note that we declare an Interface Builder outlet(IBOutlet) of type NSTextField. We will user this later as the display for our messages.
Lastly we declare a method which we will use to update the interface.
Now lets take a look at the cocoa_tutorialAppDelegate.mm file:
The first thing we do is import our header file and synthesize our classes ivars.
Here we have our init method. This is called when our class is created and it does the bulk of the work. Here we create our ROSThread and call its start method(which will in turn call its main method), and schedule a timer which will call our update method to update the interface.
We then define our update method for the timer to call. All this does is assign a new string value to the label outlet.
And lastly we have the standard NSApplication methods.
Making the Connections
The last thing to do is open up our MainMenu.xib file, add an NSTextField, and connect the label outlet in our cocoa_tutorialAppDelegate to the text field. Save, build, run and you've just build your first cocoa-ROS node!
The Final Product
If all goes well you should now have application that looks something like the following:


