| Note: This tutorial assumes that you have completed the previous tutorials: ROS Tutorials, create your own workspace. |
| |
Getting Started
Description: This tutorial gives a step by step instruction on how to set up the DJI SDK ROS package.Tutorial Level: INTERMEDIATE
Next Tutorial: Next tutorial: Running an example code dji_sdk/Tutorials/Running the flight control sample code dji_sdk/Tutorials/The mobile communication sample code
Contents
Install DJI SDK Core Library
Before using the DJI SDK ROS package, we first need to install the DJI SDK core library.
- Download the necessary files from git repo and access the directory:
$ cd ~
$ git clone https://github.com/dji-sdk/Onboard-SDK
$ cd (dji_sdk_directory)
- Create a build directory and cd into it:
$ mkdir build
$ cd build
- Compile and install DJI SDK core library
$ cmake ..
$ make djiosdk-core
$ sudo make install
Setup the DJI SDK ROS package
Now that we have the core sdk library installed and ready to go, we can start setting up the DJI SDK ROS package.
Download the Package
First we need to download and install the dji_sdk ROS package.
- Go to your catkin workspace.
$ cd ~/your_catkin_ws/src/
Download the DJI SDK ROS package from our git repository.
$ git clone https://github.com/dji-sdk/Onboard-SDK-ROS.git
- Run 'catkin_make' and compile.
$ cd ~/your_catkin_ws/
$ catkin_make
We almost have all the software setup for DJI SDK ROS.
Connect the Hardware
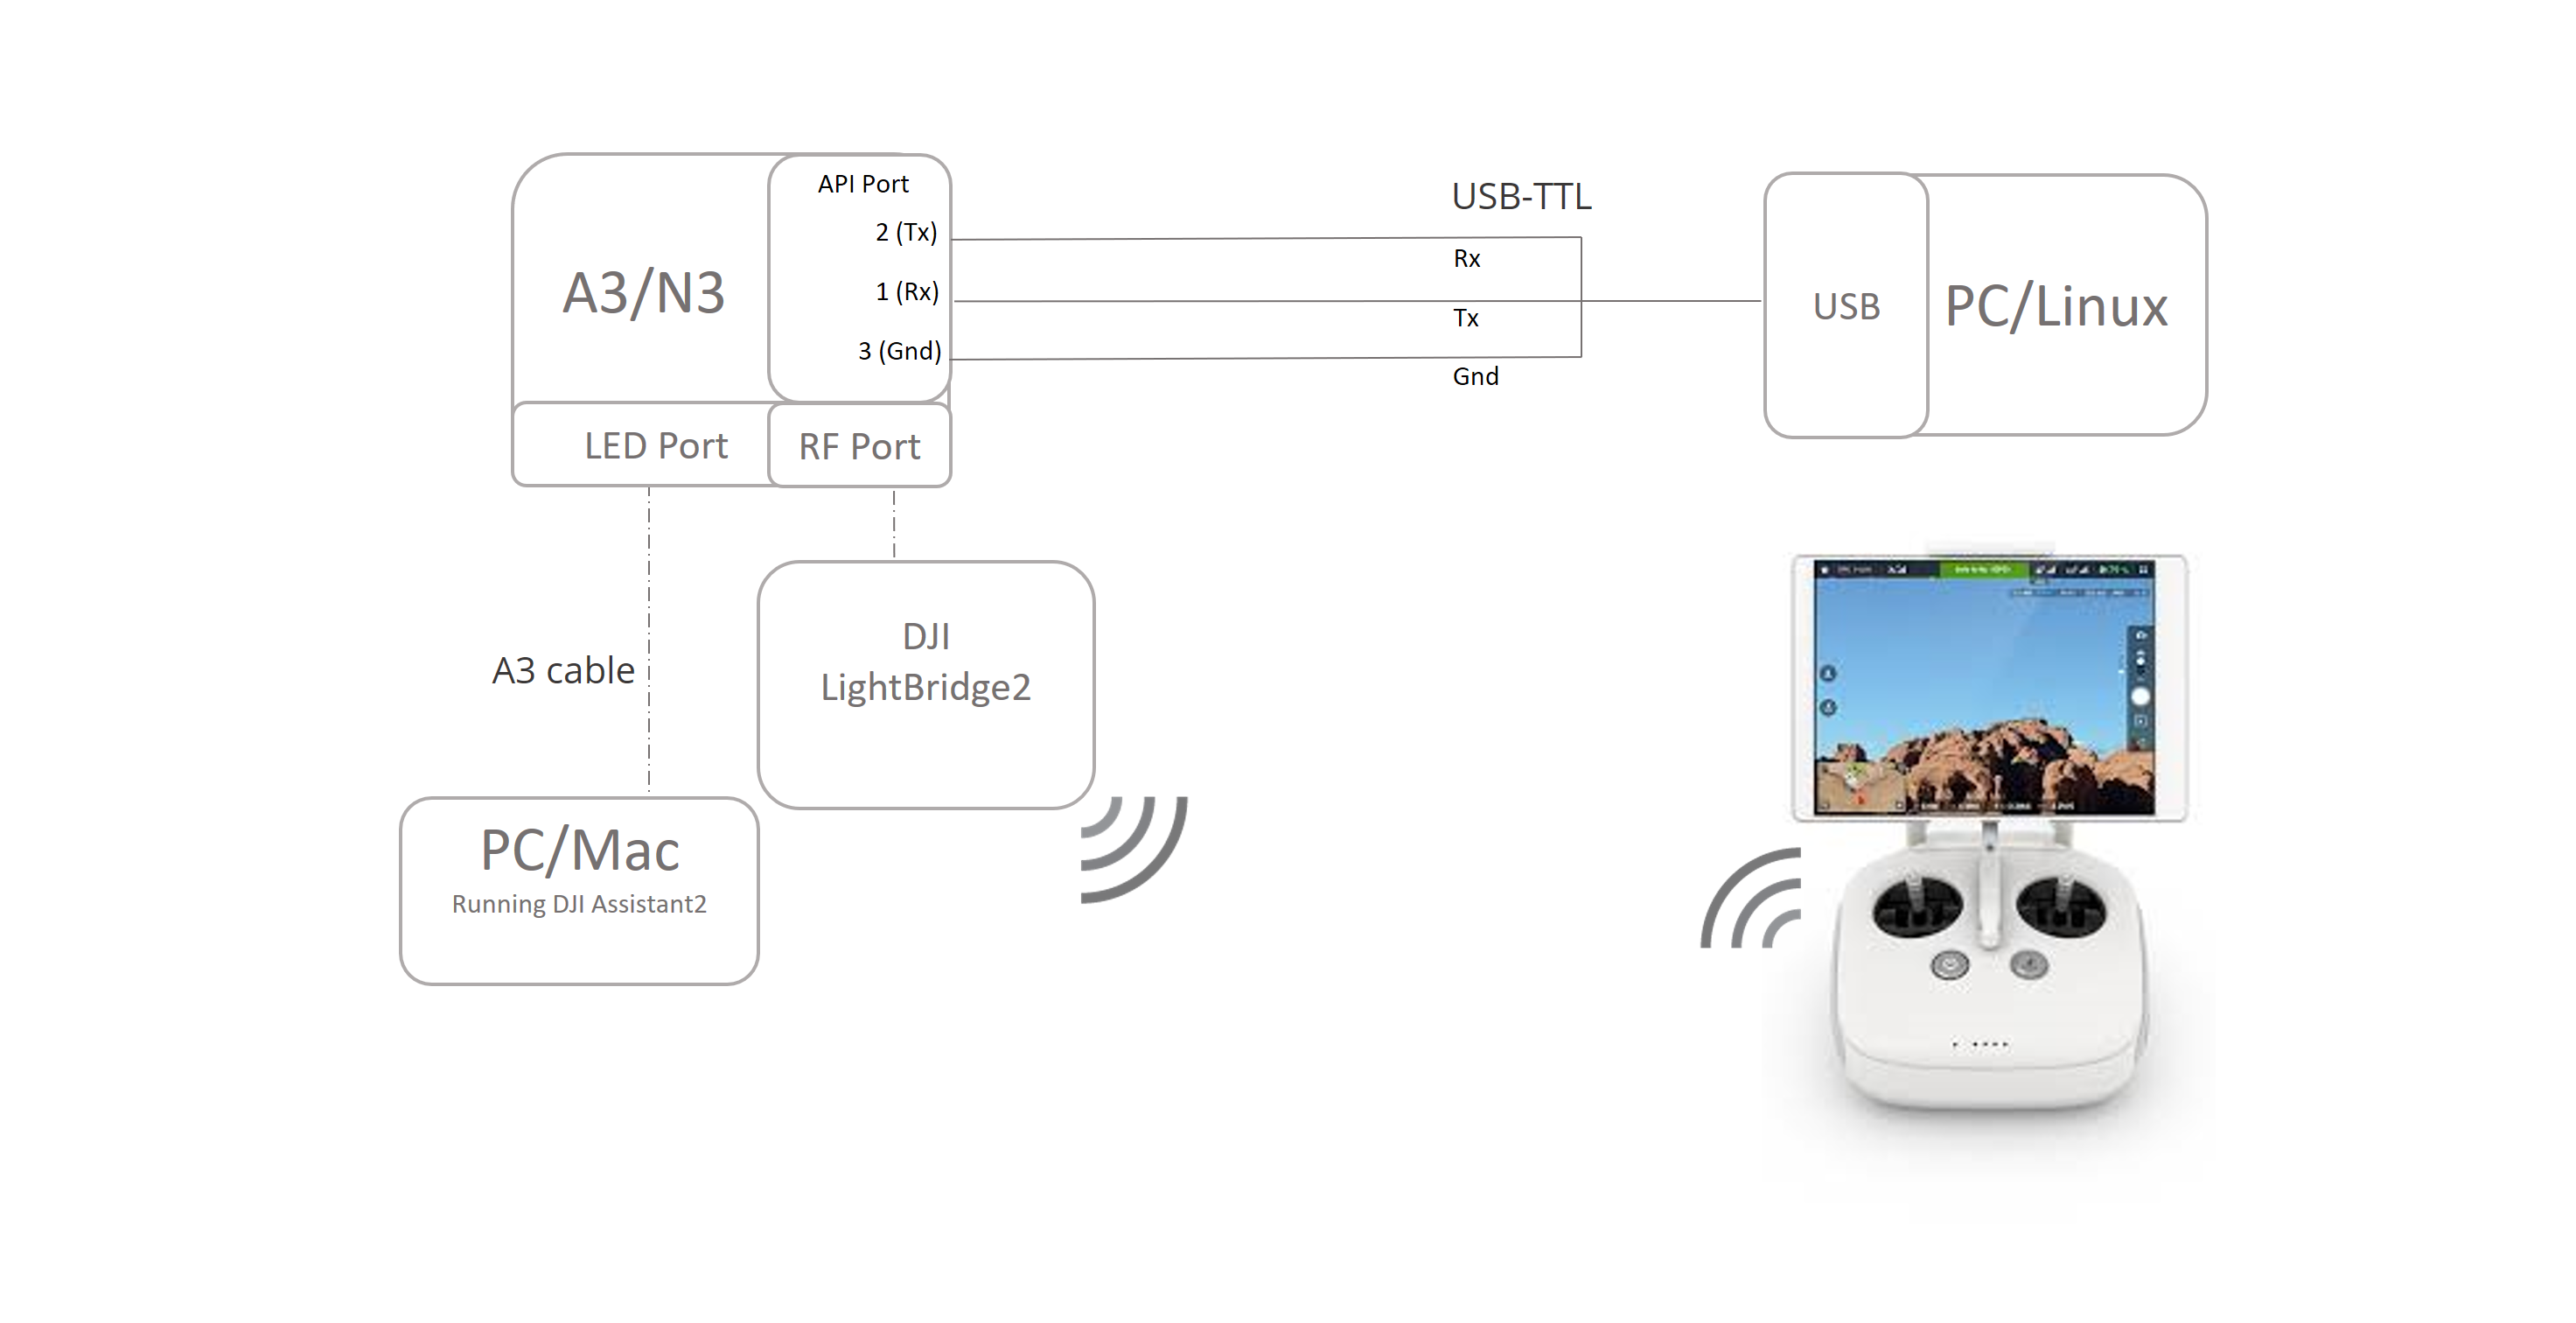
For A3/N3 UART connections, use USB-to-TTL cable and connect the API port to your ROS machine.
DO NOT connect the 9v Vcc from the API port to the USB-to-TTL cable or it can damage your PC, A3/N3 or both. But DO connect the GND to the cable.

Activation
The first time the hardware is communicating with ROS, we need to activate it. The activation requires an App ID and key pair from the DJI developter website. We also need a remote controller and a tablet/phone with internet access and DJI GO application installed. The complete set up is shown in the picture below. 
Note: The subsequent activations will not need the remote nor the tablet/phone. |
First we need to enable API control in the DJI Assistant 2:
Download the DJI PC Assistant 2 to a windows machine and install.
- Connect A3/N3 to the windows machine via LED Port using A3 cable.
- Open the DJI PC Assistant 2, when A3/N3 icon pops up, click into it.
- Update the firmware via the Firmware Update tab.
- In the SDK tab, enable API control and SDK failsafe action.
- Note down the baud rate.
Follow these steps to get your App ID and key pair:
Go to DJI Developer website, create an account.
- Log in with your account, go to the user center and find the Apps tab.
- On the top right corner, click on create app, fill in the blanks and click create.
- Click on the app name you have created, there you can find the APP ID and key pair.
Now go to your ROS machine, cd to your catkin workspace root directory
$ cd ~/your/catkin_ws/
At your catkin workspace root directory, remember to catkin_make and source workspace so we can utilize roscd.
$ catkin_make
$ source devel/setup.bash
Next, roscd to our dji_sdk ROS package.
$ roscd dji_sdk
Use your favorite editor to open the sdk.launch file in launch folder. In this tutorial, we use gedit.
$ gedit launch/sdk.launch &
In the launch file, replace the value of app_id and enc_key with your own.
The value set for the serial_name for the USB-TTL connection is default at /dev/ttyUSB0. Modify it if necessary. Match the baud_rate to that in the DJI Assistant 2 SDK setting.
|
|
|
After all necessary preparations are made, launch the dji_sdk.launch file.
$ roslaunch dji_sdk sdk.launch
If activation failed, try close it with ctrl-c and launch again.
Once the activation succeeded, open another termial and type
$ rostopic list
you should be able to see all the topics related to dji sdk.
Simulation
Start up the Simulation
Here's the step-by-step procedure to start up the simulation:
- Connect A3/N3 to the windows machine via LED Port using A3 cable.
- Open the DJI PC Assistant 2, when A3/N3 icon pops up, click into it.
- In the SDK tab, check that API control and SDK failsafe action are enabled.
- Check the baud rate matches that in the launch file.
- Check the app_id and key pair are correctly updated.
- launch the sdk launch file.
$ roslaunch dji_sdk sdk.launch
- In the Simulator tap, click open, then click start simulating.
And now you can send messages to the DJI SDK ROS node and control the simulated vehicle.
Vehicle take off and landing
Let's use terminal to command the vehicle to take off and land.
With the DJI SDK running in one terminal, open another terminal, and enter
$ rosservice call /dji_sdk/drone_task_control "task: 4"
Task number 4 is for take off. ROS should return a result of true if the drone succesfully received the take off command.
We can also see in the simulator that the drone have taken off and is hovering in air.
Now to land it, we enter
$ rosservice call /dji_sdk/drone_task_control "task: 6"
And we should see the vehicle land.
The explanation of the usage of the subscribers, publishers and services are documented in the dji_sdk wiki page


