| Note: It is assumed that you have already downloaded and build the nav2d package as described at the start page. |
| |
Setup RobotOperator for obstacle avoidance
Description: This will show how to use the Operator-Node to control a mobile robot in a planar environment. For demonstration the robot simulator Stage will be used. After completion it will be possible to control the robot with a joystick while it actively avoids all obstacles.Keywords: navigation, obstacle avoidance, simulation
Tutorial Level: BEGINNER
Next Tutorial: Add the Navigator-Node to reach a target pose. RobotNavigator
Setup simulation
All packages are designed and tested for real robots with differential drive and a horizontal laser range finder. Because this tutorial cannot cover the setup of different robotic platforms, we will use the "Stage" simulator that comes with our ROS distribution to demonstrate the basic usage of all contained modules.
The complete launch-file to follow this tutorial can be found in the nav2d_tutorials package. The following packages are required to complete all tutorials:
- stage_ros
- joy
- rviz
- robot_state_publisher (optional)
- p2os_urdf (optional)
The last two packages are only needed to show the nice Pioneer 3D-Model in RVIZ and are not required for a functional test.
Launching the ROS nodes
<param name="use_sim_time" value="true" />
<rosparam file="$(find nav2d_tutorials)/param/ros.yaml"/>
With use_sim_time=true we tell ROS to use the simulated clock provided by Stage. Then we load a general parameter file that defines various ROS specific parameters like topic names, service names and TF frame-id's that are shared among different nodes.
<node pkg="stage_ros" type="stageros" args="$(find nav2d_tutorials)/world/tutorial.world">
  <param name="base_watchdog_timeout" value="0" />
</node>
Here we start the stage simulator and load an environment file from the nav2d_tutorials package. This file defines the environment and the robots with their initial position.
<node name="Operator" pkg="nav2d_operator" type="operator" >
  <remap from="scan" to="base_scan"/>
  <rosparam file="$(find nav2d_tutorials)/param/operator.yaml"/>
  <rosparam file="$(find nav2d_tutorials)/param/costmap.yaml" ns="local_map" />
</node>
This is where the Operator-Node is started to safely control the robot. The "scan" topic is remapped to match Stage's "base_scan" topic. Then we load two parameter files, one for the Operator and one for the Costmap2D that is used internally.
<node name="Joystick" pkg="joy" type="joy_node" />
<node name="Remote" pkg="nav2d_remote" type="remote_joy" />
Here we start the joystick driver and an additional module to translate the joystick message to a command for the Operator. Remember that we do not want to simply remote control our robot directly, but want to send motion commands to the Operator, which instead will send direct motion commands to the robot.
<param name="robot_description" command="$(find xacro)/xacro.py $(find p2os_urdf)/defs/pioneer3at.xacro" />

<node name="PioneerState" pkg="robot_state_publisher" type="state_publisher">
  <remap from="joint_state" to="joint_state"/>
  <param name="publish_frequency" type="double" value="15.0"/>
  <param name="tf_prefix" type="string" value=""/>
</node>

<node name="PioneerTransforms" pkg="p2os_urdf" type="publisher"/>
This is for the 3D robot model, comment it out if you do not have the p2os_urdf package.
<node pkg="rviz" type="rviz" args=" -d $(find nav2d_tutorials)/param/tutorial1.rviz" />
Finally this will just bring up rviz with a predefined parameter file, so we can see what is actually happening.
Driving the robot around
If everything worked, you should have 2 windows opening, one being the Stage simulator showing the environment (the "real" world) and the other being RVIZ showing the various node's visualizations (the robot's internal view on the world).
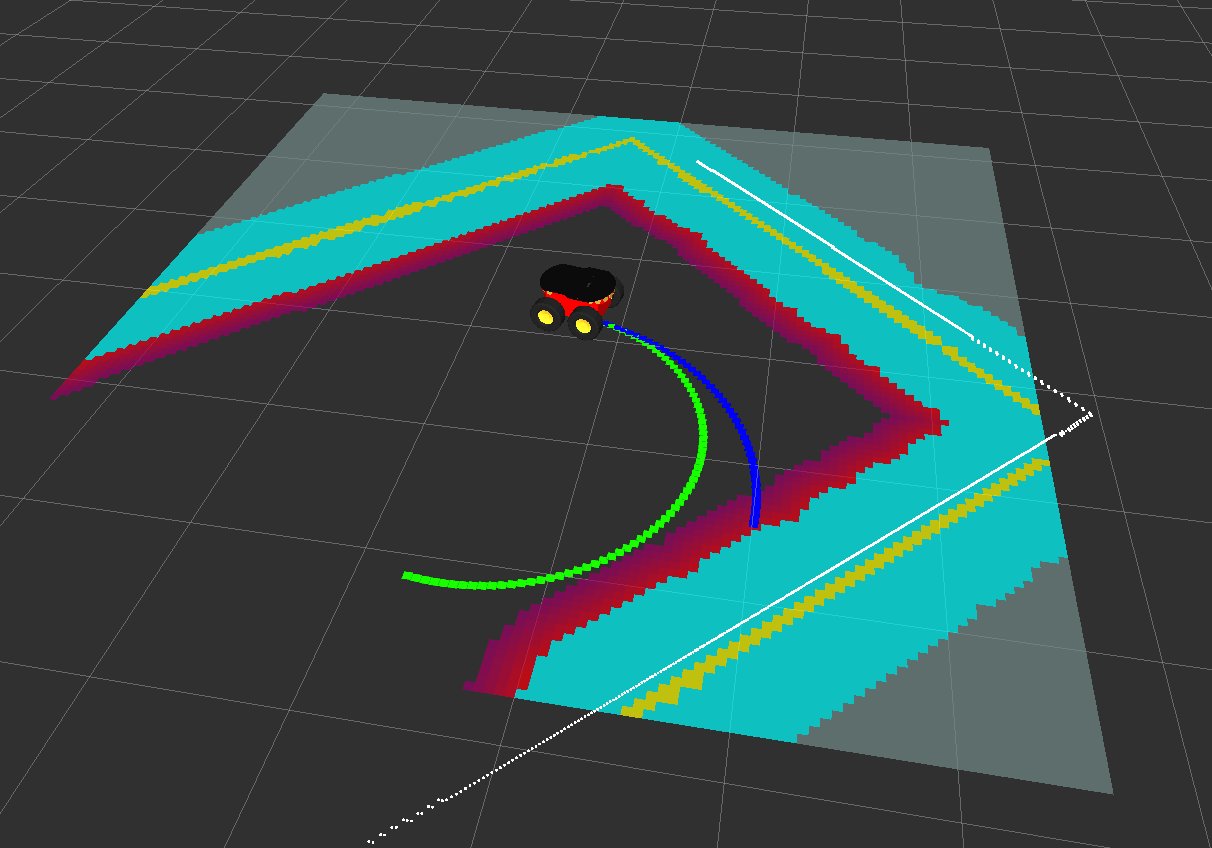
You should be able to control the robot by using your joystick. You can steer with the left stick (x-axis) and move forward/backward with the right stick (y-axis). The blue line in RVIZ visualizes your input command, while the green line shows the corrected command generated by the Operator. You should not be able to drive the robot into a wall.
Within RVIZ you should see something like this: 
Additionally you can set the Operators drive mode by holding button 6 on your joystick. In this mode the Operator will not correct the given command, but instead stop the robot if it would collide with an obstacle. This can be used to drive the robot into a "parking" position near an obstacle.


