| Note: This tutorial was developed for ROS Hydro version. However, it is expected to also work with Groovy (not tested). For any suggestions/comments about this tutorial, please send an email to Anis Koubaa (akoubaa@coins-lab.org). More information about Global Planner for ROS can be found in the iroboapp project page. A mirror of this tutorial is also available in this link.. This tutorial assumes that you have completed the previous tutorials: ROS tutorials, Turtlebot, Writing a Local Planner Plugin. |
| |
Writing A Global Path Planner As Plugin in ROS
Description: In this tutorial, I will present the steps for writing and using a global path planner in ROS. The first thing to know is that to add a new global path planner to ROS, the new path planner must adhere to the nav_core::BaseGlobalPlanner C++ interface defined in nav_core package. Once the global path planner is written, it must be added as a plugin to ROS so that it can be used by the move_base package. In this tutorial, I will provide all the steps starting from writing the path planner class until deploying it as a plugin. I will use Turtlebot as an example of robot to deploy the new path planner. For a tutorial that shows how to integrate a real GA planner as ROS plugin, refer to Adding Genetic Algorithm Global Path Planner As Plugin in ROS. A video tutorial is also available in this linkKeywords: Global Planner, Navigation Stack, Turtlebot, nav_core, Costmap
Tutorial Level: INTERMEDIATE
Contents
Writing the Path Planner Class
Class Header
The first step is to write a new class for the path planner that adheres to the nav_core::BaseGlobalPlanner. A similar example can be found in the carrot_planner.h as a reference. For this, you need to create a header file, that we will call in our case, global_planner.h. I will present just the minimal code for adding a plugin, which are the necessary and common steps to add any global planner. The minimal header file is defined as follows:
   1  /** include the libraries you need in your planner here */
   2  /** for global path planner interface */
   3  #include <ros/ros.h>
   4  #include <costmap_2d/costmap_2d_ros.h>
   5  #include <costmap_2d/costmap_2d.h>
   6  #include <nav_core/base_global_planner.h>
   7  #include <geometry_msgs/PoseStamped.h>
   8  #include <angles/angles.h>
   9  #include <base_local_planner/world_model.h>
  10  #include <base_local_planner/costmap_model.h>
  11
  12  using std::string;
  13
  14  #ifndef GLOBAL_PLANNER_CPP
  15  #define GLOBAL_PLANNER_CPP
  16
  17  namespace global_planner {
  18
  19  class GlobalPlanner : public nav_core::BaseGlobalPlanner {
  20  public:
  21
  22   GlobalPlanner();
  23   GlobalPlanner(std::string name, costmap_2d::Costmap2DROS* costmap_ros);
  24
  25   /** overridden classes from interface nav_core::BaseGlobalPlanner **/
  26   void initialize(std::string name, costmap_2d::Costmap2DROS* costmap_ros);
  27   bool makePlan(const geometry_msgs::PoseStamped& start,
  28                 const geometry_msgs::PoseStamped& goal,
  29                 std::vector<geometry_msgs::PoseStamped>& plan
  30                );
  31   };
  32  };
  33  #endif
  34
Now, I will explain the different parts of the header file.
   1  #include <ros/ros.h>
   2  #include <costmap_2d/costmap_2d_ros.h>
   3  #include <costmap_2d/costmap_2d.h>
   4  #include <nav_core/base_global_planner.h>
   5  #include <geometry_msgs/PoseStamped.h>
   6  #include <angles/angles.h>
   7  #include <base_local_planner/world_model.h>
   8  #include <base_local_planner/costmap_model.h>
   9
It is necessary to include core ROS libraries needed for path planner. <costmap_2d/costmap_2d_ros.h> and <costmap_2d/costmap_2d.h> are needed to use the costmap_2d::Costmap2D class that will be used by the path planner as input map. This map will be accessed automatically by the path planner class when defined as plugin. There is no need to subscribe to costmap2d to get the cost map from ROS. <nav_core/base_global_planner.h> is used to import the interface nav_core::BaseGlobalPlanner, which the plugin must adhere to.
It is a good practice, although not necessary, to define namespace for your class. Here, we define the namespace as global_planner for the class GlobalPlanner. The namespace is used to define a full reference to the class, as global_planner::GlobalPlanner. The class GlobalPlanner is then defined and inherits from the interface nav_core::BaseGlobalPlanner. All methods defined in nav_core::BaseGlobalPlanner must be overridden by the new class GlobalPlanner.
   1  public:
   2
   3   GlobalPlanner();
   4   GlobalPlanner(std::string name, costmap_2d::Costmap2DROS* costmap_ros);
   5    /** overriden classes from interface nav_core::BaseGlobalPlanner **/
   6   void initialize(std::string name, costmap_2d::Costmap2DROS* costmap_ros);
   7   bool makePlan(const geometry_msgs::PoseStamped& start,
   8                 const geometry_msgs::PoseStamped& goal,
   9                 std::vector<geometry_msgs::PoseStamped>& plan
  10                );
The constructor GlobalPlanner(std::string name, costmap_2d::Costmap2DROS* costmap_ros) is used to initialize the costmap, that is the map that will be used for planning (costmap_ros), and the name of the planner (name). The same for the default constructor GlobalPlanner() which initializes the planner attributes with default values. The method initialize(std::string name, costmap_2d::Costmap2DROS* costmap_ros) is an initialization function for the BaseGlobalPlanner, which initializes the costmap, that is the map that will be used for planning (costmap_ros), and the name of the planner (name).
For the particular case of the carrot_planner, the initialize method is implemented as follows:
   1    void CarrotPlanner::initialize(std::string name, costmap_2d::Costmap2DROS* costmap_ros){
   2      if(!initialized_){
   3        costmap_ros_ = costmap_ros; //initialize the costmap_ros_ attribute to the parameter.
   4        costmap_ = costmap_ros_->getCostmap(); //get the costmap_ from costmap_ros_
   5
   6       // initialize other planner parameters
   7        ros::NodeHandle private_nh("~/" + name);
   8        private_nh.param("step_size", step_size_, costmap_->getResolution());
   9        private_nh.param("min_dist_from_robot", min_dist_from_robot_, 0.10);
  10        world_model_ = new base_local_planner::CostmapModel(*costmap_);
  11
  12        initialized_ = true;
  13      }
  14      else
  15        ROS_WARN("This planner has already been initialized... doing nothing");
  16    }
Then, the method bool makePlan(start, goal, plan) must be overridden. The final plan will be stored in the parameter std::vector<geometry_msgs::PoseStamped>& plan of the method. This plan will be automatically published through the plugin as a topic. An implementation of the makePlan method of the carrot_planner can be found in this link as a reference.
Class Implementation
In what follows, I present the main issues to be considered in the implementation of a global planner as plugin. I will not describe a complete path planning algorithm. I will use a dummy example of path planning for makePlan() method just for illustration purposes (this is can be improved in the future). Here is a minimum code implementation of the global planner (global_planner.cpp), which always generates a dummy static plan.
   1  #include <pluginlib/class_list_macros.h>
   2  #include "global_planner.h"
   3
   4  //register this planner as a BaseGlobalPlanner plugin
   5  PLUGINLIB_EXPORT_CLASS(global_planner::GlobalPlanner, nav_core::BaseGlobalPlanner)
   6
   7  using namespace std;
   8
   9  //Default Constructor
  10  namespace global_planner {
  11
  12  GlobalPlanner::GlobalPlanner (){
  13
  14  }
  15
  16  GlobalPlanner::GlobalPlanner(std::string name, costmap_2d::Costmap2DROS* costmap_ros){
  17    initialize(name, costmap_ros);
  18  }
  19
  20
  21  void GlobalPlanner::initialize(std::string name, costmap_2d::Costmap2DROS* costmap_ros){
  22
  23  }
  24
  25  bool GlobalPlanner::makePlan(const geometry_msgs::PoseStamped& start, const geometry_msgs::PoseStamped& goal,  std::vector<geometry_msgs::PoseStamped>& plan ){
  26
  27     plan.push_back(start);
  28    for (int i=0; i<20; i++){
  29      geometry_msgs::PoseStamped new_goal = goal;
  30      tf::Quaternion goal_quat = tf::createQuaternionFromYaw(1.54);
  31
  32       new_goal.pose.position.x = -2.5+(0.05*i);
  33       new_goal.pose.position.y = -3.5+(0.05*i);
  34
  35       new_goal.pose.orientation.x = goal_quat.x();
  36       new_goal.pose.orientation.y = goal_quat.y();
  37       new_goal.pose.orientation.z = goal_quat.z();
  38       new_goal.pose.orientation.w = goal_quat.w();
  39
  40    plan.push_back(new_goal);
  41    }
  42    plan.push_back(goal);
  43   return true;
  44  }
  45  };
The constructors can be implemented with respect to the planner requirements and specification. Their implementation is not considered in this particular illustrative example. There are few important things to consider:
Register the planner as BaseGlobalPlanner plugin:this is done through the instruction PLUGINLIB_EXPORT_CLASS(global_planner::GlobalPlanner, nav_core::BaseGlobalPlanner). For this it is necessary to include the library #include <pluginlib/class_list_macros.h>
The implementation of the makePlan() method: The start and goal parameters are used to get initial location and target location, respectively. In this illustrative implementation, the plan vector is initiated with the start location (plan.push_back(start)). Then, 20 new dummy locations will be statically inserted in the plan in thefor loop, then, the goal location is inserted in the plan as last location. This planned path will then be sent to the move_base global planner module which will publish it through the ROS topic nav_msgs/Path, which will then be received by the local planner module.
Now that your global planner class is done, you are ready for the second step, that is creating the plugin for the global planner to integrate it in the global planner module nav_core::BaseGlobalPlanner of the move_base package.
Compilation
To compile the global planner library created above, it must be added to the CMakeLists.txt. This is the code to be added:
add_library(global_planner_lib src/path_planner/global_planner/global_planner.cpp)
Then, in a terminal run catkin_make in your catkin workspace directory to generate the binary files. This will create the library file in the lib directory ~/catkin_ws/devel/lib/libglobal_planner_lib. Observe that "lib" is appended to the library name global_planner_lib declared in the CMakeLists.txt
Writing your Plugin
Basically, it is important follow all the steps required to create a new plugin as explained in the plugin description page. There are five steps:
Plugin Registration
First, you need to register your global planner class as plugin by exporting it. In order to allow a class to be dynamically loaded, it must be marked as an exported class. This is done through the special macro PLUGINLIB_EXPORT_CLASS. This macro can be put into any source (.cpp) file that composes the plugin library, but is usually put at the end of the .cpp file for the exported class. This was already done above in global_planner.cpp with the instruction
PLUGINLIB_EXPORT_CLASS(global_planner::GlobalPlanner, nav_core::BaseGlobalPlanner)
This will make the class global_planner::GlobalPlanner registered as plugin for nav_core::BaseGlobalPlanner of the move_base.
Plugin Description File
The second step consists in describing the plugin in an description file. The plugin description file is an XML file that serves to store all the important information about a plugin in a machine readable format. It contains information about the library the plugin is in, the name of the plugin, the type of the plugin, etc. In our case of global planner, you need to create a new file and save it in certain location in your package (in our case global_planner package) and give it a name, for example global_planner_plugin.xml. The content of the plugin description file (global_planner_plugin.xml), would look like this:
 <library path="lib/libglobal_planner_lib">
  <class name="global_planner/GlobalPlanner" type="global_planner::GlobalPlanner" base_class_type="nav_core::BaseGlobalPlanner">
    <description>This is a global planner plugin by iroboapp project.</description>
  </class>
 </library>
In the first line <library path="lib/libglobal_planner_lib"> we specify the path to the plugin library. In this case, the path is lib/libglobal_planner_lib, where lib is the folder in the directory ~/catkin_ws/devel/ (see Compilation section above). In this line <class name="global_planner/GlobalPlanner" type="global_planner::GlobalPlanner" base_class_type="nav_core::BaseGlobalPlanner">, we first specify the name of the global_planner plugin that we will use later in move_base launch file as parameter that specifies the global planner to be used in nav_core. It is typically to use the namespace (global_planner) followed by a a slash then the name of the class (GlobalPlanner) to specify the name of plugin. if you do not specify the name, then the name will be equal to the type, which is in this case will be global_planner::GlobalPlanner. It recommended to specify the name to avoid confusion.
The type specifies the name the class that implements the plugin which is in our case global_planner::GlobalPlanner, and the The base_class_type specifies the name the base class that implements the plugin which is in our case nav_core::BaseGlobalPlanner. The <description> tag provides a brief description about the plugin. For a detailed description of plugin description files and their associated tags/attributes please see the following documentation.
Why Do We Need This File? We need this file in addition to the code macro to allow the ROS system to automatically discover, load, and reason about plugins. The plugin description file also holds important information, like a description of the plugin, that doesn't fit well in the macro.
Registering Plugin with ROS Package System
In order for pluginlib to query all available plugins on a system across all ROS packages, each package must explicitly specify the plugins it exports and which package libraries contain those plugins. A plugin provider must point to its plugin description file in its package.xml inside the export tag block. Note, if you have other exports they all must go in the same export field. In our global planner example, the relevant lines would look as follows:
   <export>
  <nav_core plugin="${prefix}/global_planner_plugin.xml" />
  </export>
The ${prefix}/ will automatically determine the full path to the file global_planner_plugin.xml. For a detailed discussion of exporting a plugin, please see the following documentation.
Important Note: In order for the above export command to work properly, the providing package must depend directly on the package containing the plugin interface, which is nav_core in the case of global planner. So, the global_planner package must have the line below in its package.xml:
  <build_depend>nav_core</build_depend>
  <run_depend>nav_core</run_depend>
This will tell the compiler about the dependancy on the nav_core package.
Querying ROS Package System For Available Plugins
One can query the ROS package system via rospack to see which plugins are available by any given package. For example:
rospack plugins --attrib=plugin nav_core
This will return all plugins exported from the nav_core package. Here is an example of execution:
 akoubaa@anis-vbox:~/catkin_ws$ rospack plugins --attrib=plugin nav_core
 rotate_recovery /opt/ros/hydro/share/rotate_recovery/rotate_plugin.xml
 navfn /opt/ros/hydro/share/navfn/bgp_plugin.xml
 base_local_planner /opt/ros/hydro/share/base_local_planner/blp_plugin.xml
 move_slow_and_clear /opt/ros/hydro/share/move_slow_and_clear/recovery_plugin.xml
 global_planner /home/akoubaa/catkin_ws/src/global_planner/global_planner_plugin.xml
 dwa_local_planner /opt/ros/hydro/share/dwa_local_planner/blp_plugin.xml
 clear_costmap_recovery /opt/ros/hydro/share/clear_costmap_recovery/ccr_plugin.xml
 carrot_planner /opt/ros/hydro/share/carrot_planner/bgp_plugin.xml
Observe that our plugin is now available under the package global_planner and is specified in the file /home/akoubaa/catkin_ws/src/global_planner/global_planner_plugin.xml You can also observe the other plugins already existing in nav_core package, including carrot_planner/CarrotPlanner and navfn, which implements the Dijkstra algorithm.
Now, your plugin in ready to use.
Running the Plugin on the Turtlebot
There are a few steps to follow to run your planner in turtlebot. First, you need to copy the package that contains your global planner (in our case global_planner) into the catkin workspace of your Turtlebot (e.g. catkin_ws). Then, you need to run catkin_make to export your plugin to your turtlebot ROS environment. Second, you need to make some modification to move_base configuration to specify the new planner to be used. For this, follow the three steps:
In ROS Hydro version, go to this folder /opt/ros/hydro/share/turtlebot_navigation/launch/includes
 $ roscd turtlebot_navigation/
 $ cd launch/includes/
Open the file move_base.launch.xml (you may need sudo to open and be able to save) and add the new planner as parameters of the global planner, as follows:
 ......
 <node pkg="move_base" type="move_base" respawn="false" name="move_base" output="screen">
 <param name="base_global_planner" value="global_planner/GlobalPlanner"/>
 ....
Save and close the move_base.launch.xml. Note that the name of the planner is global_planner/GlobalPlanner the same specified in global_planner_plugin.xml. Now, you are ready to use your new planner.
You must now bringup your turtlebot. You need to launch minimal.launch, 3dsensor.launch, amcl.launch.xml and move_base.launch.xml. Here is an example of launch file that can be used for this purpose.
 <launch>
 <include file="$(find turtlebot_bringup)/launch/minimal.launch"></include>

   <include file="$(find turtlebot_bringup)/launch/3dsensor.launch">
     <arg name="rgb_processing" value="false" />
     <arg name="depth_registration" value="false" />
     <arg name="depth_processing" value="false" />
     <arg name="scan_topic" value="/scan" />
   </include>

   <!-- Map server -->
   <arg name="map_file" default="your_map_folder/your_map_file.yaml"/>
   <node name="map_server" pkg="map_server" type="map_server" args="$(arg map_file)" />

   <!-- Localization -->
   <arg name="initial_pose_x" default="0.0"/>
   <arg name="initial_pose_y" default="0.0"/>
   <arg name="initial_pose_a" default="0.0"/>
   <include file="$(find turtlebot_navigation)/launch/includes/amcl.launch.xml">
     <arg name="initial_pose_x" value="$(arg initial_pose_x)"/>
     <arg name="initial_pose_y" value="$(arg initial_pose_y)"/>
     <arg name="initial_pose_a" value="$(arg initial_pose_a)"/>
   </include>

   <!-- Move base -->
   <include file="$(find turtlebot_navigation)/launch/includes/move_base.launch.xml"/>

 </launch>
Note that changes made in the file move_base.launch.xml will now be considered when you bring-up your turtlebot with this launch file.
Testing the planner with RVIZ
After you bringup your turtlebot, you can launch the rviz using this command (in new terminal)
$ roslaunch turtlebot_rviz_launchers view_navigation.launch --screen

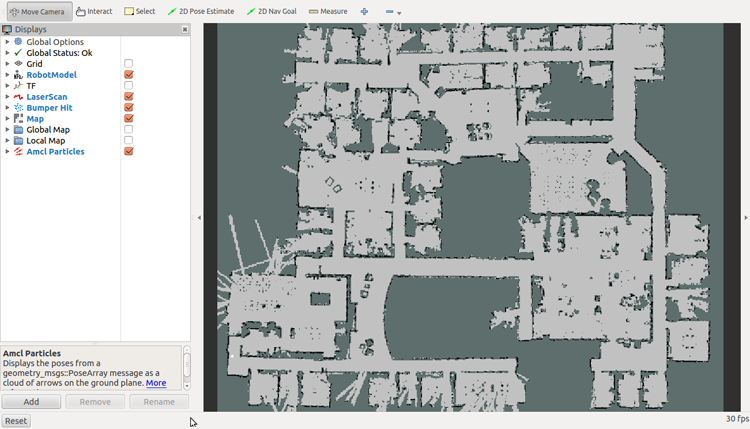
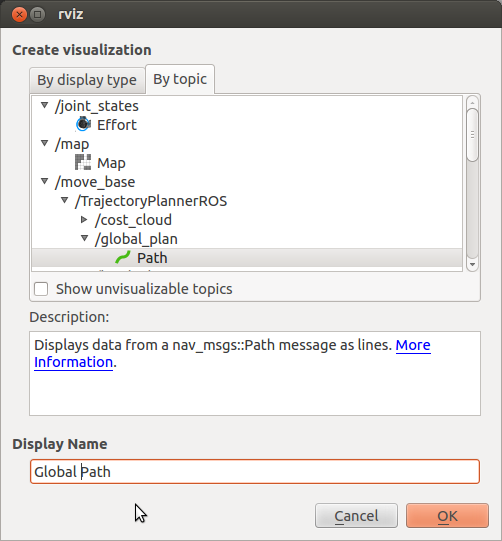
You can now add all the information you want to display in rviz by clicking on button "Add" (at the bottom). You will see the following window:

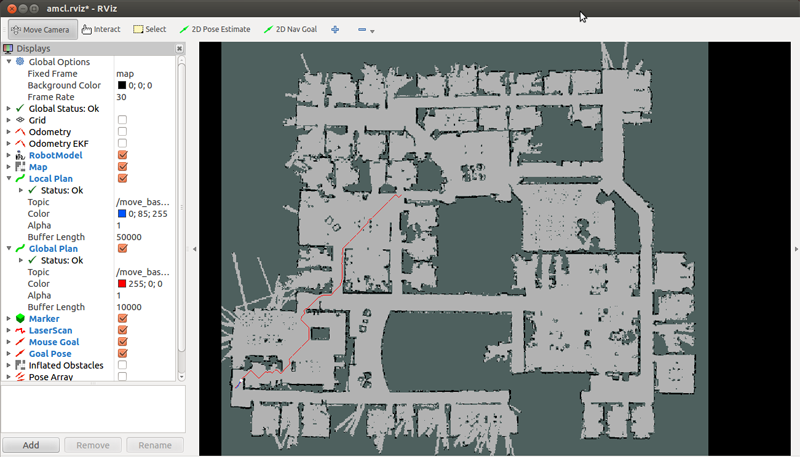
For example if you want to display the global path, click on the tab "By topic", under "move_base" category choose "/global_plan" then "Path", add display name if you want then click OK. You can add the local path in the same way.
Now click on “2D nav goal” button (at the top) and choose a goal location. You can now see your robot moving to its goal.


