| Note: This tutorial assumes that you have completed the previous tutorials: How to set up a Pilz PSENscan laser scanner with Ethernet, How to set up ROS to communicate with the scanner. |
| |
Launching multiple scanners
Description: This tutorial explains how to use multiple scanners.Keywords: PSENscan, psen_scan
Tutorial Level: BEGINNER
Contents
Introduction
This part will teach you how to start multiple scanners in master mode with a single launchfile, by showing an example of how to launch two scanners simultaneously.
Prerequisites
Make sure to complete the preceding tutorials successfully!

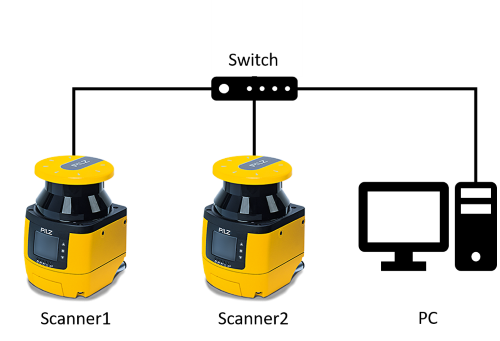
Setup an architecture similar to that one shown in the picture above.
Creating the config files
Navigate to your config folder:
roscd psen_scan_tutorials/config
We will reuse the first config-file from the previous tutorial and create a second config-file:
gedit scanner2_config.yaml
Fill the yaml-file with key: value pairs that match the parameters you would like to store. Here is an example:
password: "ac0d68d033"
sensor_ip: "192.168.0.20"
host_ip: "192.168.0.25"
host_udp_port: 50505
frame_id: "scanner2"
Note: You cannot assign adjacent IP addresses to different laser scanners, e.g. 192.168.0.10 and 192.168.0.11, because a single scanner takes up two IP-Adresses.
Note: If all your scanners send data to the same host, they have to send to different host_udp_ports to avoid conflicts.
Note: You need to choose unique frame_ids for each scanner to be able to position them independently from one another inside your ROS environment.
Creating the launch file
Create a new launch file inside your launch directory
roscd psen_scan_tutorials/launch
gedit two_scanners.launch
Here is an example launch file:
<launch>
  <node pkg="tf" type="static_transform_publisher" name="scanner_1_bc" args="0 0.15 0 0 0 0 map scanner 100" />
  <node pkg="tf" type="static_transform_publisher" name="scanner_2_bc" args="0 -0.15 0 0 0 0 map scanner2 100" />

  <node name="laser_scanner" type="psen_scan_node" pkg="psen_scan" output="screen" required="true">
    <rosparam command="load" file="$(find psen_scan_tutorials)/config/scanner_config.yaml" />
  </node>
  <node name="laser_scanner2" type="psen_scan_node" pkg="psen_scan" output="screen" required="true">
    <rosparam command="load" file="$(find psen_scan_tutorials)/config/scanner2_config.yaml" />
  </node>
  <node name="$(anon rviz)" type="rviz" pkg="rviz" args="-d $(find psen_scan)/config/config.rviz" />
</launch>
Note: Each laserscanner needs a unique node name.
In this launch file we start two laser scanner nodes. Each node publishes the data of the respective scanner on a separate topic.
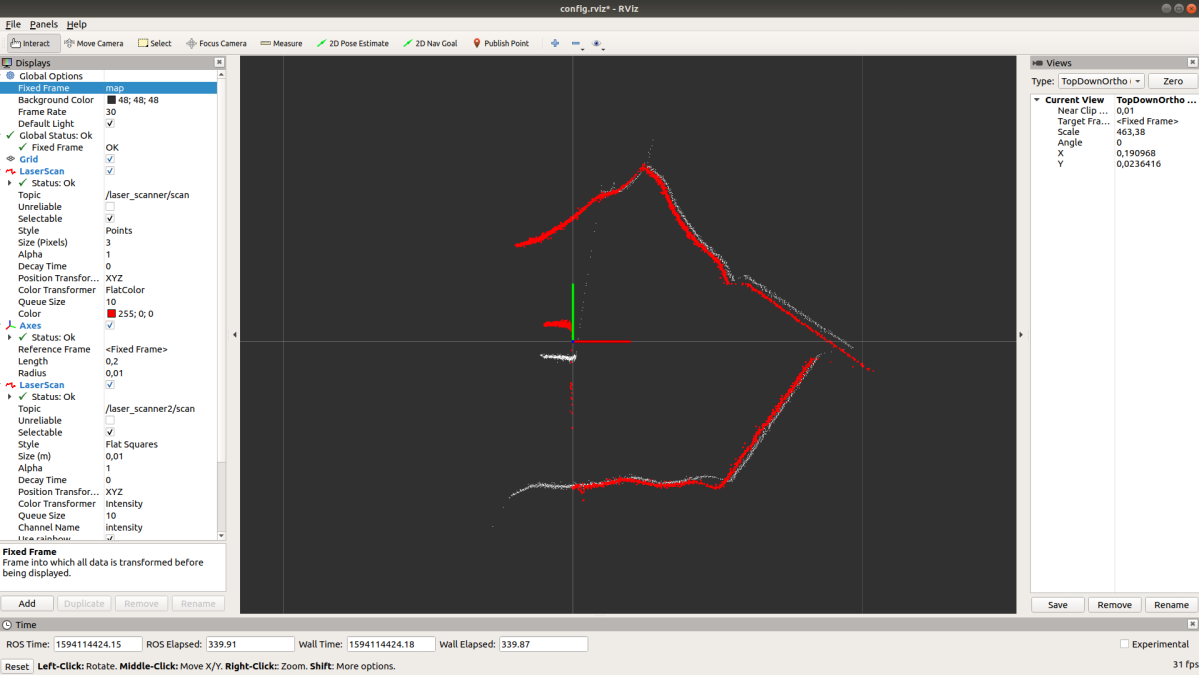
In order to visualize both scanner data at once we introduce static transforms to a common fixed frame map.
Start the application
Enter the following to start Rviz together with the ROS node for the PSENscan application.
roslaunch psen_scan_tutorials two_scanners.launch
Rviz will only show a single scanner. To add a second scanner to the visualization you need to add a LaserScan Object to Rviz and then choose "laser_scanner2/scan" as it's topic.
In the section Global Options in Rviz set Fixed Frame to map

Conclusion
You are now able to launch multiple scanners in master mode at the same time.


