| Note: This tutorial assumes that you have completed the previous tutorials: Writing a Python Plugin. |
| |
Using .ui file in rqt plugin
Description: In this tutorial python is used for now. C++ tutorial is pending.Tutorial Level: INTERMEDIATE
Contents
Background of this tutorial
Although it's up to developers, it is in general very good idea in Qt that you utilize .ui file. A few advantages:
- Good maintainability -- by separating GUI design from source code,
Easier to change design -- Qt's IDE Qt Creator allows modification in wysiwyg style.
rqt provides a way to loosen the burden of utilizing .ui files, which you face when you follow Qt's standard building steps (eg. using qmake).
Write rqt plugin without relying on .ui
If you choose not to use .ui file in your rqt plugin, no problem, there's still a standard way to do that although we won't provide documents for it. Please consult an example.
Implementation
For a concrete example, we use rqt_bag for rqt plugins written in python. We also look at rqt_image_view only for C++ specific things.
Here are the steps:
1) Create .ui file. Example
2) (Recommended) Create resource directory at the top of your package. Put .ui files into it.
3) Add argument to loadUi function like this:
loadUi(%FULLPATH_UI_FILE%, self, {'%STRING_CUSTOM_CLASSNAME%': %CUSTOM_CLASSNAME%})Concrete example of this would become:
loadUi('/home/awsomerosuser/catkin_ws/src/your_rqt_plugin/resource/mainwidget.ui', self, {'BagGraphicsView': BagGraphicsView})4) (C++) Edit CMakeLists.txt. A concrete example is available here. Also refer to a previous tutorial here.
For pythoon rqt plugins, the Qt's python binding in use would take care of .ui files and all other Qt-related things so that you don't need to add anything to CMakeLists.txt regarding Qt. And as long as you use python_qt_binding.loadUI as above, that's automatically done.
5) To add callback system (called Signal and Slot in Qt),
Other than how the GUI components are defined, how to add callback goes along with the standard Qt way both in python and C++.
In python taking bag_widget.py as an example:
        self.play_button.clicked[bool].connect(self._handle_play_clicked)
        :
        self.destroyed.connect(self.handle_destroy)
self.play_button.clicked and self.destroyed are GUI components defined either in .ui file or the upstream dependency (i.e. in this case destroyed is defined in QObject).
Accessing GUI components defined in .ui files
Assuming you do the above, in your code you can refer to the components defined in .ui files as if they are member variables.
For python bag_widget.py:
self.graphics_view.setScene(self._timeline)
   :
self.play_icon = QIcon.fromTheme('media-playback-start')
For C++, image_view.h:
Ui::ImageViewWidget ui_;
and image_view.cpp:
ui_.image_frame->installEventFilter(this);
Note that for both python and C++, you might often want to update the components in your source like python example above due to the limitation of Qt Designer.
Using custom class
"Custom" means any classes that's not defined in Qt. So both the class you define or the one defined in aother library that depends on Qt are custom to Qt.
From the same .ui file example from rqt_bag,
The value of <class> element and name attribute in <widget> element should better be the same (TODO: need proof), while the value of class attribute must be the type of the parent class of the widget.
Reusing existing GUI class
Sometime you just want to re-use widgets you see in other rqt plugins. Or even non-rqt, pure Qt widgets. Although .ui file by default allow you to only use standard Qt components, Qt provides an easy way to achieve what you want.
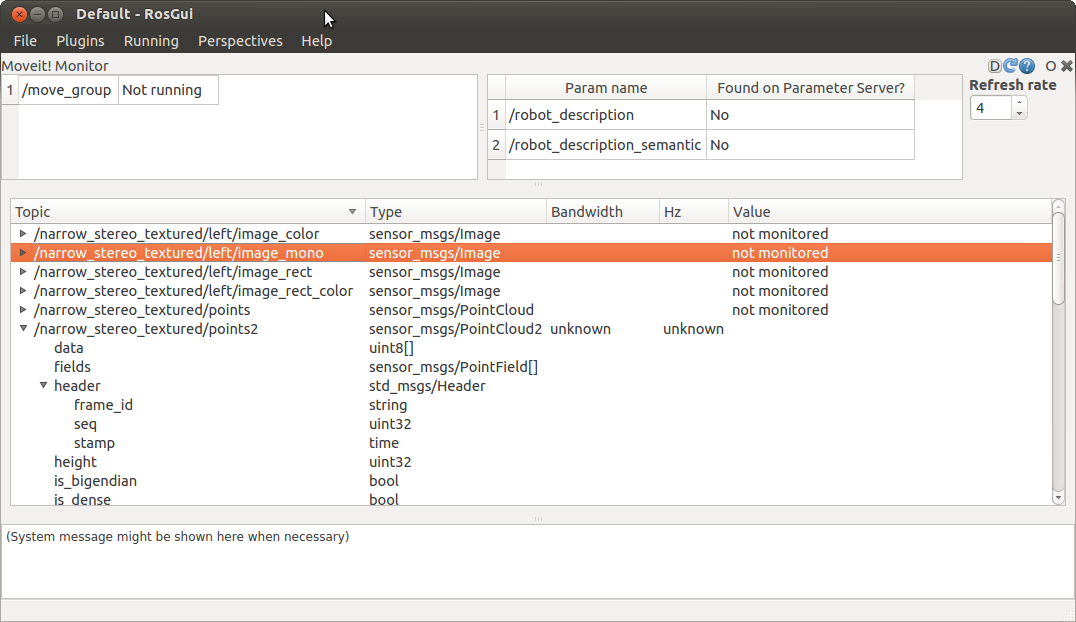
Take an existing example; If you see the screenshot of rqt_moveit, you see that it incorporates rqt_topic inside. Here the layout is organized by utilizing nice and easy .ui file as well.

Let's see how this is done.
1. Declare existing components to be used as customwidget in your rqt plugin package.
At the end of moveit_top.ui,
 <customwidgets>
  <customwidget>
    <class>TopicWidget</class>
    <extends>QWidget</extends>
    <header>rqt_topic.topic_widget</header>
  </customwidget>
 </customwidgets>
Here we're declaring rqt_topic.topic_widget as TopicWidget class, which by now is usable as a normal Qt components in your .ui.
In <header> tag, how the module where the target exisiting class is defined is specified. That said, as long as the target module is referrable in this tag, Qt should be able to find the classes even outside of rqt framework (TODO: someone confirms this?).
2. Use customwidgets in your .ui.
The TopicWidget class declared is used in this line. This is a standard way of defining a usage of any Qt classes. Nothing new.
  <widget class="TopicWidget" name="_widget_topic" native="true">
    <property name="enabled">
    :
  </widget>
You can use the same class multiple times. Just populate the name argument in widget tag. There's no rule in naming. For instance,
  <widget class="TopicWidget" name="_widget_topic_1" native="true">
    :
  </widget>
  :
  <widget class="TopicWidget" name="_widget_topic_2" native="true">
    :
  </widget>
  :
  <widget class="TopicWidget" name="_widgetopic_n" native="true">
    :
  </widget>
3. Write behaviour in the codes with your re-used class.
In moveit_widget.py, TopicWidget class is imported, same as normal classes.
from rqt_topic.topic_widget import TopicWidget
Then you have to tell rqt the custom classes you're using defined in .ui (source of this example).
loadUi(ui_file, self, {'TopicWidget': TopicWidget})Now, in your code, you can reference the custom class by self and the name you defined in .ui file (_widget_topic in this example). source.
self._widget_topic.set_selected_topics(self._selected_topics)


