| Note: This tutorial assumes that you have completed the previous tutorials: Set up and test Optimization. |
| |
Incorporate customized Obstacles
Description: In this tutorial you will learn how to take polygon-shaped obstacles published from other nodes into account.Keywords: Trajectory Optimization Local Planner Navigation Obstacles Polygon
Tutorial Level: INTERMEDIATE
Next Tutorial: Incorporate dynamic obstacles
Introduction
For some applications you might not want to rely on a costmap or you want to add other than point-obstacles. In that case you can send your own obstacle list to the teb_local_planner package using a specific topic (~<name>/obstacles).
The underlying message-type costmap_converter/ObstacleArrayMsg is part of the costmap_converter package. The message specifies the following obstacle types:
- Point obstacle: provide a polygon with a single vertex
- Circular obstacle: provide a polygon with a single vertex and a non-zero radius value.
- Line obstacle: provide a polygon with two vertices
- Polygon obstacle: provide a polygon with more than 2 vertices; the polygon will be considered to be closed between the last and the first vertex.
Write a simple Obstacle Publisher
In the following, we will create a small python node that publishes a few obstacles. For the planning part, we will run the test_optim_node described in the tutorial Set up and test Optimization. Alternatively, you could also test your publisher using a properly configured navigation launch file according to Configure and run Robot Navigation.
Create a python node called publish_obstacles.py:
   1 #!/usr/bin/env python
   2 import rospy, math
   3 from costmap_converter.msg import ObstacleArrayMsg, ObstacleMsg
   4 from geometry_msgs.msg import PolygonStamped, Point32
   5
   6 def publish_obstacle_msg():
   7   rospy.init_node("test_obstacle_msg")
   8
   9   pub = rospy.Publisher('/test_optim_node/obstacles', ObstacleArrayMsg, queue_size=1)
  10
  11   obstacle_msg = ObstacleArrayMsg()
  12   obstacle_msg.header.stamp = rospy.Time.now()
  13   obstacle_msg.header.frame_id = "odom" # CHANGE HERE: odom/map
  14
  15   # Add point obstacle
  16   obstacle_msg.obstacles.append(ObstacleMsg())
  17   obstacle_msg.obstacles[0].id = 0
  18   obstacle_msg.obstacles[0].polygon.points = [Point32()]
  19   obstacle_msg.obstacles[0].polygon.points[0].x = 1.5
  20   obstacle_msg.obstacles[0].polygon.points[0].y = 0
  21   obstacle_msg.obstacles[0].polygon.points[0].z = 0
  22
  23   # Add line obstacle
  24   obstacle_msg.obstacles.append(ObstacleMsg())
  25   obstacle_msg.obstacles[1].id = 1
  26   line_start = Point32()
  27   line_start.x = -2.5
  28   line_start.y = 0.5
  29   line_end = Point32()
  30   line_end.x = -2.5
  31   line_end.y = 2
  32   obstacle_msg.obstacles[1].polygon.points = [line_start, line_end]
  33
  34   # Add polygon obstacle
  35   obstacle_msg.obstacles.append(ObstacleMsg())
  36   obstacle_msg.obstacles[1].id = 2
  37   v1 = Point32()
  38   v1.x = -1
  39   v1.y = -1
  40   v2 = Point32()
  41   v2.x = -0.5
  42   v2.y = -1.5
  43   v3 = Point32()
  44   v3.x = 0
  45   v3.y = -1
  46   obstacle_msg.obstacles[2].polygon.points = [v1, v2, v3]
  47
  48   r = rospy.Rate(10) # 10hz
  49   t = 0.0
  50   while not rospy.is_shutdown():
  51
  52     # Vary y component of the point obstacle
  53     obstacle_msg.obstacles[0].polygon.points[0].y = 1*math.sin(t)
  54     t = t + 0.1
  55
  56     pub.publish(obstacle_msg)
  57
  58     r.sleep()
  59
  60 if __name__ == '__main__':
  61   try:
  62     publish_obstacle_msg()
  63   except rospy.ROSInterruptException:
  64     pass
Here we skip breaking the code down since creating a publisher and publishing messages is explained well in the beginner tutorials section (see here).
Now run the teb_local_planner test_optim_node in combination with rviz:
roslaunch teb_local_planner test_optim_node.launch
In the following, we assume that your package containing the python script is called mypublisher. Make sure that your script is marked as executable (chmod +x publish_obstacles.py). Open a new terminal and run your newly created python script:
roslaunch mypublisher publish_obstacles.py
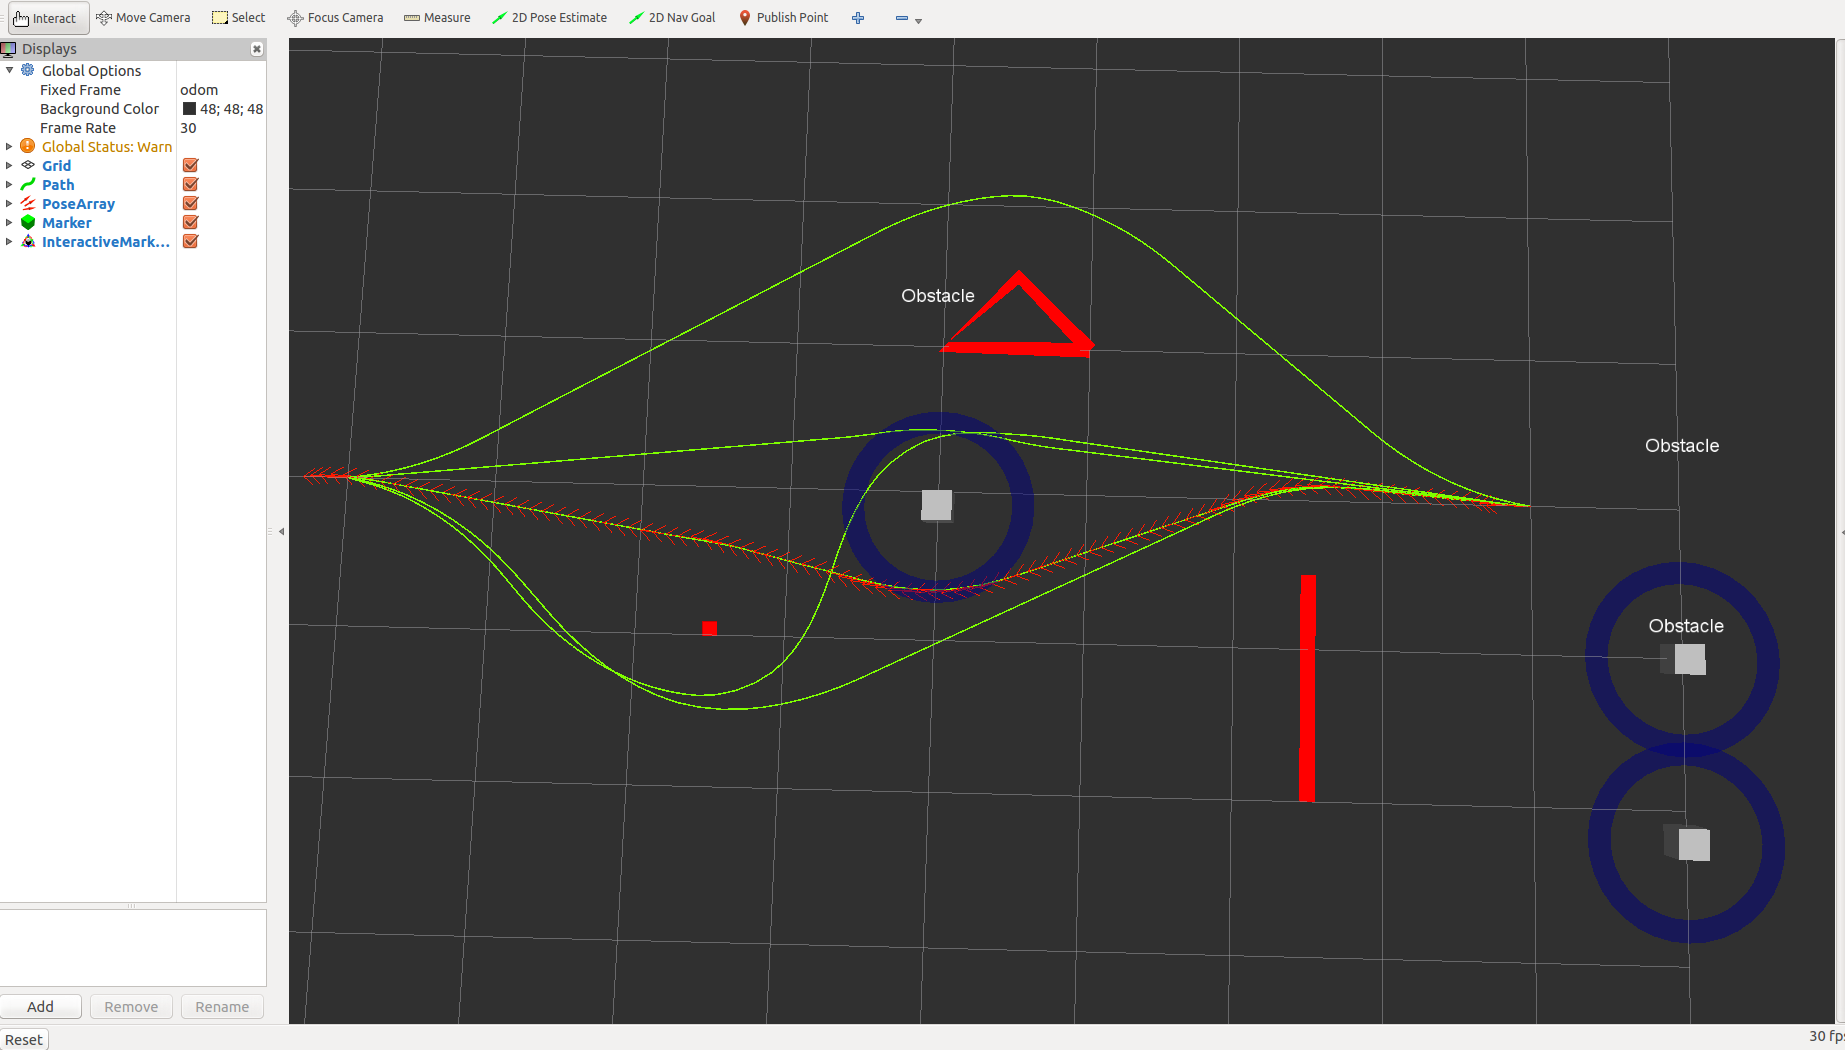
The visualization in rviz should now look similar to the one shown in the following figure: 
Related Parameters
Parameters that influence planning with custom obstacles are listed here (refer to the Node API for more details):
~<name>/min_obstacle_dist: Desired minimal distance from obstacles
~<name>/include_costmap_obstacles: Deactivate costmap obstacles completely
~<name>/costmap_obstacles_behind_robot_dist: Maximum distance behind the robot searched for occupied costmap cells.
~<name>/obstacle_poses_affected: Specify how many trajectory configurations/poses should be taken into account next to the closest one.
~<name>/weight_obstacle: Optimization weight for keeping a distance to obstacles.
~<name>/footprint_model: The robot footprint model


