Using ROS 2? Check out the ROS 2 tf2 tutorials.
| |
Adding a frame (Python)
Description: This tutorial teaches you how to add an extra fixed frame to tf2.Tutorial Level: BEGINNER
Next Tutorial: tf2 and time (Python)
Contents
In the previous tutorials we recreated the turtle demo by adding a tf2 broadcaster and a tf2 listener. This tutorial will teach you how to add an extra frame to the tf2 tree. This is very similar to creating the tf2 broadcaster, and will show some of the power of tf2.
Why adding frames
For many tasks it is easier to think inside a local frame, e.g. it is easiest to reason about a laser scan in a frame at the center of the laser scanner. tf2 allows you to define a local frame for each sensor, link, etc in your system. And, tf2 will take care of all the extra frame transforms that are introduced.
Where to add frames
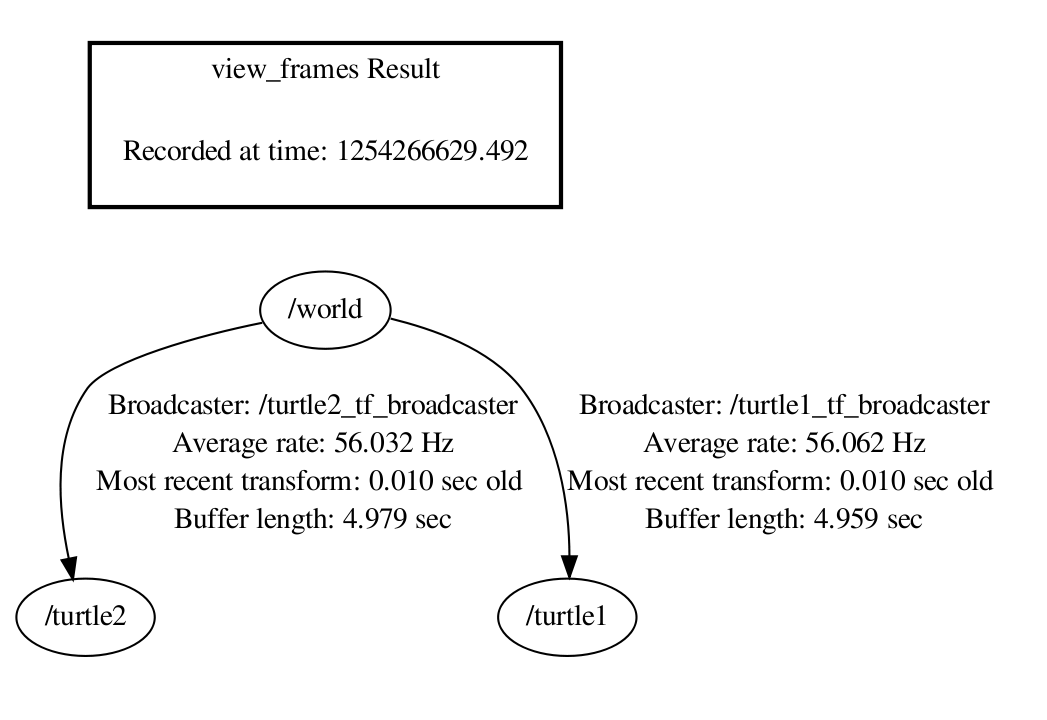
tf2 builds up a tree structure of frames; it does not allow a closed loop in the frame structure. This means that a frame only has one single parent, but it can have multiple children. Currently our tf2 tree contains three frames: world, turtle1 and turtle2. The two turtles are children of world. If we want to add a new frame to tf2, one of the three existing frames needs to be the parent frame, and the new frame will become a child frame.
How to add a frame
In our turtle example, we'll add a new frame to the first turtle. This frame will be the "carrot" for the second turtle.
Let's first create the source files. Go to the package we created for the previous tutorials:
$ roscd learning_tf2
The Code
Fire up your favorite editor and paste the following code into a new file called nodes/fixed_tf2_broadcaster.py.
   1 #!/usr/bin/env python
   2 import rospy
   3 import tf2_ros
   4 import tf2_msgs.msg
   5 import geometry_msgs.msg
   6
   7
   8 class FixedTFBroadcaster:
   9
  10     def __init__(self):
  11         self.pub_tf = rospy.Publisher("/tf", tf2_msgs.msg.TFMessage, queue_size=1)
  12
  13         while not rospy.is_shutdown():
  14             # Run this loop at about 10Hz
  15             rospy.sleep(0.1)
  16
  17             t = geometry_msgs.msg.TransformStamped()
  18             t.header.frame_id = "turtle1"
  19             t.header.stamp = rospy.Time.now()
  20             t.child_frame_id = "carrot1"
  21             t.transform.translation.x = 0.0
  22             t.transform.translation.y = 2.0
  23             t.transform.translation.z = 0.0
  24
  25             t.transform.rotation.x = 0.0
  26             t.transform.rotation.y = 0.0
  27             t.transform.rotation.z = 0.0
  28             t.transform.rotation.w = 1.0
  29
  30             tfm = tf2_msgs.msg.TFMessage([t])
  31             self.pub_tf.publish(tfm)
  32
  33 if __name__ == '__main__':
  34     rospy.init_node('fixed_tf2_broadcaster')
  35     tfb = FixedTFBroadcaster()
  36
  37     rospy.spin()
Don't forget to make the node executable:
chmod +x nodes/fixed_tf2_broadcaster.py
And add it to the CMakeLists.txt to be installed!
The code is very similar to the example in the tf2 broadcaster tutorial. Only here the transform does not change over time.
The Code Explained
Let's take a look at the key lines in this piece of code:
Here we create a new transform, from the parent "turtle1" to the new child "carrot1". The carrot1 frame is 2 meters offset from the turtle1 frame.
Running the frame broadcaster
Edit the start_demo.launch launch file. Simply add the following line:
  <launch>
    ...
    <node pkg="learning_tf2" type="fixed_tf2_broadcaster.py"
          name="broadcaster_fixed" output="screen"/>
  </launch>
First, make sure you stopped the launch file from the previous tutorial (use Ctrl-c). Now you're ready to start the turtle broadcaster demo:
$ roslaunch learning_tf2 start_demo.launch
Checking the results
So, if you drive the first turtle around, you notice that the behavior didn't change from the previous tutorial, even though we added a new frame. That's because adding an extra frame does not affect the other frames, and our listener is still using the previously defined frames. So, let's change the behavior of the listener.
Open the nodes/turtle_tf2_listener.py file, and simple replace "/turtle1" with "/carrot1":
1 trans = tfBuffer.lookup_transform(turtle_name, 'carrot1', rospy.Time())
And now the good part: just restart the turtle demo, and you'll see the second turtle following the carrot instead of the first turtle!
$ roslaunch learning_tf2 start_demo.launch
Broadcasting a moving frame
The extra frame we published in this tutorial is a fixed frame that doesn't change over time in relation to the parent frame. However, if you want to publish a moving frame you can code the broadcaster to change the frame over time. Let's change our carrot1 frame so that it changes relative to turtle1 over time.
Create the file nodes/dynamic_tf2_broadcaster.py (and remember to make it executable with chmod +x as we did above):
   1 #!/usr/bin/env python
   2 import rospy
   3 import tf2_ros
   4 import geometry_msgs.msg
   5 import math
   6
   7 if __name__ == '__main__':
   8     rospy.init_node('dynamic_tf2_broadcaster')
   9     br = tf2_ros.TransformBroadcaster()
  10     t = geometry_msgs.msg.TransformStamped()
  11
  12     t.header.frame_id = "turtle1"
  13     t.child_frame_id = "carrot1"
  14
  15     rate = rospy.Rate(10.0)
  16     while not rospy.is_shutdown():
  17         x = rospy.Time.now().to_sec() * math.pi
  18
  19         t.header.stamp = rospy.Time.now()
  20         t.transform.translation.x = 10 * math.sin(x)
  21         t.transform.translation.y = 10 * math.cos(x)
  22         t.transform.translation.z = 0.0
  23         t.transform.rotation.x = 0.0
  24         t.transform.rotation.y = 0.0
  25         t.transform.rotation.z = 0.0
  26         t.transform.rotation.w = 1.0
  27
  28         br.sendTransform(t)
  29         rate.sleep()
Instead of a fixed definition of our x and y offsets, we are using the sin and cos functions on the current time so that the offset of carrot1 is constantly changing.
To test this code, change the fixed_tf2_broadcaster.py section we changed in start_demo.launch to point to our new, dynamic frame broadcaster:
  <launch>
    ...
    <node pkg="learning_tf2" type="dynamic_tf2_broadcaster.py"
          name="broadcaster_dynamic" output="screen"/>
  </launch>
You're now ready to move to the next tutorial about tf2 and time (Python) (C++)


