| |
Adding a Hokuyo Laser to your Turtlebot
Description: How to put a laser scanner into your Turtlebot modelTutorial Level: INTERMEDIATE
Contents
This assumes that you have a TurtleBot which has already been brought up in the turtlebot bringup tutorials. This tutorial also assumes that you have a Hokuyo URG laser and a 3D printer to print this plate on.
Print the adapter plate
Get the plate files from it's thingiverse page: http://www.thingiverse.com/thing:328538
You will need some additional hardware (specified on the thingiverse page).
Screw the laser to the adapter plate first, then attach the plate to the turtlebot.
Setup udev
Create the file /etc/udev/rules.d/50-laser.rules, add the following to it:
KERNEL=="ttyACM[0-9]*", MODE="0777"
This can be done through sudo with:
sudo echo 'KERNEL=="ttyACM[0-9]*", MODE="0777"' >> /etc/udev/rules.d/50-laser.rules
Restart udev to take on the new rules with:
sudo /etc/init.d/udev restart
Now plug in your laser. Check it's file permissions. They should be read/write/execute for all. The ls output should look similar to this:
$ ls -al /dev/ttyACM0
crw-rw-rw- 1 root dialout 166, 0 May 11 23:36 /dev/ttyACM0
Prepare a catkin enviroment
Normally, you will want to add support for your laser in a new catkin enviroment. You can edit the main turtlebot definition, but you might then loose your changes when there are new package updates.
Open a terminal, source the setup.bash from your ROS distro first:
source /opt/ros/indigo/setup.bash
Now, change to the location you would like to create your new enviroment. I am assuming the new enviroment will be in ~/indigo
cd
mkdir indigo
cd indigo
mkdir src
cd src
Clone the turtlebot source into this folder:
git clone https://github.com/turtlebot/turtlebot.git
Now, your src dirctory should contain a directory and a file, like this:
turtlebot@turtlebot:~/indigo/src$ ls
turtlebot
Change down one level to ~/indigo and run catkin_make
cd ..
catkin_make
catkin_make should create a custom enviroment for you to work on.
To use that new enviroment, you will need to source the new setup.bash from it. Source that with the following:
source ~/indigo/devel/setup.sh
To make sure it's working, you can try running roscd to change to the new location
Try using roscd to get to turtlebot_description. Like this:
roscd turtlebot_description
Run "pwd" to show you what path you are in. If your current path is in the new enviroment, everything worked. If your path is in /opt/ros, one of the previous steps did not work correctly.
This is valid output:
roscd turtlebot_description
turtlebot@turtlebot:~/indigo/src/turtlebot/turtlebot_description$ pwd
/home/turtlebot/indigo/src/turtlebot/turtlebot_description
Optional, but useful step.
You will likley want your turtlebot to continue to use your new enviroment in the future. To make that happen, you will want to edit your ~/.bashrc file.
You will probably have a line in your bash rc similar to this one:
source /opt/ros/indigo/setup.bash
Comment it out by adding a # in front of it. Then, add a source to your new enviroment setup.bash. Your final changes should look like this:
#source /opt/ros/indigo/setup.bash
source /home/turtlebot//devel/setup.bash
Edit your turtlebot description
First, roscd to turtlebot_description
roscd turtlebot_description
Edit ./urdf/turtlebot_library.urdf.xacro
You need to add the laser to the robot model. Add the following right above the </robot> tag
  <joint name="laser" type="fixed">
    <origin xyz="-0.005 0.00 0.360" rpy="3.14159 0 0" />
    <parent link="base_link" />
    <child link="base_laser_link" />
  </joint>

  <link name="base_laser_link">
    <visual>
      <geometry>
        <box size="0.00 0.05 0.06" />
      </geometry>
      <material name="Green" />
    </visual>
    <inertial>
      <mass value="0.000001" />
      <origin xyz="0 0 0" />
      <inertia ixx="0.0001" ixy="0.0" ixz="0.0"
        iyy="0.0001" iyz="0.0"
        izz="0.0001" />
    </inertial>
  </link>
The stock files will have your kinect's virutal laser scan publishing on the same topic that other tutorials want to use, and I would rather the laser data would come from the hokuyo laser. This can be prevented by changing the topic that the Kinect laser publishes on with the following:
roscd to turtlebot_bringup/launch/
roscd turtlebot_bringup/launch/
edit 3dsensor.launch
Look for the line that looks like this:
<arg name="scan_topic" default="scan"/>
Remove it and replace it with:
<arg name="scan_topic" default="kinect_scan"/>
Save that file and edit minimal.launch. We now need to add the hokuyo node to it.
At the bottom of the file, right before </launch>, add the following:
 <node name="laser_driver" pkg="hokuyo_node" type="hokuyo_node">
   <param name="frame_id" value="base_laser_link" />
 </node>
The edit to minimal.launch should bring up the hokuyo node when you launch it.
The Hokuyo node can only come up if it's on your system. Make sure you have it installed by running:
sudo apt-get install ros-indigo-hokuyo-node
Bringup your new config
Assuming that it all worked, you should be able to bring up your new enviroment.
First, ensure that your ROS_MASTER_URI and ROS_HOSTNAME are correct.
If you are unsure what your master URI and ros hostname are suposed to be, please see network configuration
Bringup the new turtlebot config. In one terminal, run:
roslaunch turtlebot_bringup minimal.launch
Note that you should see messages about your laser driver starting up with messages like:
process[laser_driver-9]: started with pid [8288]
In another terminal, you can bring up the kinect sensor by running:
roslaunch turtlebot_bringup 3dsensor.launch
Check your results with rviz
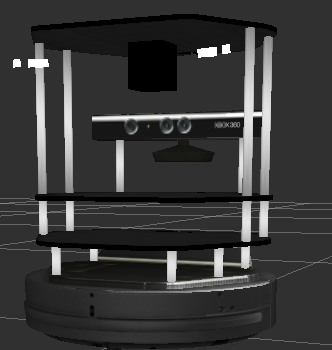
Now, run rviz. You should now have a block that appears on your turtlebot model that looks something like this:

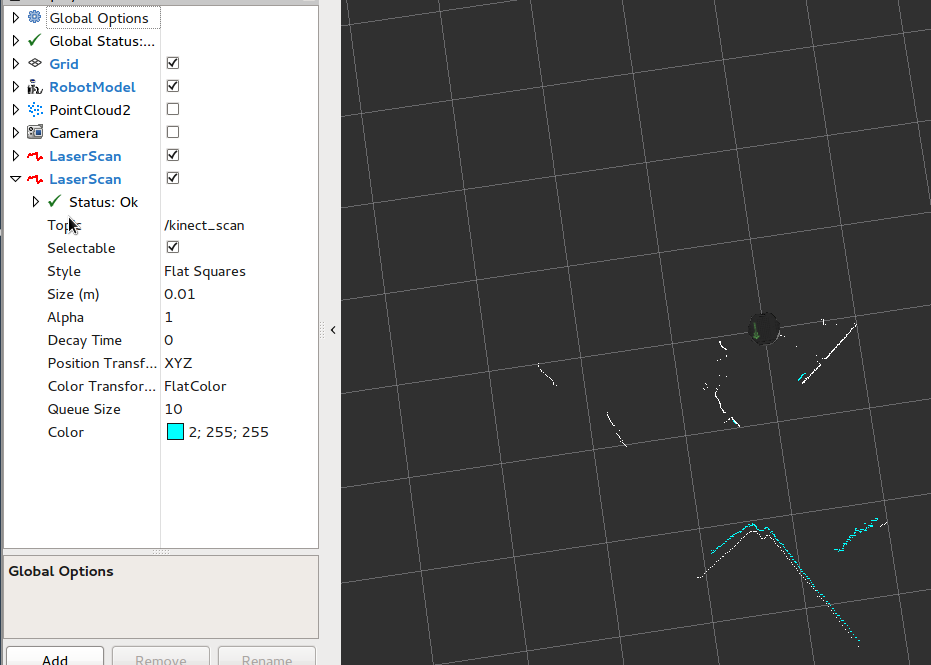
Add two LaserScan visuilizations. Subscribe one of them to the /kinect_scan topic and set it's Color to "2; 255; 255"
Like this:

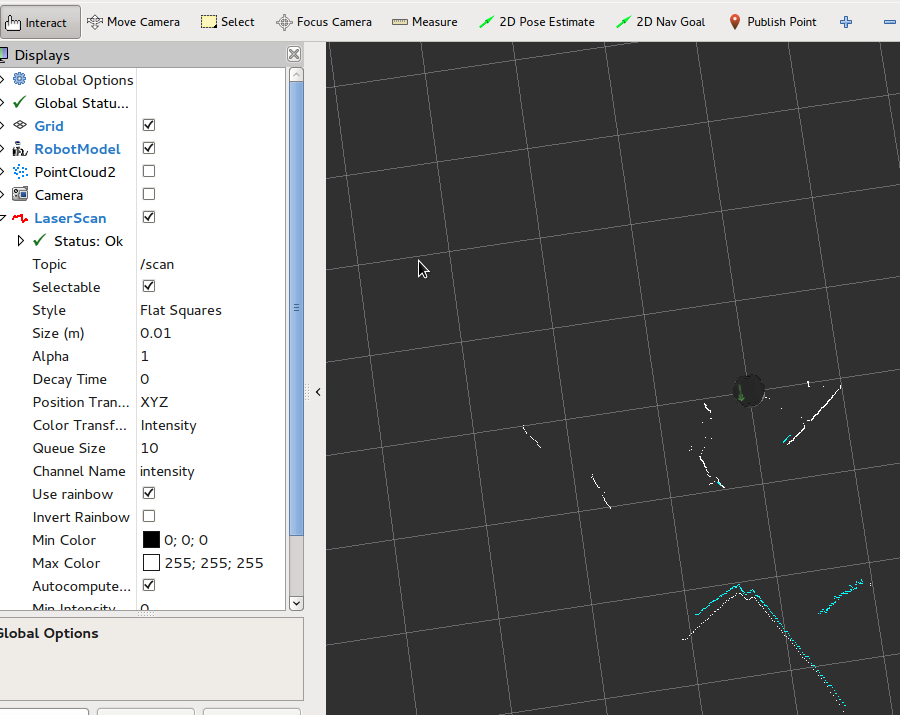
Subscribe the other topic to /scan. Leave it's Color "255; 255; 255"
Like this:


