Contents
About
This package provides a node which calibrates the camera position based on an AR tag fixed to the base. It also has a launch file for bringing up the camera.
(This package is not yet released, but it can be found here: https://github.com/andywolff/youbot_camera )
ar_camera_calibrator uses an AR marker fixed to the plate of the youBot to adjust the pose of the camera attached to the gripper. It overwrites a line in gripper.urdf.xacro in youbot_description, changing the transform from the gripper_palm_link to xtion_frame.
Note that this documentation is not yet complete. Any areas with a question mark (?) are suspicious.
Nodes
ar_camera_calibrator
ar_camera_calibrator overwrites a urdf file to adjust the camera's pose based on a fixed AR marker.
Installation
Pre-requisites
You must have youbot_common, youbot_description, openni, and ccny_vision installed.
To make sure that you have the right version of youbot_description, check that the gripper.urdf.xacro file in urdf/youbot_gripper/ has a part that looks like this:
<!-- asus xtion camera -->
<xacro:asus_xtion_camera name="xtion" parent="${name}_palm_link" tilt="0.0">
  <!-- AR_CALIBRATOR:EDIT_HERE -->
  <origin xyz="some three numbers" rpy="some three numbers" />
</xacro:asus_xtion_camera>
Also check that the plate.urdf.xacro file in urdf/youbot_plate has an ar_marker_fixed frame. In rviz, it should appear as a thin red box on the youbot's back plate.
Installing the Asus Xtion
You can use any camera which is capable of generating point clouds, but youbot_description and youbot_camera are configured for the Asus Xtion camera.
Download the camera's drivers and SDK, which can be found here, and install them according to their instructions. Test the camera with the included test program to make sure everything is okay. There is an issue with the Xtion where it causes the robot to freeze if the XnSensorServer is not running when openni is launched. To prevent this freeze, youbot_camera includes a script called always_run_XnSensorServer.sh which will make sure that XnSensorServer is always running. For this script to work, you must set the environment variable XN_SERVER_LOCATION to point to the XnSensorServer.
export $XN_SERVER_LOCATION=/path/to/XnSensorServer
Put that in your .bashrc file if you want the environment variable to be defined every time you open your terminal. Also make sure the XnSensorServer has global execute permissions, which you can give it like so:
sudo chmod a+x XnSensorServer
Setting up the AR marker on the robot
How the marker position was found
For the ar_camera_calibrator to calibrate, it must have a reference point with a known location and a way to check its position against the camera. An AR tag was chosen for this purpose because it could be added to a fixed point on the robot and reliably oriented based on the rgb video from the camera.
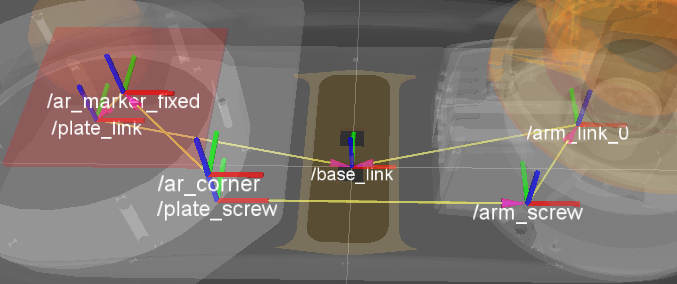
Any marker can be used for calibration, but it must be mounted exactly to the location the calibrator expects. This is made difficult by the mismatches between the youBot's simulated model and its actual form. Specifically, the model of the plate used in youbot_description is screwed to the robot with 6 screws arranged in a circle, whereas the actual plate is fixed to the robot with 4 screws. The plates are also slightly different in shape and size. However, the simulated model's arm matches more closely to the actual arm, so it was used as a reference point. The arm screws and the plate screws each form a 12cm square. Frames for the plate and the base of the arm existed already in youbot_description. The transform from arm_link_0 to the arm screw was found. The distance between the arm screws and the plate screws was measured. An ar_corner frame was made, offset from the ar_marker_fixed frame by half the width and height of the plate screw square. This left the transform from plate_link to ar_marker_fixed as the only unknown. The ar_marker_fixed was then positioned such that ar_corner aligned with plate_screw. All of the frames used during this measurement can be seen here:
|
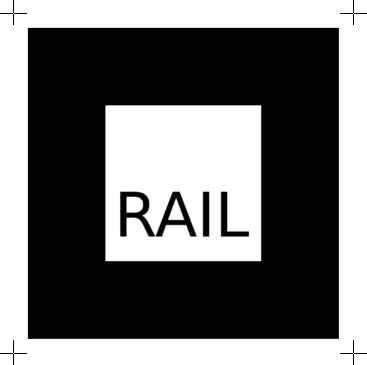
The marker's center was put in the center of the plate screw square. Points were added in a 12cm square to the image of the 11cm marker. This way, when the marker is printed out, it can be posed consistently on the plate by matching these points to the centers of the plate screws.
How to attach the marker to the robot
|
Print out the above marker such that the crosshair centers make a 12cm square. Attach it to the robot with the points aligned to the plate screws. The marker should be rotated such that 'RAIL' can be read from the arm's position.
Using different markers
Any marker that works with ARToolkit can be used, as long as it is properly positioned in the center of the plate screws' square and has a valid pattern file. The parameters for the launch file are marker_pattern, which is a full path to the pattern file, and marker_width, in millimeters. For example, to run the calibration with an 8cm marker called my.patt, one would do this:
roslaunch youbot_camera ar_pose.launch marker_pattern:=/some-full-path/my.patt marker_width:=80
It is recommended to use an 11cm marker because it is big enough to be detected easily, but not so large that the plate screw attachment points interfere with detection.
Using this Package
First, make sure youbot_wrapper and youbot_joint_state_publisher from youbot_common are running. Make sure the camera is also running. If it is not, you can launch it on the robot from this package:
roslaunch youbot_camera openni.launch
This launches the Asus Xtion camera with the correct name and settings.
Then, run the AR marker identifier:
roslaunch youbot_camera ar_pose.launch
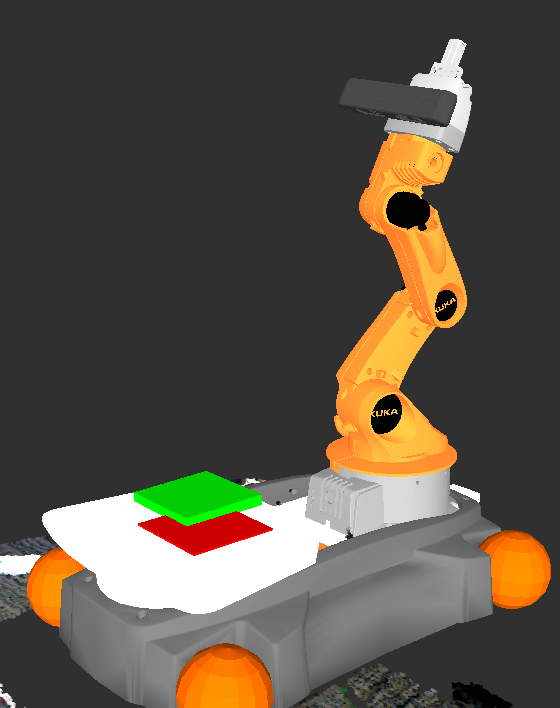
When that is running, make sure the AR tag is within view of the camera. If it is recognized, the ar_pose_single node should publish a box marker, which should be seen as a green box somewhere near the youbot's plate in rviz.
|
To correct the camera's position, run the calibration:
roslaunch youbot_camera calibrator.launch
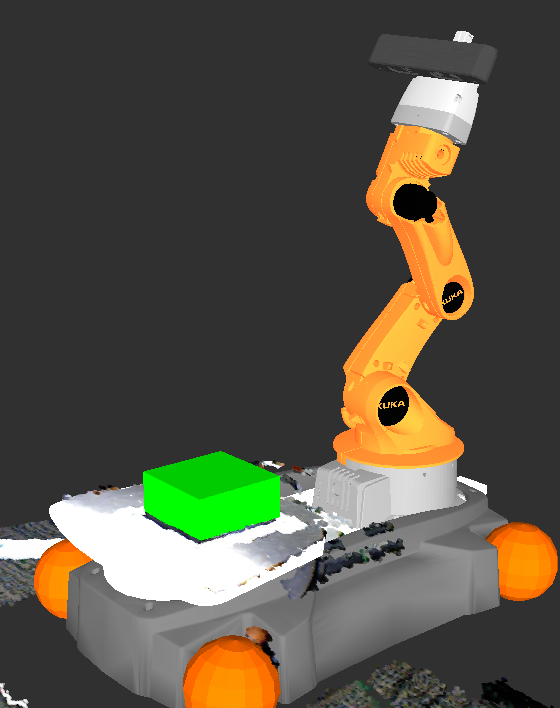
This will modify the urdf file. Shut down the youbot_joint_state_publisher and relaunch it. When that has fully started again, disable and re-enable the youBot's RobotModel display in rviz. The green box should align itself perfectly with the red ar_marker_fixed box, and the camera should move to a new position and orientation.
|
Because the urdf is changed, this new pose will be the permanent new pose for the camera. It will not change unless the urdf changes in youbot_description or the calibrator is run again.
|
|
|


