| |
Installing ROS Fuerte on Raspberry Pi
Description: This is a simple how to for installing and setting up ROS Fuerte on Raspberry Pi.Keywords: RaspberryPi, Setup, ROS
Tutorial Level: BEGINNER
Contents
This is just a small how to re: getting ROS to work on the Raspberry Pi.
Note: This tutorial applies to ROS Fuerte. For Groovy, there are instructions for installing ROS either from source or from binary packages on Raspbian on groovy/Installation/Raspbian
Debian:Squeeze OS Set-up
Raspberry Pi Setup
This tutorial will not go into a lot of detail re: the Raspberry Pi set-up itself however the main thing is to boot the Raspberry Pi with as much memory as possible. With that in mind set the arm224_start.elf to be your start.elf file.
Also ensure you have a reasonable amount of swap space available (The build of ROS is on the Raspberry Pi itself)
Building ROS
This is largely following the Debian instructions with a few notable exceptions:
The current version of Raspbian doesn't have pip. Pip in the Raspbian repository wants Python 2.6 instead of Python 2.7. To get pip for 2.7 type
sudo easy_install pip
Easy install may need to be installed using this command:
curl -O https://bitbucket.org/pypa/setuptools/raw/bootstrap/ez_setup.py
python ez_setup.py
Update the turtle.cpp file to the attached one - else compilation problems (static_cast<> issue around std::max()). The updated version can be found here:turtle.txt
- Use just make and not "make -j8" - it's a single-core machine and all 8 cpp threads will do it and hang everything on waiting on I/O - trust me I tried - 8 hours later and still nothing... This step takes somewhere between 1-2 hours.
Before Section 1.5 (Build Higher Level Tools), type .
export ROS_OS_OVERRIDE=debian:squeeze
It is mentioned later in the install. I found you need it sooner. If rosdep throws an error after this during Step 1.5 (when executing rosdep install -a) about not being able to identify the OS then it will be necessary to use the following instead
rosdep install -ay --os=debian:squeeze
Then Finish off
Note: At the time of writing re: section 1.5 "rosdep install -a". There are problems with this. However these are the higher level functions that might be too much for the Raspberry Pi. However it will certainly work as remote I/O nodes around on a robot for lower level processing.
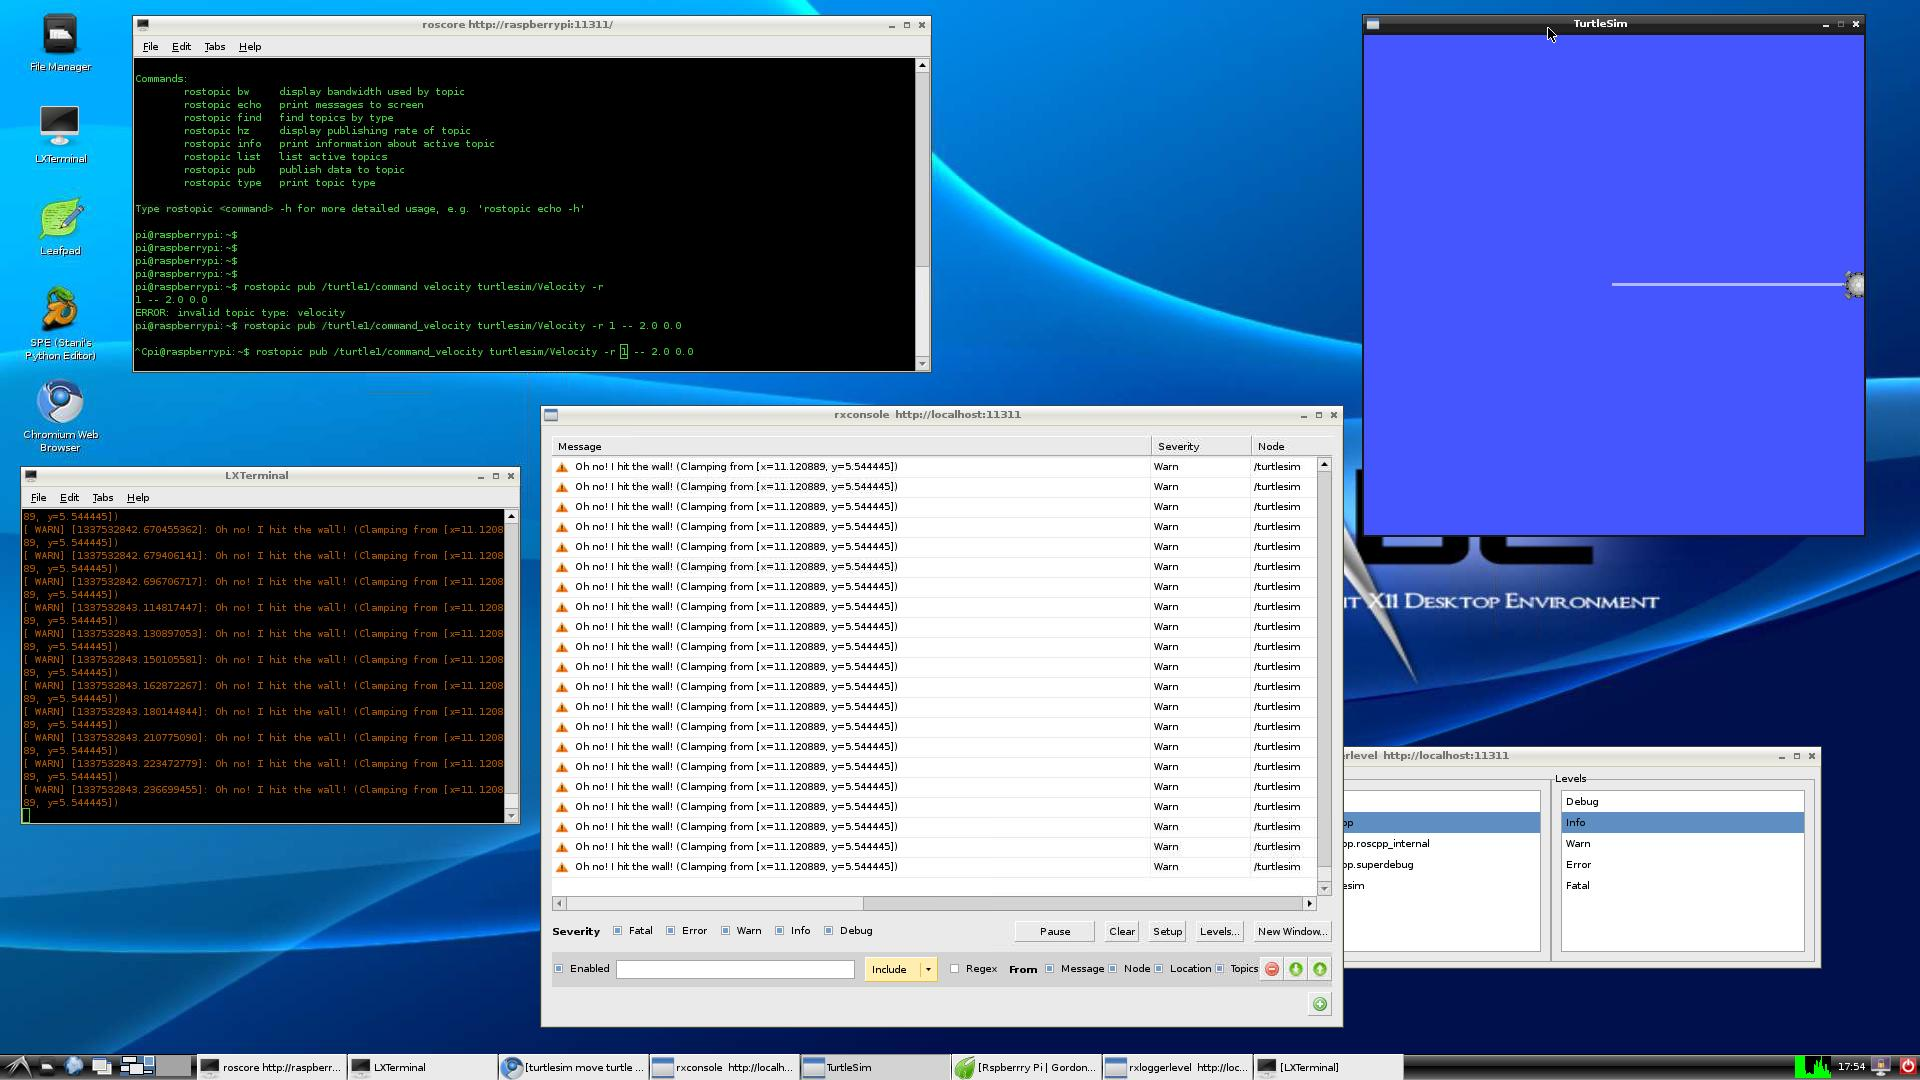
Once complete done you should be able to run ROS. Below is a screen shot of rxconsole; turtlesim etc with a move command being published (from the tutorials).

A word of expectation: it's slow. I expect the graphics drivers will have much to do with it (which are due to be changed to take advantage of the GPU).
To get the tutorial running, open three terminal windows.
In window 1 enter
roscore
In window 2 enter (this will bring-up the turtlesim window)
rosrun turtlesim turtlesim_node
In window 3 enter (this will enable you to control the turtle in the turtlesim window using your keyboard - so long as window 3 is in focus / selected).
rosrun turtlesim turtle_teleop_key
Raspbian OS
During the build, you may run into a error that looks like this.
- "/ros-underlay/rx/rxtools/src/rxtools/rxtools.i:2: Error: Unable to find 'std_string.i'"
swig was installed to the wrong folder you must move it. Use the following command from root directory.
- cp -r /swig /usr/local/share
The Raspbian OS has /tmp set up to be in RAM. To fix it this:
- In .bashrc, add: export TMPFS=/var/tmp
- Then edit /etc/default/rcS and comment out the line that reads: RAMPTMP=yes
- Reboot.
Additionally, it appears there was some sort of error in the install scripts that placed ROS in /opt/ros/fuert not in /opt/ros/fuerte.
To fix it, do a: sudo mv /opt/ros/fuert /opt/ros/fuerte to rename it, after performing step 1.3.2, and then repeat 1.3.2 to get it to put everything in the right place.
ROS Peripherals
This section details how to build some of the interfaces on the Raspberry Pi
usb_cam
Firstly get the usb_cam driver from svn:
$ cd <some ros workspace>
$ svn co https://bosch-ros-pkg.svn.sourceforge.net/svnroot/bosch-ros-pkg/trunk/stacks/bosch_drivers
$ rospack profile
$ roscd usb_cam
Then install the prerequisite packages:
$ sudo apt-get install libavcodec-dev
$ sudo apt-get install libswscale-dev
$ sudo apt-get install libtinyxml-dev
$ cd <some ros workspace>
$ rosmake
Finally test using
$ rosrun usb_cam usb_cam_node
usb_cam will use about 60% on the latest hard-float release (as of 8th Oct 2012)
GPIO Interface
There is a project under development which offers a GPIO interface also using the bosch_drivers package. https://github.com/kalectro/raspi_interface


