| Note: For this tutorial you need a working and calibrated camera using the ATAN camera model. This tutorial assumes that you have completed the previous tutorials: camera_calibration. |
| |
Tutorial for using ethzasl_ptam
Description: This tutorial explaines how to work with and use ethzasl_ptam. Different parameters and best practices are discussed.Tutorial Level: BEGINNER
Next Tutorial: remote_ptam
Contents
Preparation
This tutorial assumes that you have a working camera streaming monochrome images on a ROS image topic. Also, it assumes you to have stored correct camera calibration parameters and image resolution parameters in PtamFixParams.yaml. Cameras with rolling shutter do work to some extent, however, feature extraction and matching performance deteriorates greatly with more motion. When working with ethzasl_ptam, ensure that there is sufficient light. As a rule of thumb, the camera shutter speed should always be lower than 5ms to avoid motion blur. Furthermore, try to avoid rotations whenever possible, feature triangulations yield best results after sufficient and pure translations.
If you have no camera at hand, you may download this dataset (151MB).
Launching the Framework
Edit ptam.launch to remap the PTAM image topic to your specific image source topic. Then, launch ethzasl_ptam:
roslaunch ptam ptam.launch
A screen showing the current camera image should pop up If this screen does not show up, make sure that "gui: True" is set in PtamFixParams.yaml.
launch the dynamic reconfigure gui to have access to all dynamic parameters:
rosrun rqt_reconfigure rqt_reconfigure
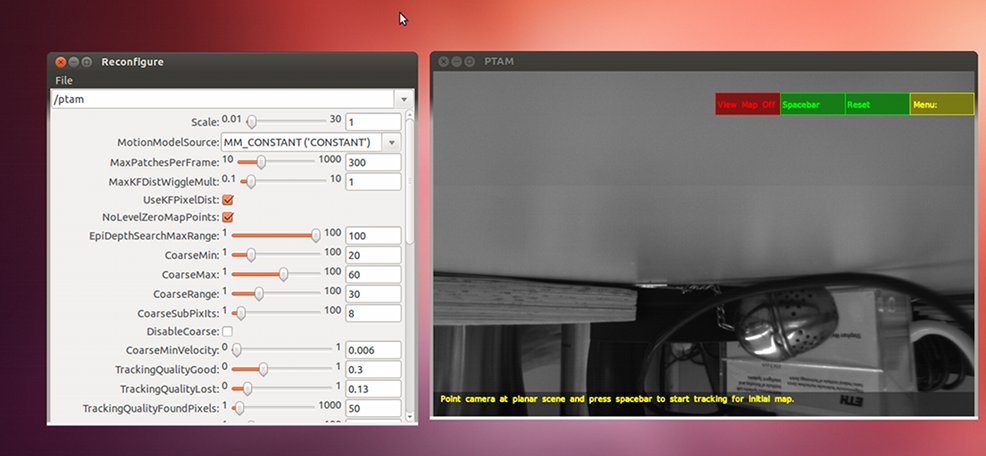
if you select the /ptam node in the reconfigure gui, your screen may now look like this

Initializing a Map
ethzasl_ptam is a key-frame based visual pose estimator. That is, we need first two key-frames to start building the (local) map in which the camera will be localized.
We have two different modes to initialize the first two key-frames: manual and automatic. First, we discuss the manual initialization to highlight the points one should consider during this procedure. Second, we discuss the automatic initialization.
Manual Initialization
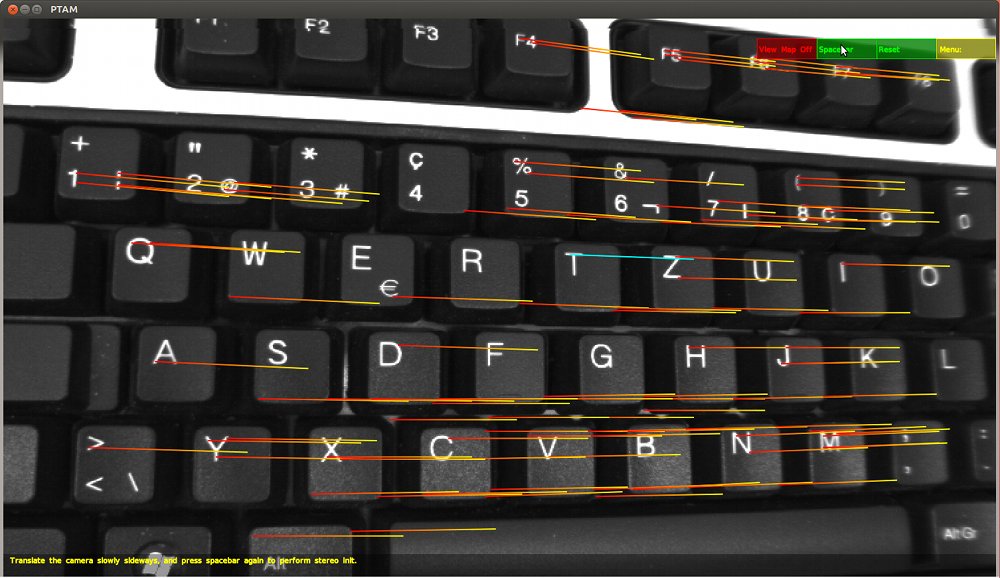
The manual initialization is the same as in the original PTAM: put the focus on the window displaying the current camera image (we denote it as the "PTAM-window" from now on) and hit [Spacebar] either on your key-board or the button in the window. This creates the first key-frame and you will see feature tracks as you move the camera.
 Feature tracks after initializing the first key-frame.
A second hit on [Spacebar] initializes the second key-frame. Since we have a monocular system the second key-frame:
- needs to have some Euclidean distance to the first key-frame. As a rule of thumb the distance should be at least 1/10th of the scene depth.
- should have no rotation with respect to the first key-frame
A pure translation with the length of about 1/10th of the scene depth works best for the initialization.
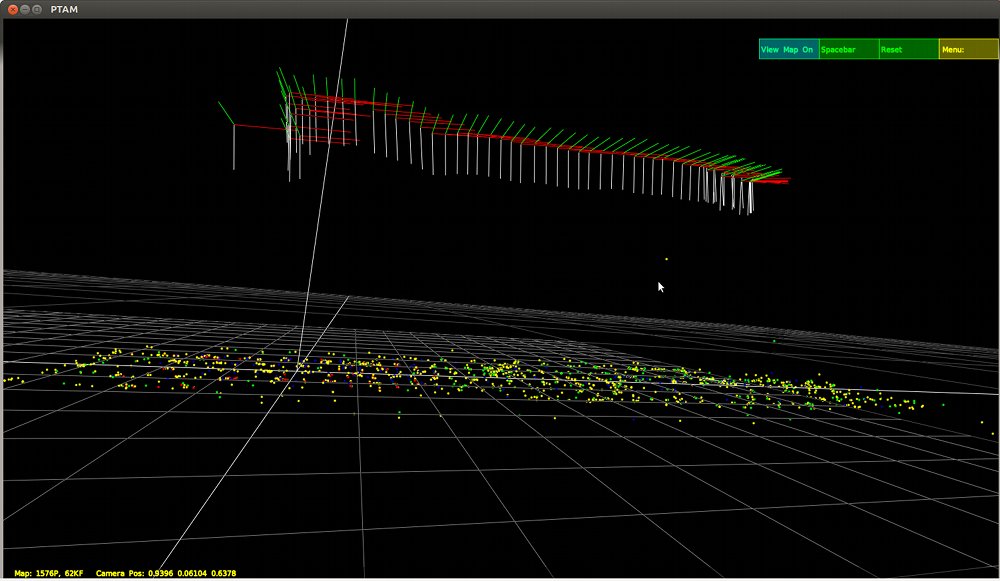
After successful initialization, you see the features tracked in the different pyramidal levels of the current image. You can also switch to the 3D visualization-mode displaying key-frames, current camera pose and the map features in 3D.
 ethzasl_ptam after successful initialization (camera and 3D view)
Automatic Initialization
For automatic initialization, you need to enable the dynamic parameter "AutoInit". As soon as this parameter is "True" ethzasl_ptam tries to initialize the first two key-frames upon the following rules:
after un-rotation, the median pixel distance between the two key-frames needs to be larger than the number set in "AutoInitPixel". A value between 20 and 50 is reasonable.
- the standard deviation of all feature's scene depths of both key-frames needs to be lower than 0.5. This value is arbitrarily set and may be adjusted for non-flat initialization areas.
The initialization procedure keeps trying to find two suitable key-frames until an initialization is successful according to the above criteria. If the initialization keeps failing, you might want to adjust the "AutoInitPixel" parameter or augment the number of loops the system tries to make a possible set of key-frames converge. This is done by augmenting "MaxStereoInitLoops". Augmenting this value above 10 will most likely not influence anything anymore.
Verifying the Functioning
Once a map is initialized, you should first verify the proper functioning of the system: this includes image quality, camera calibration, texture of the environment.
The image should not show any saturated areas nor extremely underexposed areas. If you need to increase the shutter speed to more than 5ms in order to not have underexposed areas, add more light sources. A shutter speed of more than 5ms easily leads to motion blur.
Now, we verify the quality of the camera calibration. Make sure you use the default values for all parameters apart of "MaxKF". Set "MaxKF" to zero. This keeps all generated key-frames always in the map. Point the camera at your key-board (or any flat, well textured surface of at least 50cm length) at a height of about 10cm. Initialize a map at on end of the key-board at 10cm height. After successful initialization, move slowly to the other end of the key-board without any rotational motion. Once arrived at the other end while still having an intact map, check the point cloud in the PTAM's 3D view. If the point cloud is curved instead of flat, your camera calibration for this camera axis is not of high quality and should be done again. Reset the map, yaw the camera 90° and repeat this check for the other camera axis.
 This is how a point cloud of a key-board should look like if the camera is calibrated correctly.
Now that we ensured good exposure settings and a good camera calibration, we check the texture of the environment we like to move the camera in. Limit "MaxKF" to 10 in order to make sure we have sufficient calculation power. Then, initialize a map in your environment and move the camera freely to see how robust the system is in your given environment and lighting conditions.
Map Losses
As in every map-based approach, the map is prone to be corrupted or lost. This can happen due to a feature-less area or due to a number of wrongly matched features. There are two different behaviors of ethzasl_ptam on a map loss: the system stays in failure mode until manual map reset or it tries to re-initialize a new map if "AutoInit" is enabled.
Manual Map Reset and Re-Initialization
If "AutoInit" is disabled and a map loss occurs the behavior is equivalent to the original PTAM code. It tries to re-localize in the map built so far and shows "attempting recovery" as user message. Limiting the number of key-frames usually leads to unrecoverable situations once the map is lost. The user can reset the map by pressing "r" while the PTAM window has the focus. Then a completely new initialization can be performed.
By pressing "a", the user resets the map while storing the last well estimated camera pose and scene depth (marked with "good" tracking quality). With this information, a newly initialized map will be re-aligned and scaled to the old one. This scale and pose propagation reduces pose-jumps upon map loss followed by a re-initialization. The propagation algorithm assumes the camera to not have moved between the map loss and the initialization of the first key-frame of the new map.
Automatic Map Reset and Re-Initialization
If "AutoInit" is enabled, the algorithm decides automatically if a map should be discarded and re-initialized. This can happen if one of the following is true:
PTAM marks the current tracking quality as "bad" (i.e. the ratio of found features versus total number of features possible to find is lower than "TrackingQualityLost")
The total number of well tracked features drops below "TrackingQualityFoundPixels"
If one of the above is true, then the algorithm discards the map, stores the last well tracked camera pose and scene depth, tries to initialize automatically a new map and aligns this new map with the old one. Because of this propagation, in the best case, one does not notice a map loss by only looking at the camera-pose trajecotry This automatic procedure corresponds to pressing "a" and immediately re-initialize a map in manual mode.
Testing the Automatic Map Handling
Point your camera at one end of your key-board at a height of about 10cm. Now, enable "AutoInit" and move the camera slowly along the key-board at a height of about 10cm. Arriving at the middle of the key-board, hit "a" (while keeping "AutoInit" enabled) and continue moving. You should see an automatic re-initialization. Furthermore, after successful re-initialization, the map grid should be at the same place as before.
If you arrive at the end of the key-board, hit "r" and move back to the beginning of the key-board. You should again see an automatic map re-initialization, but this time we omitted the propagation and the map grid should now be at a different place on the key-board than before.
Initialize a new map at a hight of about 10cm above your key-board. Make sure, the key-board is on a homogeneous background. Build the map across the key-board
Using the Framework
Note, that this framework is not robust to all wild motions one can perform with a hand-held camera. In particular you should follow the following suggestions:
- avoid rotations whenever possible. Feature triangulation works best with pure translation
- move slowly according to the frame-rate of your camera. For example 50% overlap between two consecutive camera frames indicates a far too fast motion given the camera frame-rate. Aim at 90% overlap and more.
- observe the motion blur in your images. If necessary reduce the shutter speed or add light sources
- avoid homogeneous and texture-free areas
Sufficient overlap between two consecutive camera images is crucial. Too little overlap has the following effect: each new camera frame is likely to trigger a new key-frame creation. This triggers the entire map handler to be active (including local bundle adjustment and new map feature additions) which is a computational costly procedure as compared to pure tracking. Furthermore, the large gaps between camera frames deteriorates the quality of the motion model, leading to large search windows and costly and inaccurate feature matching on self-similar structures.
Using Different Parameters
In this part, we discuss the effects of the parameters accessible in the dynamic reconfigure gui for ethzasl_ptam. Some have already been discussed previously ("AutoInit", "MaxStereoinitLoops", "TrackingQualityFoundPixels") or will lead too much into details and will not be discussed here.
Maximal Number of Features per Key-Frame: MaxPatchesPerFrame
To decrease the computational complexity of the framework, you can limit the maximum number of features extracted in a new key-frame. A value of 300 never caused any issues in our tests. Since FAST corners with image patches as descriptors are noisy, you should not decrease this value below 200. This way, the mean of all feature measurements cancels sufficiently any noise.
Key-Frame-to-Key-Frame Distance
In the original code, the minimal key-frame-to-key-frame distance is defined by "MaxKFDistWiggleMult" which is a factor applied to the distance of the first two key-frames. Even though we preserved this in ethzasl_ptam we found it useful to define the minimal key-frame-to-key-frame distance using pixel disparities.
By enabling "UseKFPixelDist", a new key-frame is created if the current camera pose is at least "AutoInitPixel" (un-rotated) away from the neares key-frame or if the criteria of the above "MaxKFDistWiggleMult" condition is fulfilled. We made good experience by setting "AutoInitPixel" to about 40 (between 20 and 50).
Small "AutoInitPixel" values: The small distance between them may lead to faster drifts because of inaccurate triangulations. Retaining more key-frames in the map ("MaxKF") mitigates this issue with local bundle adjustments. The benefit of often creating new key-frames is the distribution of workload for building a map: since the key-frames have a large overlap, the new key-frame only covers a small area where new features have to be triangulated. Using ethzasl_sensor_fusion to keep track of the visual drifts, in practice, we found it beneficial to use a small minimal key-frame-to-key-frame distance in order to avoid peaks in the required computation power upon key-frame creation.
Navigating on Self-Similar Texture
On high frequent self-similar textures, the built-in motion model of PTAM is not accurate enough to separate the features on the repetitive structure in the original image. PTAM works on different sub-sampled image levels (pyramidal levels) which essentially blurs the original image. This blurring acts like a low pass filter, only retaining lower frequent self-similarities. Thus, in higher pyramidal levels, the motion model can disambiguate these repetitive features.
For the above reason, we suggest to discard the original image for the map building process by enabling "NoLevelZeroMapPoints". This way, the map is more robust to self-similarities in the environment. Higher pyramidal map features are still tracked in the current original image in order to track changes in scene depth accurately.
For the same reason, we suggest to initialize the first two key-frames of the map using only features in the pyramidal level "InitLevel: 1" or higher. This can be adjusted in "PtamFixParams.yaml" as a fix parameter. The pyramidal level 0 is the original image.
Navigation in Flat Areas
PTAM has a built in outlier rejection criteria which is based on the standard deviation of the existing point-cloud. If "EpiDepthSearchMaxRange" is set to 1, only new triangulated features which lie in the 1-sigma bound of the existing point cloud are considered as valid. Of course, in a highly 3D outdoor area with trees, we suggest to put a large value for this parameter. Conversely, areas which are known to be flat, you may decrease this value for a better outlier rejection.
Adjusting the Map Quality Assessment
Generally, you should not change these settings. They are empirical values also used in the original PTAM and have proved to be OK in all our tests. "TrackingQualityGood" refers to the minimal ratio between found features and features possible to find above which the currently estimated camera pose is considered as well estimated. Below this value, a warning flag is rised and no key-frames will be added. The message "Tracking quality poor" will show up in the PTAM window. If the ratio drops below "TrackingQualityLost" about PTAM triggers a map loss.
Optimizing Computation Power
The easiest way to reduce computational complexity is to disable the use of level 0 features (disable "NoLevelZeroMapPoints") as discussed above and limiting the number of retained key-frames in the map by setting "MaxKF" for example to 10.
If you like to retain many key-frames in the map and still want to decrease computational complexity you ma change "BundleMethod" from LOCAL_GLOBAL to LOCAL. LOCAL bundle adjustment only takes the current and nearest 4 key-frames (including their associated features) into accoun during the optimization whereas GLOBAL optimizes all available key-frames and features. Only using LOCAL bundle adjustments significantly increases the visual drifts.
Selecting the Right Features
With "FASTMethod" you can select the feature type and method used to extract the features from the images:
- FAST9, FAST10: FAST corner extraction without non-maxima suppression
- FAST9_nonmax: FAST corner extraction with non-maxima suppression
- AGAST12d: AGAST feature extraction using a 12 pixel diamond pattern
- OAST16: AGAST feature extraction using a 16 pixel circular pattern
We did not find any situation where we absolutely suggest one particular method or feature type. In general you should avoid applying non-maxima suppression in order to extract sufficient candidates for the matching procedure. Also, AGAST corners tend to be more repetitive than FAST corners.
Remaining Parameters
The remaining parameters should be left as they are. In particular any modifications on the extraction threshold levels "Thres_lvl0" to "Thres_lvl3" will most likely not lead to the expected result. These empirical values have proven to be OK in all our experiments. Also, the option for extracting the features with an adaptive threshold "AdaptiveThrs" is highly experimental and was never used in our experiments.
The "Scale" parameter can be used to scale the entire map by a specific factor. Since the monocular framework is scale free and has a different scale with respect to the metric world after each initialization, this parameter might not be used at all.
The "MotionModelSource" can be used to include a motion model estimated by IMU readings. This is highly experimental and did not work properly in our tests. The value MM_CONSTANT models a motion in rotation and sets all translational motion to zero. This is the best choice for large overlab between two consecutive camera frames. MM_FULL_POSE also tries to model translational motion - this is very inaccurate.
Familiarize Yourself with the Framework
Prepare a texture- and light-rich area where you can try the effects of the different parameters and get feeling of the working of the algorithm. Only when you have a feeling about the framework's strengths and weaknesses, you may use it for autonomous navigation on your robot


