| |
Move your robot with the pilz_command_planner
Description: Setup your ROS with the pilz_industrial_motion packages and learn how to plan and move your robot along a path with the pilz_command_planner.Tutorial Level: BEGINNER
Next Tutorial: Program your robot with the Python API
Note: Please be aware that the Pilz command planner has moved to MoveIt and http://wiki.ros.org/pilz_robots and http://wiki.ros.org/pilz_industrial_motion are unmaintained. These tutorials are outdated and might or might not work dependent on the ROS distro. /!\This tutorial has been updated the 30th of March 2022 for ROS::noetic and the latest pilz package up-to-date (renamed
Contents
Introduction
In the previous tutorial, you learned how to model a virtual environment and how to drag the robot around there.
Building on this, this tutorial describes how to control the robot with repetitive commands. We use the Pilz motion planning pilz_command_planner, which can process the commands LIN, PTP and CIRC. So, in the end, you can move your robot to a specific position on a reproducible path. If there would be any collisions, the robot won't move.
Note: You can also control a real robot manipulator with the same procedure but we limit this tutorial to a virtual environment. In a later tutorial, we will show you how to do it with a real robot.
Prerequisites
You need to have the following prerequisites:
Completed the first Pilz robots tutorial Model your application with PRBT or downloaded the files from tutorial 1 GitHub/tutorial_1 including the prerequisites mentioned in tutorial 1
Note: The files at the end of this tutorials are also available for download from GitHub/pilz_tutorials. But we recommend to start with the end of tutorial 1 and create the files from this tutorial on your own.
Setup your simulation environment
The requirement for path-planning is to tell the program where the tool centre point is positioned at the robot model. To do so you have to add the tcp-joint beneath the other joints in the xacro file (pilz_tutorial/urdf/my_first_application.xacro). You can also find the whole xacro file at my_first_application.xacro:
Furthermore, we want to move the table a little bit, to model an environment where the robot can move the PNOZ from one side of the table to the other. Therefore we change the y-value to zero (line 23 of my_first_application.xacro).
23 <origin rpy="0 0 0" xyz="0 0 -0.03"/>
But if you have your own real environment for your robot, feel free to change the xacro file to match your specific requirements. We will also do so in one of the next tutorials when we try to run the real robot.
pilz_command_planner
Description
The pilz_command_planner is implemented as MoveIt planner similar to OMPL. But instead of sampling-based planners, the pilz_command_planner will move the robot along reproducible paths. That means the path will be planned without recognition of the current environment. If the robot would collide with anything, the path is marked as invalid and isn't executed. Therefore the planned path will be always the same, even if the environment will change. In the worst case, the pilz_command_planner won't plan generally instead of colliding with the robot. Look here for more info!
Install Pilz industrial motion package
The pilz_command_planner is available in the industrial motion package. Update your package list and install the pilz_industrial_motion meta-package in a terminal:
Show EOL distros:
sudo apt update
sudo apt install ros-$ROS_DISTRO-pilz-industrial-motion
This installs the pilz_extensions, pilz_msgs and pilz_trajectory_generation package, which includes the pilz_command_planner. To test the successful installation (and your ROS environment) you can run in the terminal:
roslaunch prbt_moveit_config moveit_planning_execution.launch pipeline:=pilz_command_planner
Note: If you use pilz_industrial_motion 0.4.5 or lower use pipeline:=command_planner
Note: If you use the latest branch (noetic-devel) use pipeline:=pilz_industrial_motion_planner
Then the robot should be shown in RViz without a table or any virtual environment. If this is the case, the packages have been installed correctly.

You can finish the test in the terminal with Ctrl + C, RViz should close again.
Startup with pilz_industrial_motion capabilities
Maybe you recognized the argument pipeline:=pilz_command_planner in the test command above. We have to add this to our launch file my_application.launch to use the pilz_command_planner.
You find this change in line 12:
Show EOL distros:
   1 <?xml version="1.0"?>
   2 <launch>
   3
   4   <arg name="sim" default="true" />
   5
   6   <!-- send urdf to param server -->
   7   <param name="robot_description" command="$(find xacro)/xacro --inorder '$(find pilz_tutorial)/urdf/my_first_application.xacro'"/>
   8
   9   <include file="$(find prbt_moveit_config)/launch/moveit_planning_execution.launch">
  10     <arg name="load_robot_description" value="false"/>
  11     <arg name="sim" value="$(arg sim)"/>
  12     <arg name="pipeline" value="pilz_command_planner"/><!-- Until version 0.4.5 'command_planner' -->
  13   </include>
  14
  15 </launch>
   1 <?xml version="1.0"?>
   2 <launch>
   3
   4   <arg name="sim" default="true" />
   5
   6   <!-- send urdf to param server -->
   7   <param name="robot_description" command="$(find xacro)/xacro '$(find pilz_tutorial)/urdf/my_first_application.xacro'"/>
   8
   9   <include file="$(find prbt_moveit_config)/launch/moveit_planning_execution.launch">
  10     <arg name="load_robot_description" value="false"/>
  11     <arg name="sim" value="$(arg sim)"/>
  12     <arg name="pipeline" value="pilz_command_planner"/><!-- Until version 0.4.5 'command_planner' -->
  13   </include>
  14
  15 </launch>
Note: If you use the latest branch (noetic-devel) use <arg name="pipeline" value="pilz_industrial_motion_planner"/>
Start the launch file (use the following command in the terminal):
roslaunch pilz_tutorial my_application.launch
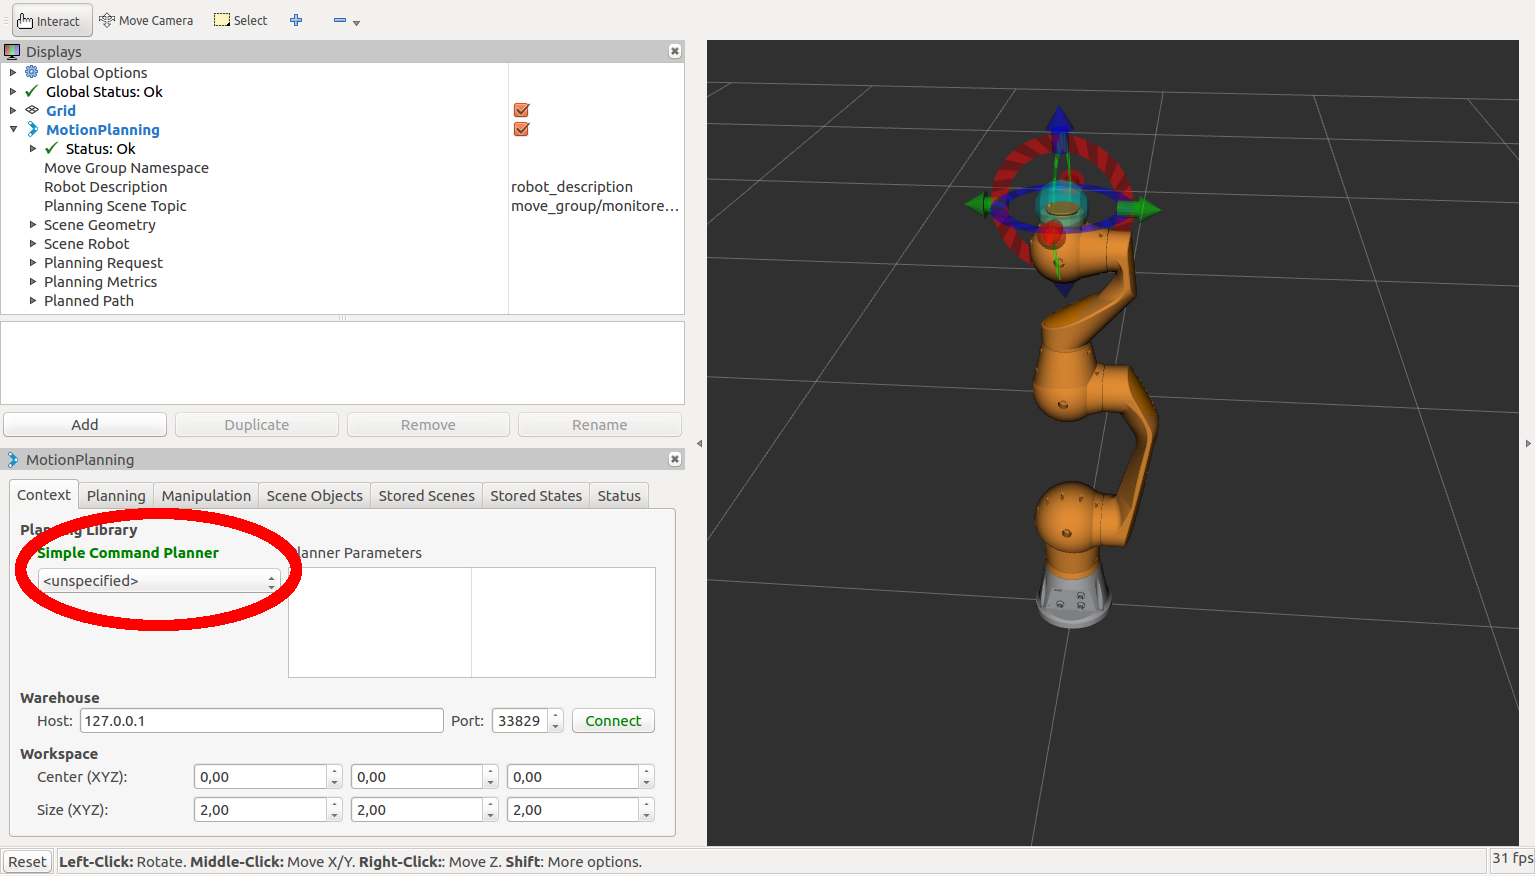
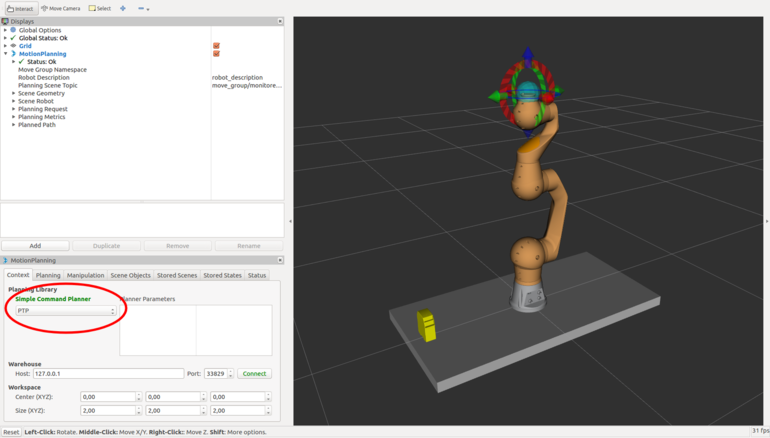
Now RViz shows the Planner Plugin "Simple Command Planner" and you can select the planner Plugin "PTP":

Note: Of course, you can use the other Plugins LIN and CIRC too, but pay attention to the following restrictions:
- With LIN you have to scale down your velocity and acceleration until the planner succeeds. If it is too high, the robot won't move. In this case, watch out for error messages in the terminal.
- You can not use the plugin CIRC in RViz because you'd need to define at least two points for a circle. But you could use it for example in your soon created Python script.
Move Robot using RViz MotionPlanningPlugin
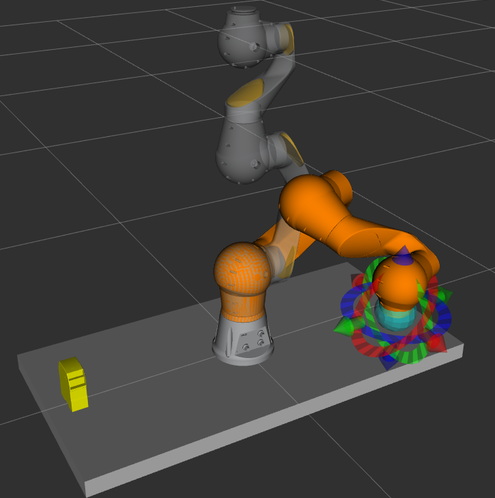
If you have selected the desired plugin (LIN or PTP) drag and drop the turquoise sphere to move the robot to an approximate goal location. You can change the tool orientation by moving the red, green or blue circles around the turquoise sphere.

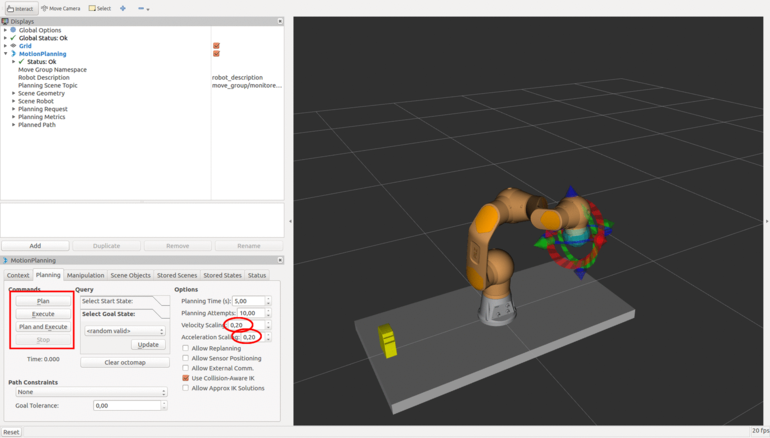
Furthermore, reduce the velocity and acceleration in the planning tab to 0.2 (see next picture). Especially with the real robot that gives you some time to react to unexpected movements or unseen obstacles.
Now you can start to plan the trajectory path and move your robot afterwards. Press the button "Plan" in the Planning tab at the bottom left in your window and the pilz_command_planner will plan the path for the robot and show it in RViz.
If the planned path is ok for you, press "Execute" to move your robot along the planned path. As a result the robot moves to that goal position still checking possible collisions with scene objects and rejecting trajectories that would result in collisions.

If you don't want to see the planned path first, you can directly press "Plan and Execute" to do both steps at once.
As an exercise move the robot to a valid starting position now, so that we can read the coordinates of its position in the next tutorial. For example, as shown in the picture.
Try around and use the other options as described in the ROS-I training section Motion Planning using RViz.
Conclusion
In this tutorial, you have learned, how to set up and control the robot with the pilz_command_planner. In the next tutorial, we will learn to use this planner in the Python API.


