| |
Program your robot with the Python API
Description: Develop a pick and place application and learn how to teach positions. You create a script which runs with the Python API and use the PTP and LIN commands.Tutorial Level: BEGINNER
Next Tutorial: Pick and Place application with the Pilz Manipulator Module PRBT and the Python API
Note: Please be aware that the Pilz command planner has moved to MoveIt and http://wiki.ros.org/pilz_robots and http://wiki.ros.org/pilz_industrial_motion are unmaintained. These tutorials are outdated and might or might not work dependent on the ROS distro.
Contents
Introduction
In the previous tutorial you learned how to move the robot in RViz with the Pilz command_planner. But in RViz you cannot program any sequences of points, let alone branches or loops, so in this tutorial, we will show you how to use the Python API.
To do so we will explain how to create a new Python file, and how to control the robot with a few lines of code. We will discuss the basic Python commands as well as the structure and execution of such a script file.
So, in the end, you have an application in your virtual environment in which the robot moves with industrial motion commands in a Python script.
You can also control a real robot manipulator with the same procedure but we limit this tutorial to a virtual environment. In a later tutorial, we will show you how to do it with a real robot.
Prerequisites
You need to have the following prerequisites:
Completed the second Pilz robots tutorial Move your robot with the Pilz command_planner or downloaded the files from tutorial 2 GitHub/pilz_tutorial_2 including the prerequisites from tutorial 2
Made you familiar with the visualization tool RViz to set up the tool as you need it RViz documentation
The files at the end of this tutorials are also available for download from GitHub/pilz_tutorial_3. But we recommend to start with the end of tutorial 2 and create the files from this tutorial on your own.
Python Setup
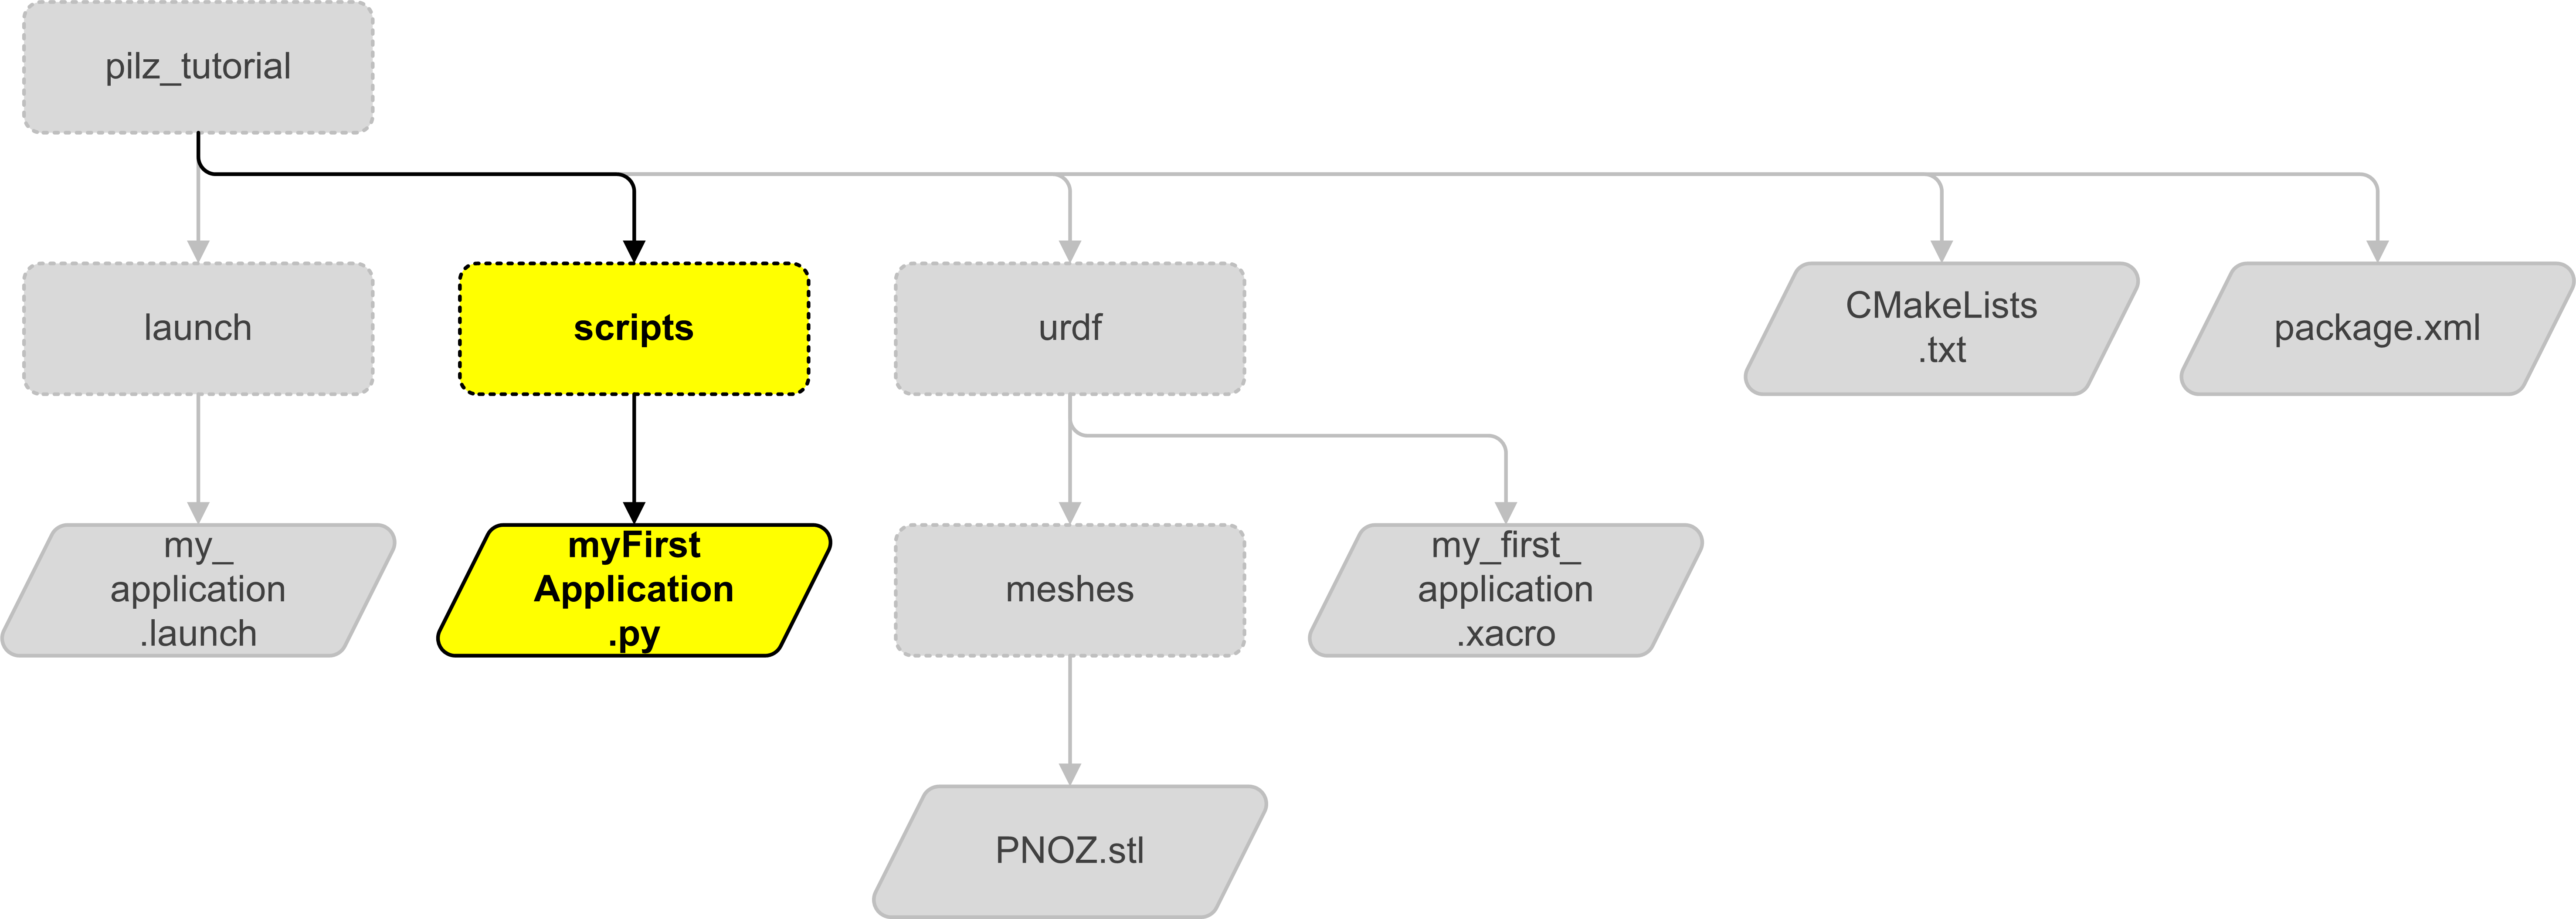
Create a new folder /scripts in your pilz_tutorial package besides the launch and urdf folder
Go into /scripts and create a new file named myFirstApplication.py

- Make it executable:
chmod +x myFirstApplication.py
For Beginners: Making a file executable is necessary to run it later using rosrun. To do so open your file explorer, right-click the file and open the settings window. In this window, you have to switch to the second tab "Permissions". Check the checkbox at "Make the program executable".
- Put the following lines in sequence into your file to build a working application: In the first line, we have to tell the program loader in which language we wrote the script and which interpreter it should use.
1 #!/usr/bin/env pythonThen import Pilz-specific and general libraries. These are needed to provide the desired functionality. For example, we use the module math to convert angles from degree to radian. For detailed information see the documentation from the respective library.
In the next line we define the pilz_robot_programming API version we want to use. The reason is, that in a newer API version the robot could move a little bit different to the older version. In that way if you don't change the API version in this line the robot will probably move the same, even after an update. Beneath the version definition, we define the default velocity of the robot. So if we want to slow down or speed up the robot we just change __ROBOT_VELOCITY__ in a single line to change the velocity in the whole program.
Next define the function start_program(). This function contains the actual program flow and we'll call it later from the python interpreter. We only print the current position of the robot r as a placeholder.
As last step we have to show the interpreter, which function is the start function and do some initialization. We do three things here:- Init a rosnode: Start a rosnode to set up communication with the ROS-system.
Instantiate the robot r: We create a new instance of the class robot and pass the API version in there.
- Call the start function
If you pasted all the above lines, you finished your first Python script. It doesn't move yet, so we will program the movement in the next steps. You can find this empty script as a template in emptyPythonTemplate.py. This will help you to create your own script step by step.
Run the program
Try out the program, and look at how the current pose will be shown in the terminal:
- Save the Python script
Make sure that the robot is running in RViz. Otherwise, you have to run the launch file from last tutorial Move your robot with the Pilz command_planner again:
roslaunch pilz_tutorial my_application.launch
- Now execute the Python code. Start a new terminal with Ctrl + Shift + T and type:
rosrun pilz_tutorial myFirstApplication.py
- This should start your program.
If there are any errors, or stops moving at a specific step, look at the Debugging section at the next tutorial to analyze the mistake. In that chapter, we will explain how to end, pause or debug the program.
Once your program works as desired, you could add it into the launch file. In this case, every time you run the launch file your script is executed. But we recommend starting the launch file separate from the Python script for now. The result is, that you can restart the python script faster and debug it easier.
RViz: Move Robot to a position
Now we have to teach some points where the robot should move. Because there is no real robot connected yet, we use RViz.
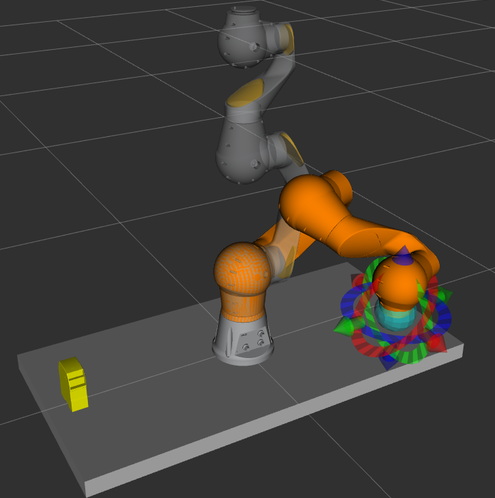
Now move the robot with the turquoise tracking ball in a valid position (Move the orange robot to a position similar to the picture below and press Plan and Execute). We will use this position in the next step to read the coordinates from the robot and save them in our Python script.

Run the python script again and watch out for the changed robot position.
Reading current robot state
To give a position for a robot you can use two schemes: Cartesian coordinates and joint values.
Cartesian coordinates
In our first program above we already printed the cartesian coordinates. As you could see the pose of the robot is split in position and orientation.
The position describes the position in the 3D space with X, Y, Z in meters. For example: position = Point(-0.5, 0.1, 0.2)
The orientation describes the direction of the TCP with quaternions: x, y, z, w. For example: orientation = Quaternion(-0.7071, 0, 0.7071, 0)
Because quaternion values are hard to imagine (They are a more complicated, mathematically unambiguous indication of orientation in space and you do not need to understand them more closely), the computer is able to calculate them for you. In the Python API you can do it with:
orientation = from_euler(a, b, c)
Where a, b, c are polar coordinates in radian. If you work in degrees you can convert the degree values again. For example:
orientation = from_euler(0, math.radians(-135), math.radians(90))
To read the current cartesian values from the robot there are different ways:
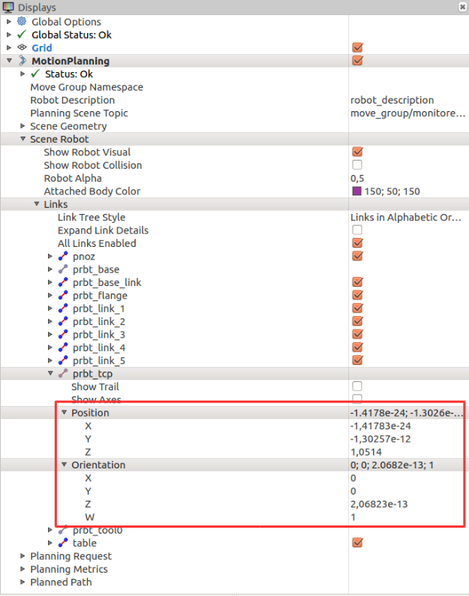
RViz - You can read the cartesian coordinates directly in RViz, with the disadvantage that you can not copy the coordinates. Also, be aware that the orientation will be presented in quaternions. To do this you have to open in the top left corner the following: MotionPlanning → Scene Robot → Links → prbt_tcp → Position / Orientation

Terminal - To get the current position from tf in a terminal, go to a new terminal and run
rosrun tf tf_echo /prbt_base_link /prbt_tcp
Once the desired values are presented in the terminal you can press Ctrl + C to stop the position updates.Python - To get the coordinates while running a program, run this command in your Python script or in a Python console like iPython:
print(robot.get_current_pose())
Add your position into start_program()
cartesian_goal=Pose(position=Point(...), orientation=Quaternion(...))
Joint-Values
This is the position of the manipulator given in radian angles of the robot joints. Therefore we get a unique position of the robotarm. The joint position is given in six angles, for example: goal = [-0.2, 0, 0, 0, 0, 0]
To read the joint values, there are also different ways:
Terminal - Open a new terminal and type:
rostopic echo /joint_states
- Now all the joint states are presented in the terminal. Press Ctrl + C to stop the updates.
Python - To get the coordinates while running a program, run this command in your Python script or in a Python console like iPython:
print(r.get_current_joint_states())
Add your joint position into start_program()
joint_goal=[...]
Teaching the robot goals
To teach your robot now you have to move it with a panel, with commands, with RViz or with some other possibilities to the right position. Then you can read out the coordinates in different ways for our Python script. We have presented you some options, you can choose on your own which one is the best for you.
First Move
Now that we defined the positions of the robot we want to move our robot there with Python. Therefore add in start_program(): the following command:
r.move(Ptp(goal=#insert your position#, vel_scale=__ROBOT_VELOCITY__))
to tell the robot that he should move there. The function start_program(): should now look like for example this one:
   1 # main program
   2 def start_program():
   3
   4     # define the positions:
   5     joint_goal = ... # Use joint values for the first position
   6     cartesian_goal = ... # Use cartesian coordinates for another position
   7
   8     # Move to start point with joint values to avoid random trajectory
   9     r.move(Ptp(goal=joint_goal, vel_scale=__ROBOT_VELOCITY__))
  10
  11     #Move to the second position
  12     r.move(Ptp(goal=cartesian_goal, vel_scale=__ROBOT_VELOCITY__))
It is always recommended that your first move command is in joint values. This will avoid random trajectories from multiple kinematics solutions for the same pose.
Run the Python program now and watch the robot moving. Maybe you have to move the robot away manually or restart the launch file first. If you are an advanced user you can also program more positions to your script, maybe try out linear or circular movements?.
Nice to know: Tweak visualisation
If you want to show a simulation to your colleagues, you probably want to deactivate the annoying orange planning robot. To do so you have to change some display settings. This won't affect any functions or technical settings of the program.
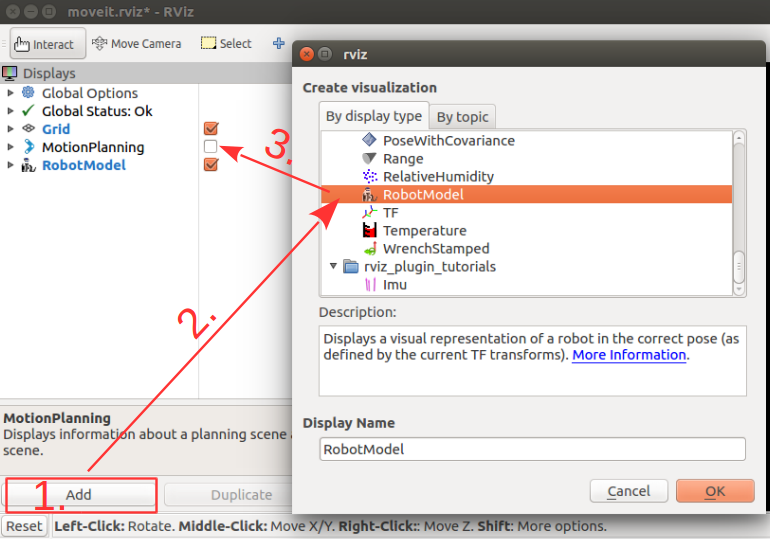
Adjust the following settings (see picture):
Press Add to insert a new module
Select RobotModel
Uncheck MotionPlanning plugin to hide the orange robot goal

Conclusion
In this tutorial, you have learned, how to set up a python script. You know how to read the current position of the robot in different coordinate systems. Finally, you learned to move the robot to a fixed position with the Python API.
Now go on with the next tutorial to program a pick and place application.


