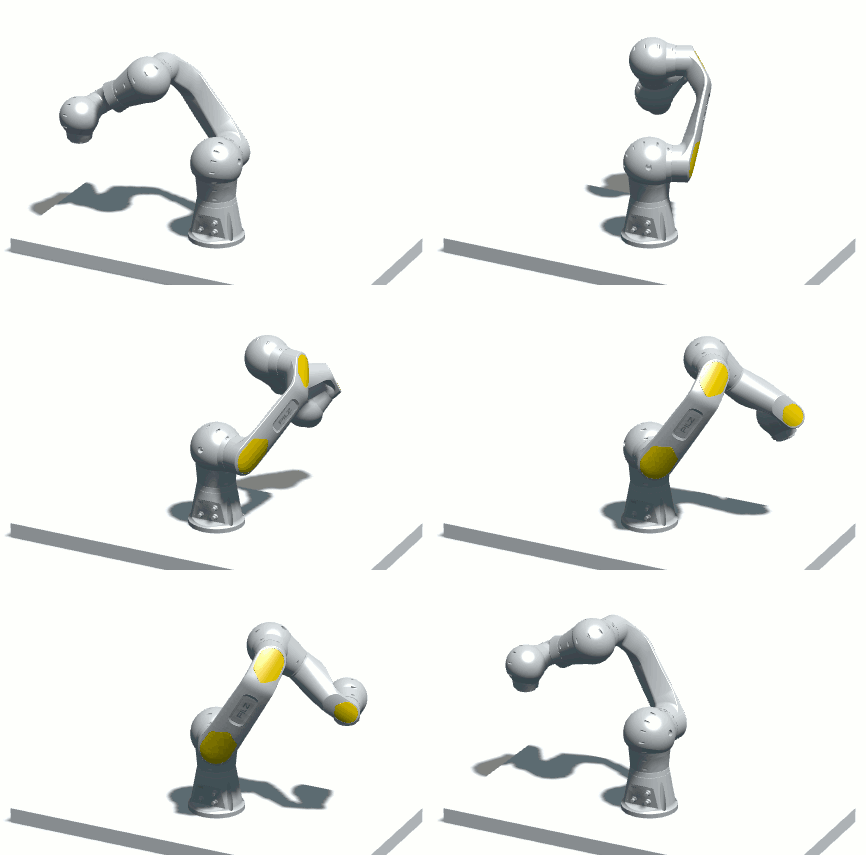
| |
Pick and Place application with the Pilz Manipulator Module PRBT and the Python API
Description: Implement a pick and place application and learn to program a simple application with the Python API.Tutorial Level: BEGINNER
Note: Please be aware that the Pilz command planner has moved to MoveIt and http://wiki.ros.org/pilz_robots and http://wiki.ros.org/pilz_industrial_motion are unmaintained. These tutorials are outdated and might or might not work dependent on the ROS distro.
Contents
Introduction
In the previous tutorial you learned how to read robot positions and wrote your first python script to move the robot.
To implement an application you stick multiple such commands together in branches or loops. This tutorial guides you through this process and shows how to move the robot in the tcp coordinate frame and to structure your script file.

So, in the end, you have an application in your virtual environment in which the robot moves in a continuous cycle between different positions in a Python script.
You can also control a real robot manipulator with the same procedure, but we limit this tutorial to a virtual environment. In a later tutorial, we will show you how to do it with a real robot.
Prerequisites
You need to have the following prerequisites:
Completed the previous Pilz robots tutorial Program your robot with the Python API or downloaded the files from tutorial 3 GitHub/pilz_tutorial_3 including the prerequisites from tutorial 3
The files at the end of this tutorial are also available for download from GitHub/pilz_tutorial_4. But we recommend to start with the end of tutorial 3 and create the files from this tutorial on your own.
Run the program again
To continue from last tutorial Program your robot with the Python API launch the application again:
roslaunch pilz_tutorial my_application.launch
Program the application
Description
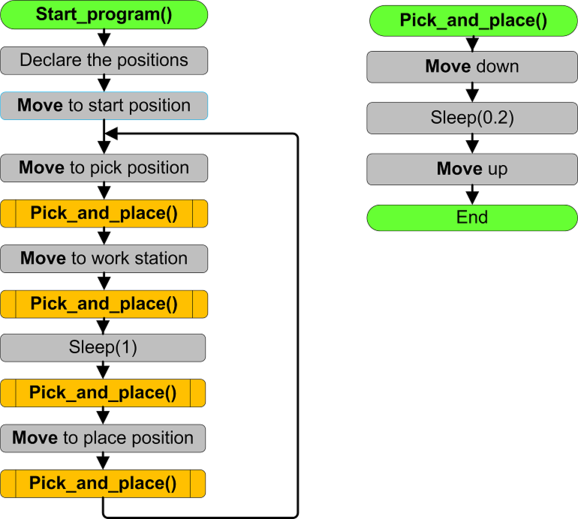
As an example, we now continue to program our simple pick and place trajectory. The robot shall move to one side, pick up an imaginary part and then moves to another point. There it inserts the imaginary workpiece into an imaginary machine, waits, and takes it out again. It then moves to the place point and makes the place movement. These functions are called sequentially in an endless loop. So the program flow will look like the following.

First, we will program the pick_and_place function based on the previous Python file. Then we can write our main positions in the start sequence. Afterwards, we simply write the program flow into an endless loop. You can try out your program after every step, to see if your code works and fine-tune the positions.
Reminder: To start the program use
rosrun pilz_tutorial myFirstApplication.py
while the launchfile is running.
Pick_and_place function
Now you have to modify and implement the move-commands in a pick_and_place() function. Therefore, you implement a function in which the robot moves relative to the tcp down, and moves up again. So in the main program, you only have to call this function to do the pick and place movement.
First of all implement the function pick_and_place() in your program. There we add the move commands. Currently, we don't have a gripper mounted at the arm, so instead of opening and closing the gripper we will sleep for 0.2 seconds (and the PNOZ modelled in the application won't move):
  51 def pick_and_place():
  52     """pick and place function"""
  53
  54     # a static velocity of 0.2 is used
  55     # the position is given relative to the TCP.
  56     r.move(Lin(goal=Pose(position=Point(0, 0, 0.1)), reference_frame="prbt_tcp", vel_scale=0.2))
  57     rospy.loginfo("Open/Close the gripper") # log
  58     rospy.sleep(0.2)    # pick or Place the PNOZ (close or open the gripper)
  59     r.move(Lin(goal=Pose(position=Point(0, 0, -0.1)), reference_frame="prbt_tcp", vel_scale=0.2))
The robot moves 0.1 (10 cm) down, and then 0.1 up in the coordinate system of the tcp prbt_tcp. In whatever position the robot is standing, the pick_and_place() function always moves in direction of the tcp.
If you want to create your own reference frame, you can look the commands for it up in the pilz_robot_programming’s documentation. You can also move absolute, of course, but for pick-and-place prbt_tcp is the correct coordinate system.
To try your program just call the function in the main function start_program(). Make sure that the positions of the robot allows a down and up movement without a collision.
Start sequence
You did all preparations to develop the remaining program now. So teach the robot now as learned in the previous tutorial.
Replace the content of the start_program function with the following:
Define three valid pose variables. Orient at the interactive video at github. Use variables with the names below to design your program readable and understandable.
- Teach also a start position (not the all-zeros-position) in joint values.
- Move the robot to the taught start position (add a move command to the function).
If you need help for the commands, visit pilz_robot_programming’s documentation.
   1 # main program
   2 def start_program():
   3
   4     rospy.loginfo("Program started") # log
   5
   6     # important positions
   7     start_pos = [1.49, -0.54, 1.09, 0.05, 0.91,-1.67]   # joint values
   8
   9     pick_pose= # fill it in
  10     work_station_pose = # fill it in
  11     place_pose = # fill it in
  12
  13     r.move(Ptp(goal=start_pos, vel_scale=__ROBOT_VELOCITY__))
Now we can start the main program sequence.
Endless loop
The main program runs in an endless loop moving the robot infinitely.
Therefore, we simply alternate between moving to a point and then call the pick_and_place() function we developed. The result should look similar to the following code:
  27     while(True):
  28         # do infinite loop
  29
  30         # pick the PNOZ
  31         rospy.loginfo("Move to pick position") # log
  32         r.move(Ptp(goal=pick_pose, vel_scale = __ROBOT_VELOCITY__, relative=False))
  33         rospy.loginfo("Pick movement") # log
  34         pick_and_place()
  35
  36         # put the PNOZ in a "machine"
  37         rospy.loginfo("Move to virtual machine") # log
  38         r.move(Ptp(goal=work_station_pose,vel_scale = __ROBOT_VELOCITY__, relative=False))
  39         rospy.loginfo("Place PNOZ in machine") # log
  40         pick_and_place()
  41         rospy.sleep(1)      # Sleeps for 1 sec (wait until work is finished)
  42         rospy.loginfo("Pick PNOZ from machine") # log
  43         pick_and_place()
  44
  45         # place the PNOZ
  46         rospy.loginfo("Move to place position") # log
  47         r.move(Ptp(goal=place_pose, vel_scale = __ROBOT_VELOCITY__, relative=False))
  48         rospy.loginfo("Place movement") # log
  49         pick_and_place()
If we now run the program, the robot should move as specified from one point to another. At each point, it should do an up-down-movement to pick the PNOZ. This all will be done in an endless loop so the program won't stop if you don't stop it.
Final program
You can find the final Python script at GitHub/myFirstApplication.py for reference.
Runtime tools and debugging
At last, we present you some helpful tips and tricks. They are not necessary for this tutorial, but if you have any issues you can read it through. This might help you to solve common bugs or general mistakes. This chapter is sectioned in runtime tools, debugging and common mistake description.
Runtime tools
End the program: Simply press Ctrl + C in the terminal in which you started the program, and wait until the program ends. This also stops the robot movement. You alternatively could close all the windows, this will stop your application too.
Pause the program: Open up a new terminal and call
rosservice call /pause_movement
- Interrupts your program immediately at its current position. To continue the program at this point again, follow the next step: Resume the program
Resume the program: Open up a new terminal and call
rosservice call /resume_movement
- Continues your paused program immediately at its current position.
Debugging
If any errors are occurring, have a look at the terminals and read the error messages. If you started the robot (launch file) and your python script (*.py) in separate terminals, you can debug your program easier. The reason is that the terminal where you started your script shows all the Python errors. Furthermore, it also shows in which line of your program the error occurs, to simplify the debugging process.
On the other hand, the terminal in which you started the robot shows all the errors from the robot. For example, if you collide with the wall or have a cable rupture.
But errors if for example the kinematic solution can not be found will be shown in both terminals. So if you want to find the reason why your robot stopped or did unexpected things, you better check both terminals for errors.
You can write a console log, too if you want to know until which point your program is executed. Therefore use for different priorities:
Common mistakes and bugs
- If the program doesn't work as expected: Did you save all the files?
- If the program couldn't be found: Did you made the file executable? Is the path correct?
- If the robot doesn't want to move: Are your coordinates implausible?
- If the program only drops errors: Is your syntax correct?
Conclusion
In this tutorial, you have learned, how to control the robot with the Python API. Therefore, you can now write your own program moving the Pilz Manipulator Module PRBT. If you want to learn more commands with the Python API, you should check out the pilz_robot_programming’s documentation.


