| Note: This tutorial assumes that you have completed the previous tutorials: How to set up a Pilz PSENscan laser scanner with Ethernet. |
| |
How to set up ROS to communicate with the scanner
Description: You learn how to set up the PILZ laser scanner with ROS and show the result in Rviz.Keywords: PSENscan, psen_scan, psen_scan_v2
Tutorial Level: BEGINNER
Next Tutorial: Launching multiple scanners
Contents
WARNING
THE PILZ SOFTWARE IS PROVIDED AS-IS AND WITH NO WARRANTY (FOR MORE DETAILS SEE LICENSE).
Introduction
This tutorial teaches you to set up and launch the ROS driver for the PSENscan laser scanner. This includes creating a new ROS package to read and display laser scanner data.
Prerequisites
Show EOL distros:
In order to complete this tutorial, you need the following:
A workstation or a Virtual machine with Ubuntu 18.04 LTS and ROS melodic installed.
A workstation or a Virtual machine with Ubuntu 20.04 LTS and ROS noetic installed.
Completed the first ROS tutorial create a catkin workspace.
- An operable catkin workspace.
- An installed psen_scan_v2 package.
sudo apt update
sudo apt install ros-$ROS_DISTRO-psen-scan-v2
Create a ROS package with the required files
Install the psen_scan_v2 package as in the previous tutorials described.
In your workspace, create a new package:
cd ~/catkin_ws/src
catkin_create_pkg --rosdistro $ROS_DISTRO psen_scan_v2_tutorials psen_scan_v2
cd psen_scan_v2_tutorials
mkdir config
gedit config/scanner_config.yaml
Copy the following content and paste it into gedit. Do not forget to save the new created file.
sensor_ip: "192.168.0.10"    # Insert the IP of the laser scanner here.
## The following parameters are optional:
tf_prefix: laser_1           # This name is prefixed to the TF, where the scanner is mounted
angle_start: deg(-137.4)     # The angle of the first measurement
angle_end: deg(137.4)        # The angle of the last measurement
intensities: false           # Receive intensity values
resolution: deg(0.1)         # Scan resolution
host_ip: "auto"              # Change the IP to the IP of your PC.
host_udp_port_control: 55115 # The port on your pc used to start/stop the scanner
host_udp_port_data: 55116    # The port on your pc where the data is received
fragmented_scans: false      # Receive fragmented scans a.s.a.p. instead of full scan
Like in the last step create the file psen_scan_tutorials/launch/psen_scan_v2.launch with the following content by using gedit:
mkdir launch
gedit launch/psen_scan_v2.launch
<launch>
  <include file="$(find psen_scan_v2)/launch/bringup.launch" />
  <rosparam ns="laser_1" command="load" file="$(find psen_scan_v2_tutorials)/config/scanner_config.yaml" />

  <param name="robot_description"
         command="$(find xacro)/xacro '$(find psen_scan_v2_tutorials)/urdf/example.urdf.xacro'" />
  <node name="robot_state_publisher" pkg="robot_state_publisher" type="robot_state_publisher" />

  <node name="$(anon rviz)" type="rviz" pkg="rviz"
        args="-d $(find psen_scan_v2)/config/config.rviz" />
</launch>
The code explained:
  <include file="$(find psen_scan_v2)/launch/bringup.launch" />
  <rosparam ns="laser_1" command="load" file="$(find psen_scan_v2_tutorials)/config/scanner_config.yaml" />
This starts the psen_scan_v2_node and loads the newly created config file.
  <param name="robot_description"
         command="$(find xacro)/xacro '$(find psen_scan_v2_tutorials)/urdf/example.urdf.xacro'" />
  <node name="robot_state_publisher" pkg="robot_state_publisher" type="robot_state_publisher" />

  <node name="$(anon rviz)" type="rviz" pkg="rviz"
        args="-d $(find psen_scan_v2)/config/config.rviz" />
</launch>
This loads the robot model from an urdf.xacro-file. It contains geometric information of the scanner and TF frames.
  <node name="$(anon rviz)" type="rviz" pkg="rviz"
        args="-d $(find psen_scan_v2)/config/config.rviz" />
This starts rviz with a predefined configuration.
You need to additionally create the aforementioned urdf.xacro-file.
mkdir urdf
gedit urdf/example.urdf.xacro
This will later contain a description of your whole robot. For now it only contains the one laser scanner. Which is created from the xacro:psen_scan macro after this was included:
<robot xmlns:xacro="http://ros.org/wiki/xacro" name="psen_scan">
   <xacro:include filename="$(find psen_scan_v2)/urdf/psen_scan.urdf.xacro" />
   <xacro:psen_scan prefix="laser_1" />
</robot>
Required parameters
To launch the ROS driver, only one parameter is mandatory:
sensor_ip The IP of the laser scanner in the network. You have configured this in the first tutorial using the configuration tool.
For an overview of all parameters, please visit https://github.com/PilzDE/psen_scan_v2/blob/main/README.md#usage
Start the PSENscan application
Now you can launch your newly created launchfile with the following command:
roslaunch psen_scan_v2_tutorials psen_scan_v2.launch
- Make sure your PC operates in the same IP subnet like the laser scanner.
- Make sure to set the IP addresses according the parameters above. The previous tutorial showed how these could be altered.
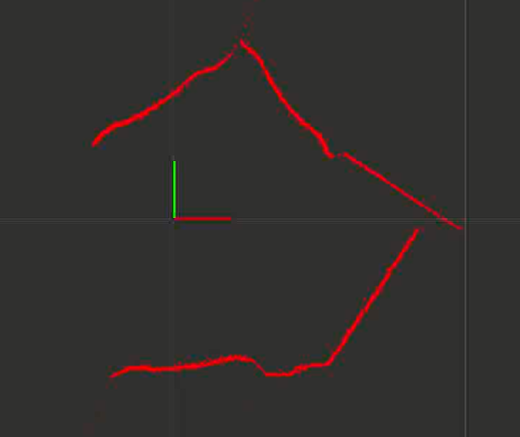
This should launch rviz and look something like this:

The red lines show the detected surroundings of the scanner.
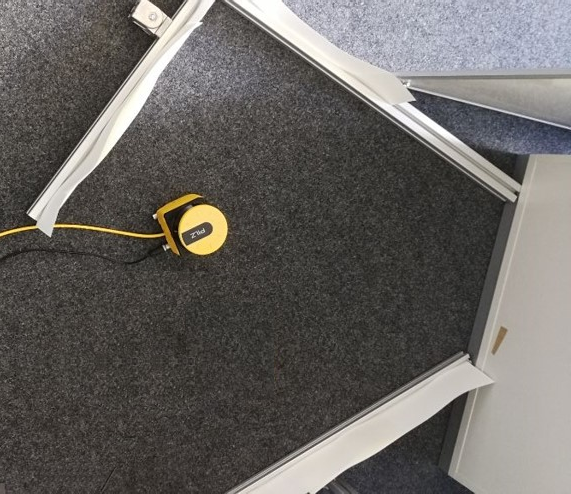
For comparison in reality the scanner was placed in an arrangement more or less like this:

Whatever your setup is, it should be comparable with the actual environment of the scanner. The red x-axis in the rviz window can be imagined as pointing out of the scanner in the direction of the display in its front.
The psen_scan_v2 package is not available for ROS $ROS_DISTRO.
Conclusion
In this tutorial you created a basis for an application using the PSENscan laser scanner together with ROS. In the next tutorial you learn how to connect to multiple scanners.


