| Note: This tutorial assumes that you have completed the previous tutorials: Launch RSM Simulation. |
| |
GUI Introduction
Description: How to use the GUI provided by the Robot Statemachine in RViz and rqt.Tutorial Level: BEGINNER
Next Tutorial: RSM Robot Setup
Contents
Activate GUI Panel
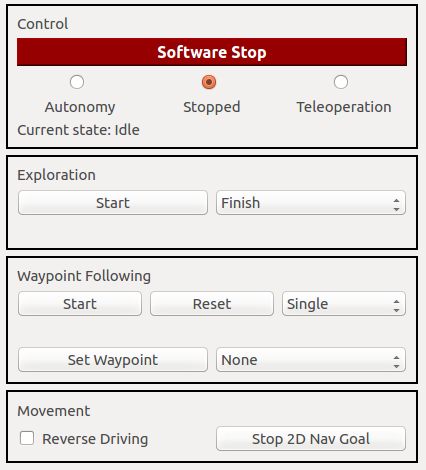
The RSM can be operated through a GUI that enables the use of all its core functionalities. The GUI panel is depicted below and can be integrated into RViz or rqt. To the former by adding a new panel through Panels->Add New Panel and then choose RSMControlPanel under rsm_rviz_plugins. To the latter by adding a new plugin through Plugins->RSM Control. The GUI always shows which state is currently active and provides the options explained below.

GUI Controls
The GUI offers control over the class handling the command velocities forwarded to the motor controller interface. This includes the software emergency stop as well as choosing autonomy, teleoperation or stopped. When the software emergency stop is active, the other choices are disabled and the command velocity is set to stopped until the software emergency stop is released again.
The exploration can be started and stopped by using the respective buttons in the GUI. Next to the button is a drop-down box where the exploration mode can be set. This mode can either be Finish or Interrupt where the former lets the robot reach each goal before transitioning to Mapping State while the latter starts the transition as soon as the current goal is no longer listed as an exploration goal. The mode can only be set before starting exploration and not while it is running.
Waypoint following can also be started and stopped through the respective buttons. Furthermore, when waypoint following is stopped, there is the option to reset the current progress and restore all waypoints to their initial values. It is possible to set the waypoint following mode using the drop-down box next to the formerly mentioned buttons. The waypoint following mode can be one of the following three and only changed when stopped:
- single
- roundtrip
- patrol
The single mode lets the robot start from the first waypoint and then to all consecutive ones. Upon reaching the last one it stops. In roundtrip mode, after reaching the last waypoint all waypoints are reset and it starts anew from waypoint one. This is repeated until manually stopped. Patrol mode works in a similar fashion. After reaching the last waypoint all waypoints are reset and it starts again in reverse order. The first and last waypoints are only targeted once and their attached routines executed only once as well. Also, it can only be stopped manually.
The GUI also offers the possibility to set a waypoint at the robot's current location and with the robot's current orientation. These waypoint's routines can be set from the drop-down box next to the button setting the actual waypoint.
Furthermore, a checkbox enables setting the reverse mode manually. When the box is checked the robot moves in reverse. A button next to the checkbox enables stopping the navigation when a simple navigation goal was set through RViz.
Waypoints
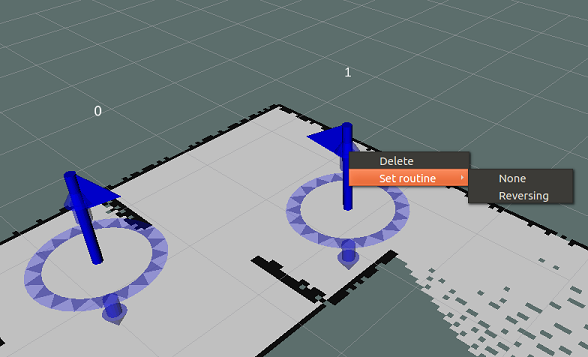
When using RViz, waypoints can be set by utilizing the Plant Waypoint Tool (Hotkey: "w"). It can be added through the plus button (Add a new tool) in the toolbar and then choosing PlantWaypointTool under rsm_rviz_plugins. This enables putting waypoints on the ground plane, determining their x- and y-coordinates, and orientate them in yaw by dragging the mouse in the desired direction. They are depicted as interactive_markers with a flagpole mesh and the number of the waypoint above. Accordingly, an interactive marker display needs to be added with the topic name waypoint_markers/update to show them. The color of the marker corresponds to the waypoint's status: blue is the default color, green means the waypoint has been visited and red that it is unreachable.
The displayed markers are interactive and can be seen below. Using the circle around them, they can be dragged in the desired direction, changing their x-y-position and yaw-orientation. The arrows above and below can be used to drag them in the respective direction, altering its z-coordinate. Clicking on the waypoint marker opens a menu that offers the options to set the routine to be executed when reaching the waypoint and to delete the waypoint. The routine can also be set to none.

Note: When the robot is moving towards a waypoint, the specific waypoint can be manipulated but these changes will not be forwarded to the current navigation. So, changes made after the robot started to move towards the waypoint, will not be regarded until the waypoint and its possible routine was finished.
RViz Configuration for RSM
The RSM additions package features some exemplary RViz configuration files for the respective launch files that automatically include the GUI and Plant Waypoint Tool as well as adding the waypoint interactive marker topic to the display.
Note: When saving the RViz configuration, the Plant Waypoint Tool sometimes does not get included in the configuration and has to be added each time RViz is started manually. To fix this, you need to add - Class: rsm::PlantWaypointTool to your RViz configuration file by hand. It has to be appended under Visualization Manager: Tools as can be seen in the snippet below.
...
Visualization Manager:
  Class: ""
  Displays:
  ...
  Name: root
  Tools:
    ...
    - Class: rsm::PlantWaypointTool
  Value: true
  ...
Embed RViz Navigation Goal
If the 2D Nav Goal Tool (Hotkey: "g") from RViz should be used, the respective topic from RViz needs to be remapped, so that it works with the RSM. The following remap needs to be added to the RViz launch, otherwise the 2D Nav Goal Tool cannot be used:
<node if="$(arg rviz)" pkg="rviz" type="rviz" name="rviz" args="-d ...">
        <remap from="/move_base_simple/goal" to="/rsm/simpleGoal" />
</node>Note: Replace the dots with the path to your configuration file.


