| Note: This tutorial assumes you are familiar with the xml markup language. |
| |
Create your own urdf file
Description: In this tutorial you start creating your own urdf robot description file.Tutorial Level: BEGINNER
Next Tutorial: Now that you have a urdf file, you can parse your urdf file, start using the kdl parser, or use the robot state publisher on your own robot
Create the tree structure
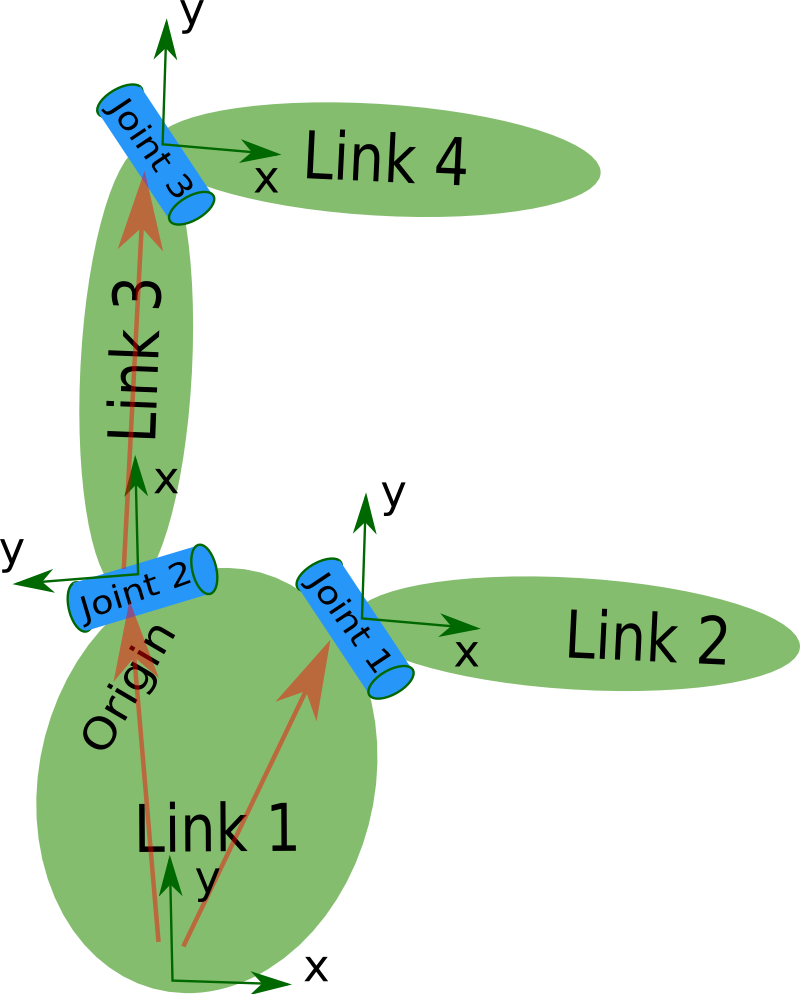
In this tutorial we'll create the URDF description of the "robot" shown in the image below.

The robot in the image is a tree structure. Let's start very simple, and create a description of that tree structure, without worrying about the dimensions etc. Fire up your favorite text editor, and create a file called my_robot.urdf:
   1 <robot name="test_robot">
   2   <link name="link1" />
   3   <link name="link2" />
   4   <link name="link3" />
   5   <link name="link4" />
   6
   7   <joint name="joint1" type="continuous">
   8     <parent link="link1"/>
   9     <child link="link2"/>
  10   </joint>
  11
  12   <joint name="joint2" type="continuous">
  13     <parent link="link1"/>
  14     <child link="link3"/>
  15   </joint>
  16
  17   <joint name="joint3" type="continuous">
  18     <parent link="link3"/>
  19     <child link="link4"/>
  20   </joint>
  21 </robot>
So, just creating the structure is very simple! Now let's see if we can get this urdf file parsed. There is a simple command line tool that will parse a urdf file for you, and tell you if the syntax is correct:1
You might need to install, urdfdom as an upstream, ROS independent package:
$ sudo apt-get install liburdfdom-tools
Now run the check command:
$ rosmake urdfdom_model              # only needed if installed from source
$ check_urdf my_robot.urdf                    # hydro and later
$
$ # for older ROS distros, use the following commands
$ (see footnote at bottom of page for why above commands are different)
$ rosrun urdfdom check_urdf my_robot.urdf     # groovy
$ rosrun urdf_parser check_urdf my_robot.urdf # electric and fuerte
$ rosrun urdf check_urdf my_robot.urdf        # diamondback and earlier
2If everything works correctly, the output should look like this:
robot name is: test_robot
---------- Successfully Parsed XML ---------------
root Link: link1 has 2 child(ren)
    child(1):  link2
    child(2):  link3
        child(1):  link4
Add the dimensions
So now that we have the basic tree structure, let's add the appropriate dimensions. As you notice in the robot image, the reference frame of each link (in green) is located at the bottom of the link, and is identical to the reference frame of the joint. So, to add dimensions to our tree, all we have to specify is the offset from a link to the joint(s) of its children. To accomplish this, we will add the field <origin> to each of the joints.
Let's look at the second joint. Joint2 is offset in the Y-direction from link1, a little offset in the negative X-direction from link1, and it is rotated 90 degrees around the Z-axis. So, we need to add the following <origin> element:
1 <origin xyz="-2 5 0" rpy="0 0 1.57" />
If you repeat this for all the elements our URDF will look like this:
   1 <robot name="test_robot">
   2   <link name="link1" />
   3   <link name="link2" />
   4   <link name="link3" />
   5   <link name="link4" />
   6
   7
   8   <joint name="joint1" type="continuous">
   9     <parent link="link1"/>
  10     <child link="link2"/>
  11     <origin xyz="5 3 0" rpy="0 0 0" />
  12   </joint>
  13
  14   <joint name="joint2" type="continuous">
  15     <parent link="link1"/>
  16     <child link="link3"/>
  17     <origin xyz="-2 5 0" rpy="0 0 1.57" />
  18   </joint>
  19
  20   <joint name="joint3" type="continuous">
  21     <parent link="link3"/>
  22     <child link="link4"/>
  23     <origin xyz="5 0 0" rpy="0 0 -1.57" />
  24   </joint>
  25 </robot>
Update your file my_robot.urdf and run it through the parser:3
$ check_urdf my_robot.urdf
If it all looks good, you can move to the next step.
Completing the Kinematics
What we didn't specify yet is around which axis the joints rotate. Once we add that, we actually have a full kinematic model of this robot! All we need to do is add the <axis> element to each joint. The axis specifies the rotational axis in the local frame.
So, if you look at joint2, you see it rotates around the positive Y-axis. So, simple add the following xml to the joint element:
1 <axis xyz="0 1 0" />
Similarly, joint1 is rotating around the following axis:
1 <axis xyz="-0.707 0.707 0" />
Note that it is a good idea to normalize the axis.
If we add this to all the joints of the robot, our URDF looks like this:
   1 <robot name="test_robot">
   2   <link name="link1" />
   3   <link name="link2" />
   4   <link name="link3" />
   5   <link name="link4" />
   6
   7   <joint name="joint1" type="continuous">
   8     <parent link="link1"/>
   9     <child link="link2"/>
  10     <origin xyz="5 3 0" rpy="0 0 0" />
  11     <axis xyz="-0.9 0.15 0" />
  12   </joint>
  13
  14   <joint name="joint2" type="continuous">
  15     <parent link="link1"/>
  16     <child link="link3"/>
  17     <origin xyz="-2 5 0" rpy="0 0 1.57" />
  18     <axis xyz="-0.707 0.707 0" />
  19   </joint>
  20
  21   <joint name="joint3" type="continuous">
  22     <parent link="link3"/>
  23     <child link="link4"/>
  24     <origin xyz="5 0 0" rpy="0 0 -1.57" />
  25     <axis xyz="0.707 -0.707 0" />
  26   </joint>
  27 </robot>
Update your file my_robot.urdf and run it through the parser:4
$ check_urdf my_robot.urdf
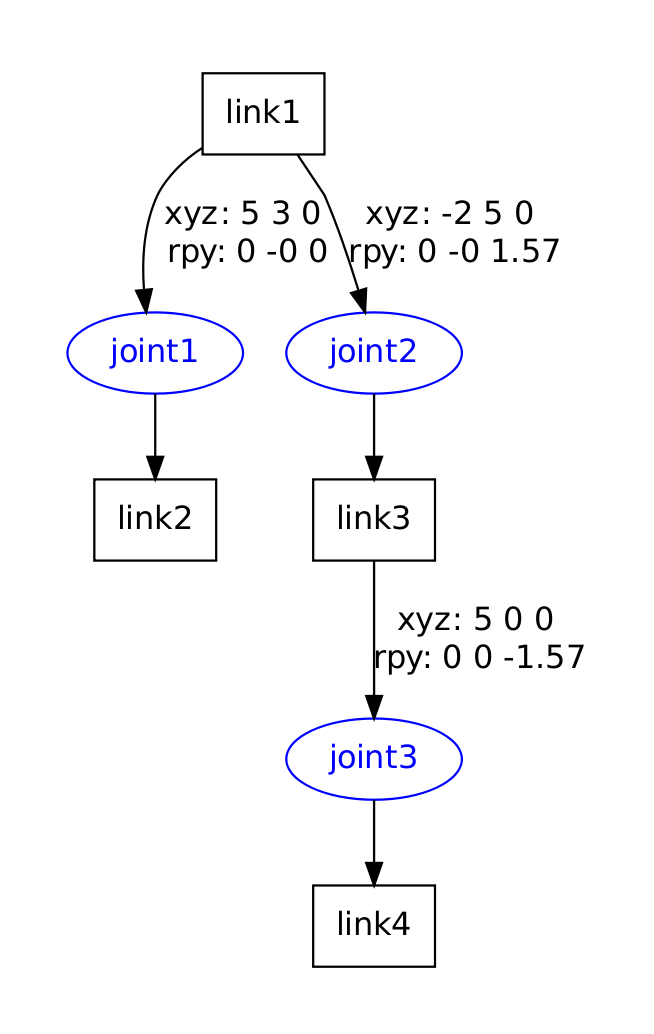
That's it, you created your first URDF robot description! Now you can try to visualize the URDF using graphiz:5
$ urdf_to_graphiz my_robot.urdf
and open the generated file with your favorite pdf viewer:
$ evince test_robot.pdf

You are now ready to move to the next tutorial, and start using the URDF parser in your C++ code.
Starting with ROS Electric Eyms, the check_urdf script has been moved from urdf into urdf_parser. In later releases it is moved to urdfdom_model. (1)
The binaries from urdfdom now appear in the path directly and rosrun no longer works: http://answers.ros.org/question/112081/urdfdom-check_urdf/ (2)
Starting with ROS Electric Emys, the check_urdf script has been moved from urdf into urdf_parser. In later releases it is moved to urdfdom_model. (3)
Starting with Electric Turtle, the check_urdf script has been moved from urdf into urdf_parser. In later releases it is moved to urdfdom_model. (4)
Starting with Electric Turtle, urdf_to_graphiz and check_urdf scripts have been moved from urdf into urdf_parser. In later releases they are moved to urdfdom_model. (5)


