| |
Librviz: Incorporating RViz into a Custom GUI
Description: How to write an application using an RViz visualization widget.Tutorial Level: INTERMEDIATE
Next Tutorial: Rviz in Stereo (japanese)
Show EOL distros:
The RViz library API was not supported in Electric, so there is no tutorial. Might as well jump straight to Groovy!
Note: The RViz plugin API and library API were preliminary in Fuerte. They have changed significantly in Groovy without backwards compatibility, so we encourage developers to program for Groovy. We expect the API to be much more stable going forward.
The Fuerte version of the tutorial can be found here: http://ros.org/doc/fuerte/api/librviz_tutorial/html/index.html
This tutorial can be found here: http://ros.org/doc/groovy/api/librviz_tutorial/html/index.html
このチュートリアルの原本: http://ros.org/doc/hydro/api/librviz_tutorial/html/index.html
Librviz Tutorial
概要
RVizは単なる可視化のアプリケーションではなく、ライブラリでもあります。 RVizの機能の多くは、自分のアプリケーションからlibrviz.so(OSによって名称は異なります)に対するリンクによってアクセスできます。
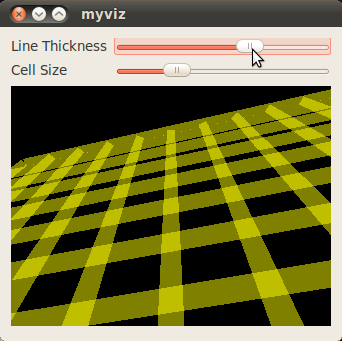
このチュートリアルでは3Dの可視化ウィジェット(rviz::RenderPanel)のとてもシンプルな例を取り上げ、この中で新しいGridディスプレイをプログラム的に生成します。そして、一組のグリッドのプロパティをQtのスライダーがコントロールします。このアプリは“myviz”と呼ばれています。
チュートリアル用のソースコードはlibrviz_tutorialパッケージにあります。ソースのディレクトリを確認、または(もしUbuntuを使っているなら)コンパイル済みのパッケージを、以下のようにapt-getでインストールできます:
sudo apt-get install ros-hydro-visualization-tutorials
このアプリケーションが実行されている様子はこのようになります:

myvizのコード
myvizのコードは以下のファイルです: src/main.cpp,src/myviz.h, src/myviz.cpp
main.cpp
main.cppの全内容は:src/main.cpp
この“myviz”サンプルのmain() はとてもシンプルで、ROSを初期化、QApplicationを生成し、トップレベルのウィジェット(“MyViz”の型で)を作り、これを表示し、Qtのイベントループを走らせます。
#include <QApplication>
#include <ros/ros.h>
#include "myviz.h"

int main(int argc, char **argv)
{
  if( !ros::isInitialized() )
  {
    ros::init( argc, argv, "myviz", ros::init_options::AnonymousName );
  }

  QApplication app( argc, argv );

  MyViz* myviz = new MyViz();
  myviz->show();

  app.exec();

  delete myviz;
}
myviz.h
myviz.hの全内容はsrc/myviz.h
“MyViz”クラスはこの例のトップレベルのウィジェットを実装しています。
class MyViz: public QWidget
{
Q_OBJECT
public:
  MyViz( QWidget* parent = 0 );
  virtual ~MyViz();

private Q_SLOTS:
  void setThickness( int thickness_percent );
  void setCellSize( int cell_size_percent );

private:
  rviz::VisualizationManager* manager_;
  rviz::RenderPanel* render_panel_;
  rviz::Display* grid_;
};
myviz.cpp
myviz.cppの全内容はsrc/myviz.cpp
MyVizのコンストラクタ。ここでこのクラスのほとんどの仕事をします。
MyViz::MyViz( QWidget* parent )
  : QWidget( parent )
{
ラベルとスライダーコントロールを構築し配置します。
QLabel* thickness_label = new QLabel( "Line Thickness" );
QSlider* thickness_slider = new QSlider( Qt::Horizontal );
thickness_slider->setMinimum( 1 );
thickness_slider->setMaximum( 100 );
QLabel* cell_size_label = new QLabel( "Cell Size" );
QSlider* cell_size_slider = new QSlider( Qt::Horizontal );
cell_size_slider->setMinimum( 1 );
cell_size_slider->setMaximum( 100 );
QGridLayout* controls_layout = new QGridLayout();
controls_layout->addWidget( thickness_label, 0, 0 );
controls_layout->addWidget( thickness_slider, 0, 1 );
controls_layout->addWidget( cell_size_label, 1, 0 );
controls_layout->addWidget( cell_size_slider, 1, 1 );
renderパネルを構築し配置します。
render_panel_ = new rviz::RenderPanel();
QVBoxLayout* main_layout = new QVBoxLayout;
main_layout->addLayout( controls_layout );
main_layout->addWidget( render_panel_ );
トップレベルのレイアウトをMyVizウィジェットに設定します。
setLayout( main_layout );
シグナルとスロットを接続します。
connect( thickness_slider, SIGNAL( valueChanged( int )), this, SLOT( setThickness( int )));
connect( cell_size_slider, SIGNAL( valueChanged( int )), this, SLOT( setCellSize( int )));
次に、メインのRVizクラスを初期化します。
manager_ = new rviz::VisualizationManager( render_panel_ );
render_panel_->initialize( manager_->getSceneManager(), manager_ );
manager_->initialize();
manager_->startUpdate();
Gridディスプレイを生成します。
grid_ = manager_->createDisplay( "rviz/Grid", "adjustable grid", true );
ROS_ASSERT( grid_ != NULL );
GridDisplayを適宜構成します。
grid_->subProp( "Line Style" )->setValue( "Billboards" );
grid_->subProp( "Color" )->setValue( Qt::yellow );
スライダー値を初期化します。
  thickness_slider->setValue( 25 );
  cell_size_slider->setValue( 10 );
}
デストラクタです。
MyViz::~MyViz()
{
  delete manager_;
}これはQSliderのvalueChanged()シグナルに接続されたQtのスロットの関数です。グリッドの“Line Width”プロパティを変更することで、グリッドの線幅を設定します。
void MyViz::setThickness( int thickness_percent )
{
  if( grid_ != NULL )
  {
    grid_->subProp( "Line Style" )->subProp( "Line Width" )->setValue( thickness_percent / 100.0f );
  }
}これはQSliderのvalueChanged()シグナルに接続されたQtのスロットの関数です。グリッドの“Cell Size”プロパティを変更することで、グリッドのセルサイズを設定します。
void MyViz::setCellSize( int cell_size_percent )
{
  if( grid_ != NULL )
  {
    grid_->subProp( "Cell Size" )->setValue( cell_size_percent / 10.0f );
  }
}
ビルドする
CmakeLists.txtの全内容は:CMakeLists.txt
実行する
以下のように打ち込みます:
rosrun librviz_tutorial myviz
This tutorial can be found here: http://ros.org/doc/indigo/api/librviz_tutorial/html/index.html


