| |
Collecting object model data and grasp demonstrations
Description: This is the first step in creating and using an object recognition and manipulation database using the rail_pick_and_place metapackage. This tutorial describes setting up the grasp database, connecting the rail_grasp_collection node to both your database and your robot, and collecting data.Keywords: RAIL, pick and place, grasp database, object recognition, grasp demonstration, graspdb
Tutorial Level: BEGINNER
Next Tutorial: Generating object models
Contents
Prerequisites
For this tutorial we will use the rail_pick_and_place metapackage, which can be installed as follows:
$ sudo apt-get install ros-<distro>-rail-pick-and-place
Replace '<distro>' with the name of your ROS distribution (e.g. indigo).
Alternatively, you can install the latest code from the repository at https://github.com/WPI-RAIL/rail_pick_and_place.
Setting up the Grasp Database
Before collecting data, you will need a grasp database. Set up your database as explained in the graspdb package.
Connecting the Collection Node, your Database, and your Robot
The rail_grasp_collection package contains a launch file, rail_grasp_collection.launch, that specifies all of the parameters required to run grasp collection. These include database specific parameters and robot specific parameters.
Database parameters (fill these in with the appropriate values from the Setting up the Grasp Database section):
- host - graspdb ip address
- port - graspdb port
- user - graspdb username
- password - graspdb password
- db - graspdb name
Robot parameters (fill these in with the appropriate values specific to your robot):
- robot_fixed_frame_id - the name of the robot's fixed frame (e.g. base_link)
- eef_frame_id - the name of the robot's end effector frame, corresponding to the end effector that you will use to demonstrate grasps
gripper_action_server - the name of an action server that opens and closes the robot's gripper (this must be implemented using the Gripper action found in rail_manipulation_msgs)
segmented_objects_topic - the name of a ROS topic that publishes segmented object information, e.g. /rail_segmentation/segmented_objects from rail_segmentation
lift_action_server (optional) - the name of an action server that raises the robot's end effector (this must be implemented using the Lift action found in rail_manipulation_msgs)
verify_grasp_action_server (optional) - the name of an action server that provides verification of successful grasping (this must be implemented using the VerifyGrasp action found in rail_manipulation_msgs)
With all of these parameters set, and with the above listed action servers and topics active on your robot, the rail_grasp_collection node should run and provide actions for data collection as specified in the package documentation.
Collecting Data with the rviz Plugin
The rail_pick_and_place_tools package, included in the rail_pick_and_place metapackage, provides rviz plugins to aid in the full object model generation process. To launch the rviz visualization, use the following (note that the model_generation_backend launch requires the same parameters to be set as the standalone rail_grasp_collection launch file):
$ roslaunch rail_pick_and_place_tools model_generation_backend.launch
$ roslaunch rail_pick_and_place_tools model_generation_frontend.launch
This will bring up an rviz window that should look similar to the image below. The left panel contains vision, grasp collection, and model generation functionality, much of which will be described in subsequent tutorials. This tutorial will focus on the grasp collection and vision panels, highlighted in red.
Grasp demonstration and object model generation interface:

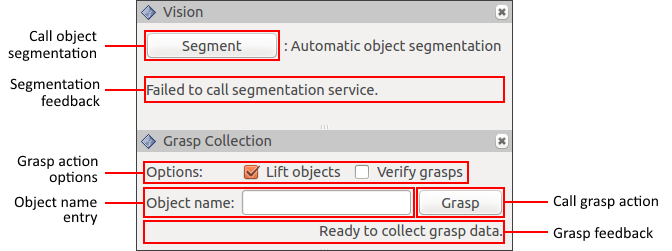
Functionality of the vision and grasp collection panels:

Before collecting any data, set the options to something suitable for your robot by clicking on the checkboxes next to each option. Options include:
- Lift objects - lift the object into the air after performing a grasp (note that this requires a lift_action_server to be implemented on your robot)
- Verify grasps - only store a grasp in the database if it was verified as successful (note that this requires a verify_grasp_action_server to be implemented on your robot)
You are now ready to perform grasp demonstrations and collect object model data. Repeat the following process until you have collected a suitable amount of data for your object set.
Segment the objects. This can be done with the "Segment" button if you are using the rail_segmentation package.
- Enter the name of the object which you are picking up in the "Object name" box.
- Move the end effector into the grasp pose you would like to demonstrate.
- Click the "Grasp" button to perform the grasp.
- Wait for the feedback message to report success or failure.
Successful demonstrations will be stored as new GraspDemonstration objects in the grasp database. This information can be used to build object models used for recognition and manipulation, explained in the next tutorial: Generating object models.
Support
Please send bug reports to the GitHub Issue Tracker.


