Only released in EOL distros:
Package Summary
A simple robot drive system that includes skid steering joystick teleoperation, control of a panning servo to look around the robot, and Arduino firmware.
- Maintainer status: maintained
- Maintainer: Daniel Snider <danielsnider12 AT gmail DOT com>
- Author: Daniel Snider <danielsnider12 AT gmail DOT com>, Matthew Mirvish <matthewmirvish AT hotmail DOT com>
- License: Unlicense
- Source: git https://github.com/danielsnider/simple_drive.git (branch: master)
Contents
Overview

A simple robot drive system. Features include:
- skid steering joystick teleoperation with three drive speeds
- joystick control of a servo (left and right only)
- dedicated left and right thumbsticks for left and right wheel speeds
- a cmd_vel multiplexer to support a coexisting autonomous drive system
- simple Arduino firmware to talk to PWM motors and a servo
This package does not do the following:
no tf publishing
- no wheel odometry publishing
- no PID control loop
no integration with ros_control
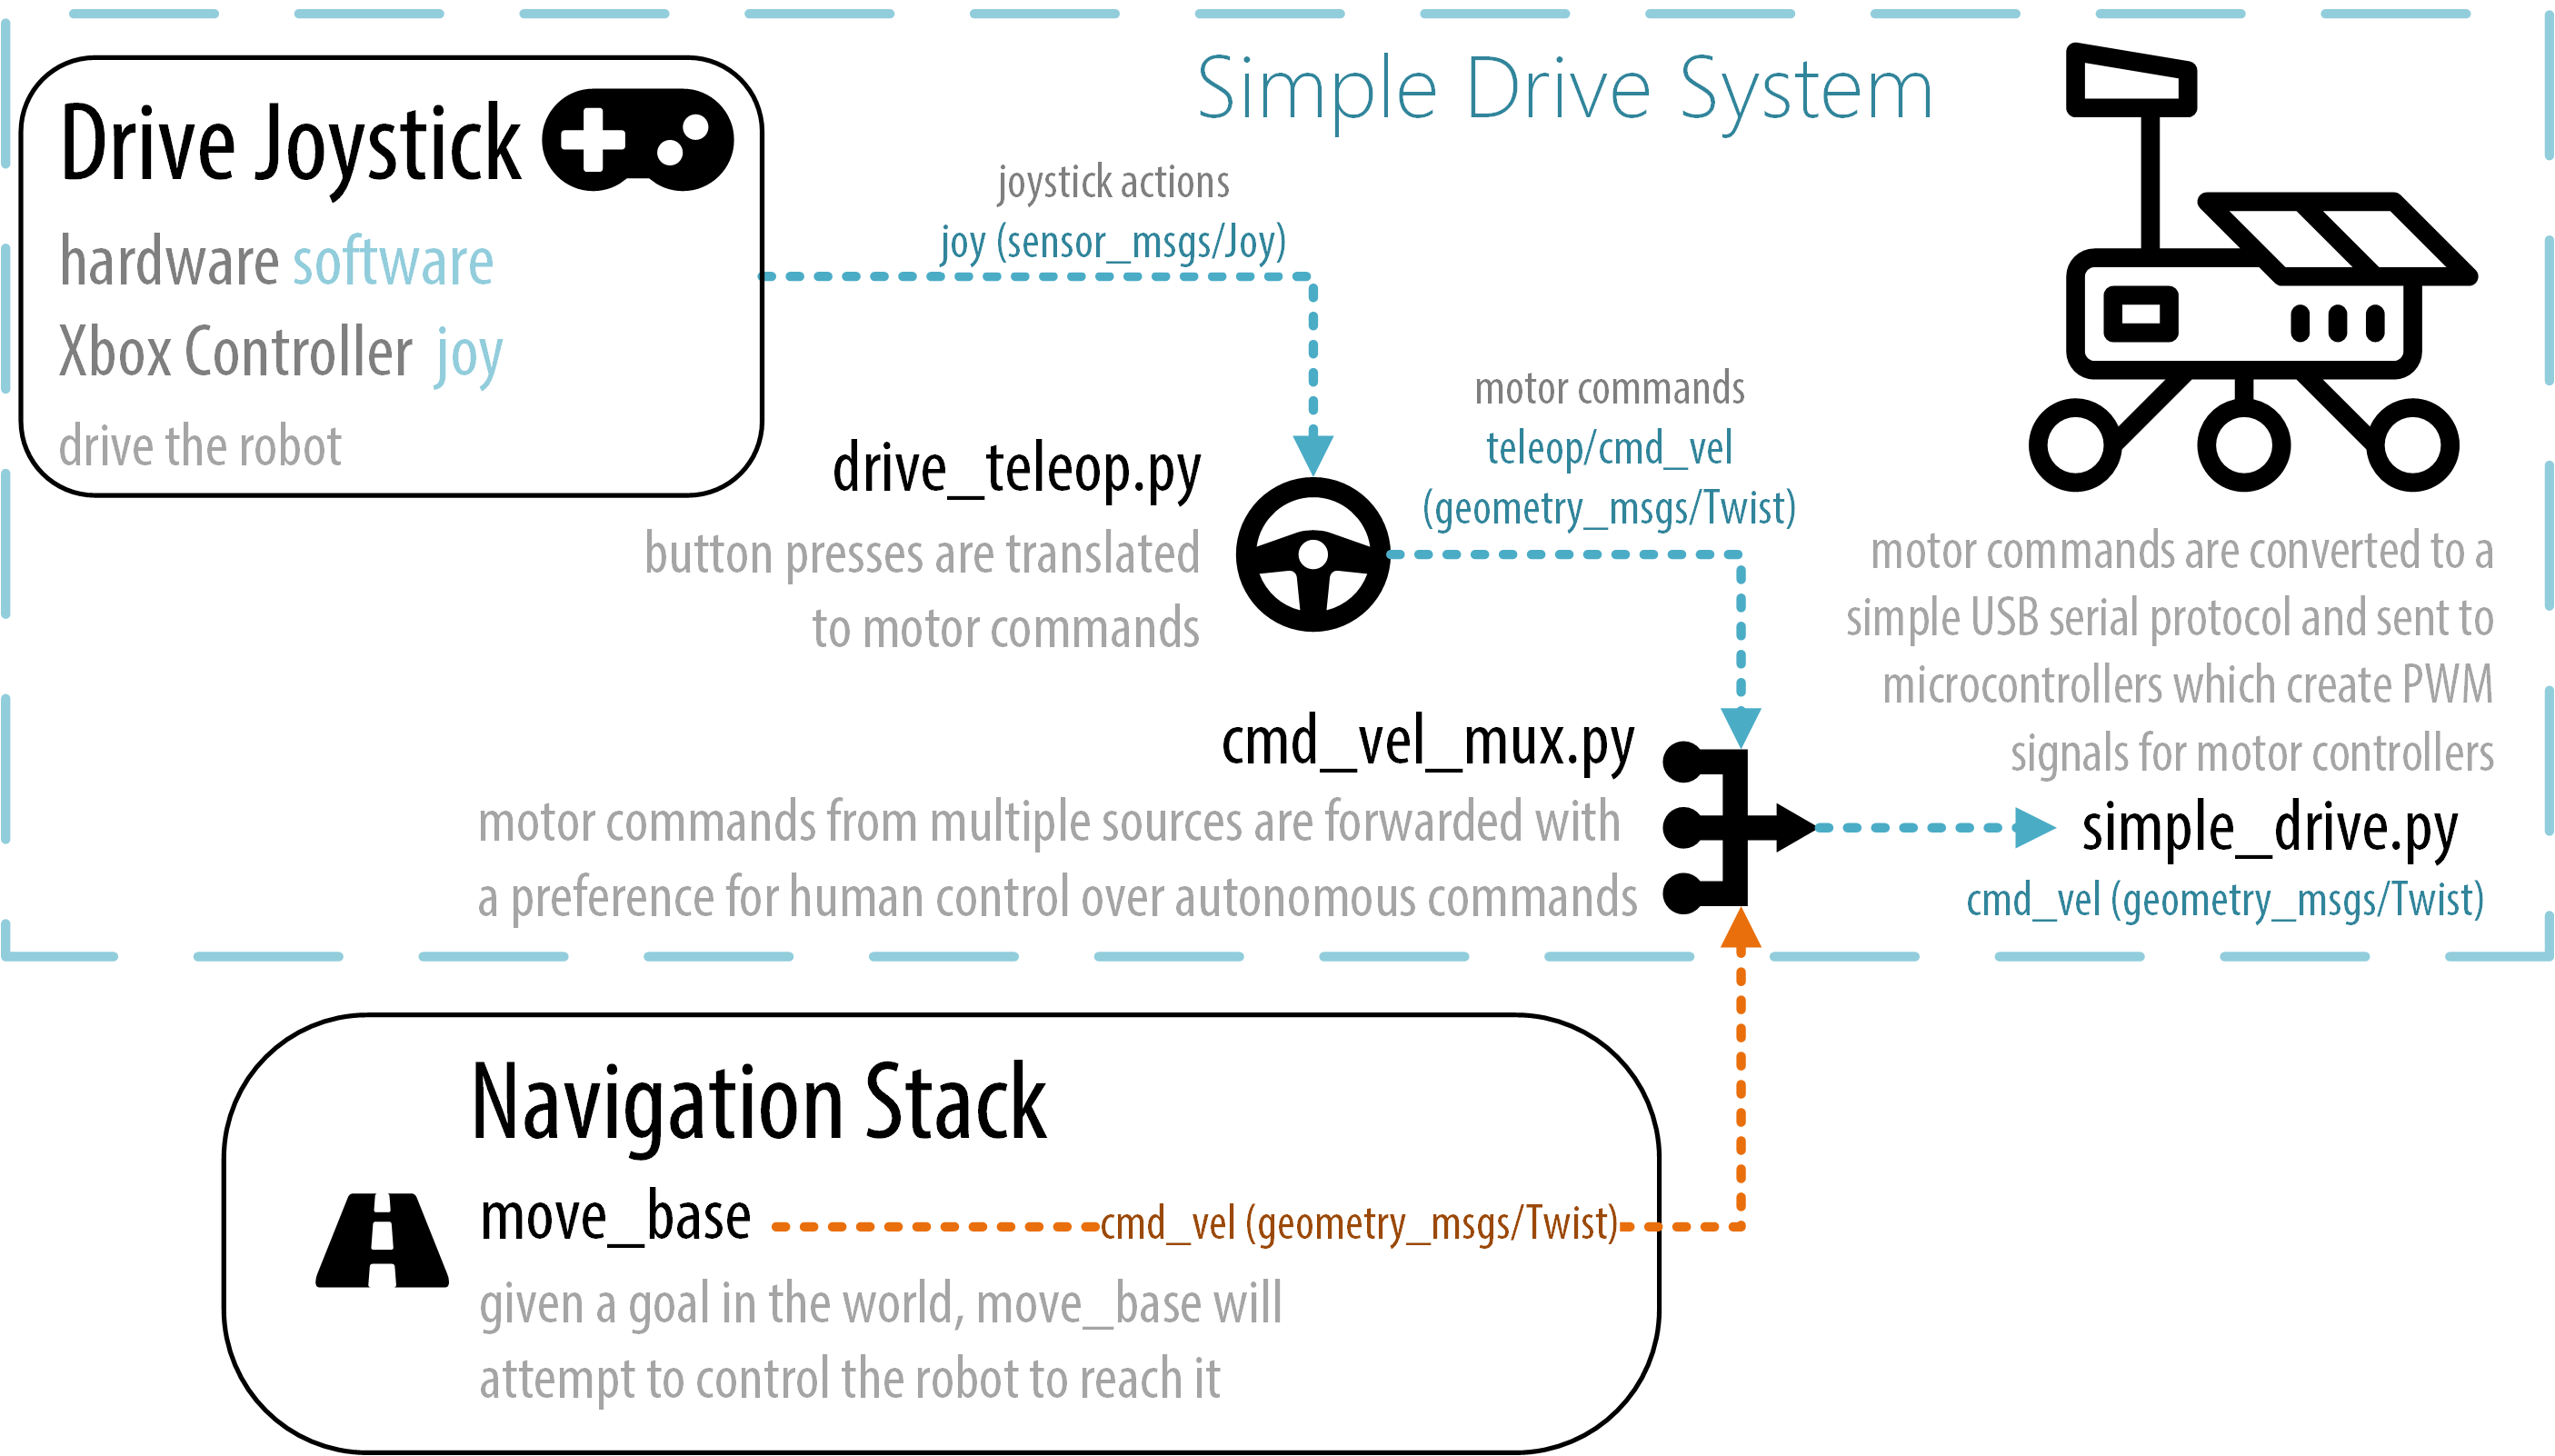
This package is divided into four parts:
Nodes |
Purpose |
Drive your robot with a joystick in skid steering mode (also known as diff drive or tank drive). Left joystick thumbstick controls left wheels, right thumbstick controls right wheels. |
|
Motor commands from multiple sources are forwarded with a preference for human control over autonomous commands. |
|
Send motor commands to your microcontroller. |
|
Microcontroller software that controls your motors. Not a ROS node. |
Package created by Ryerson University students for the University Rover Competition, summer 2017.
Quick Start
1. Install:
$ sudo apt-get install ros-kinetic-simple-drive
2. Launch ROS nodes:
$ roslaunch simple_drive drive_teleop.launch joy_dev:=/dev/input/js0
$ roslaunch simple_drive cmd_vel_mux.launch
$ roslaunch simple_drive simple_drive.launch serial_dev:=/dev/ttyACM0

OR all-in-one launch:
$ roslaunch simple_drive drive.launch
3. Install the drive_firmware onto a microcontroller connected to motors and wheels by PWM. The microcontroller must also be connected to the computer running the simple_drive ROS node by a serial connection (ex. USB).
4. Drive your robot around.
Nodes
drive_teleop

This diagram is also available in Visio format.
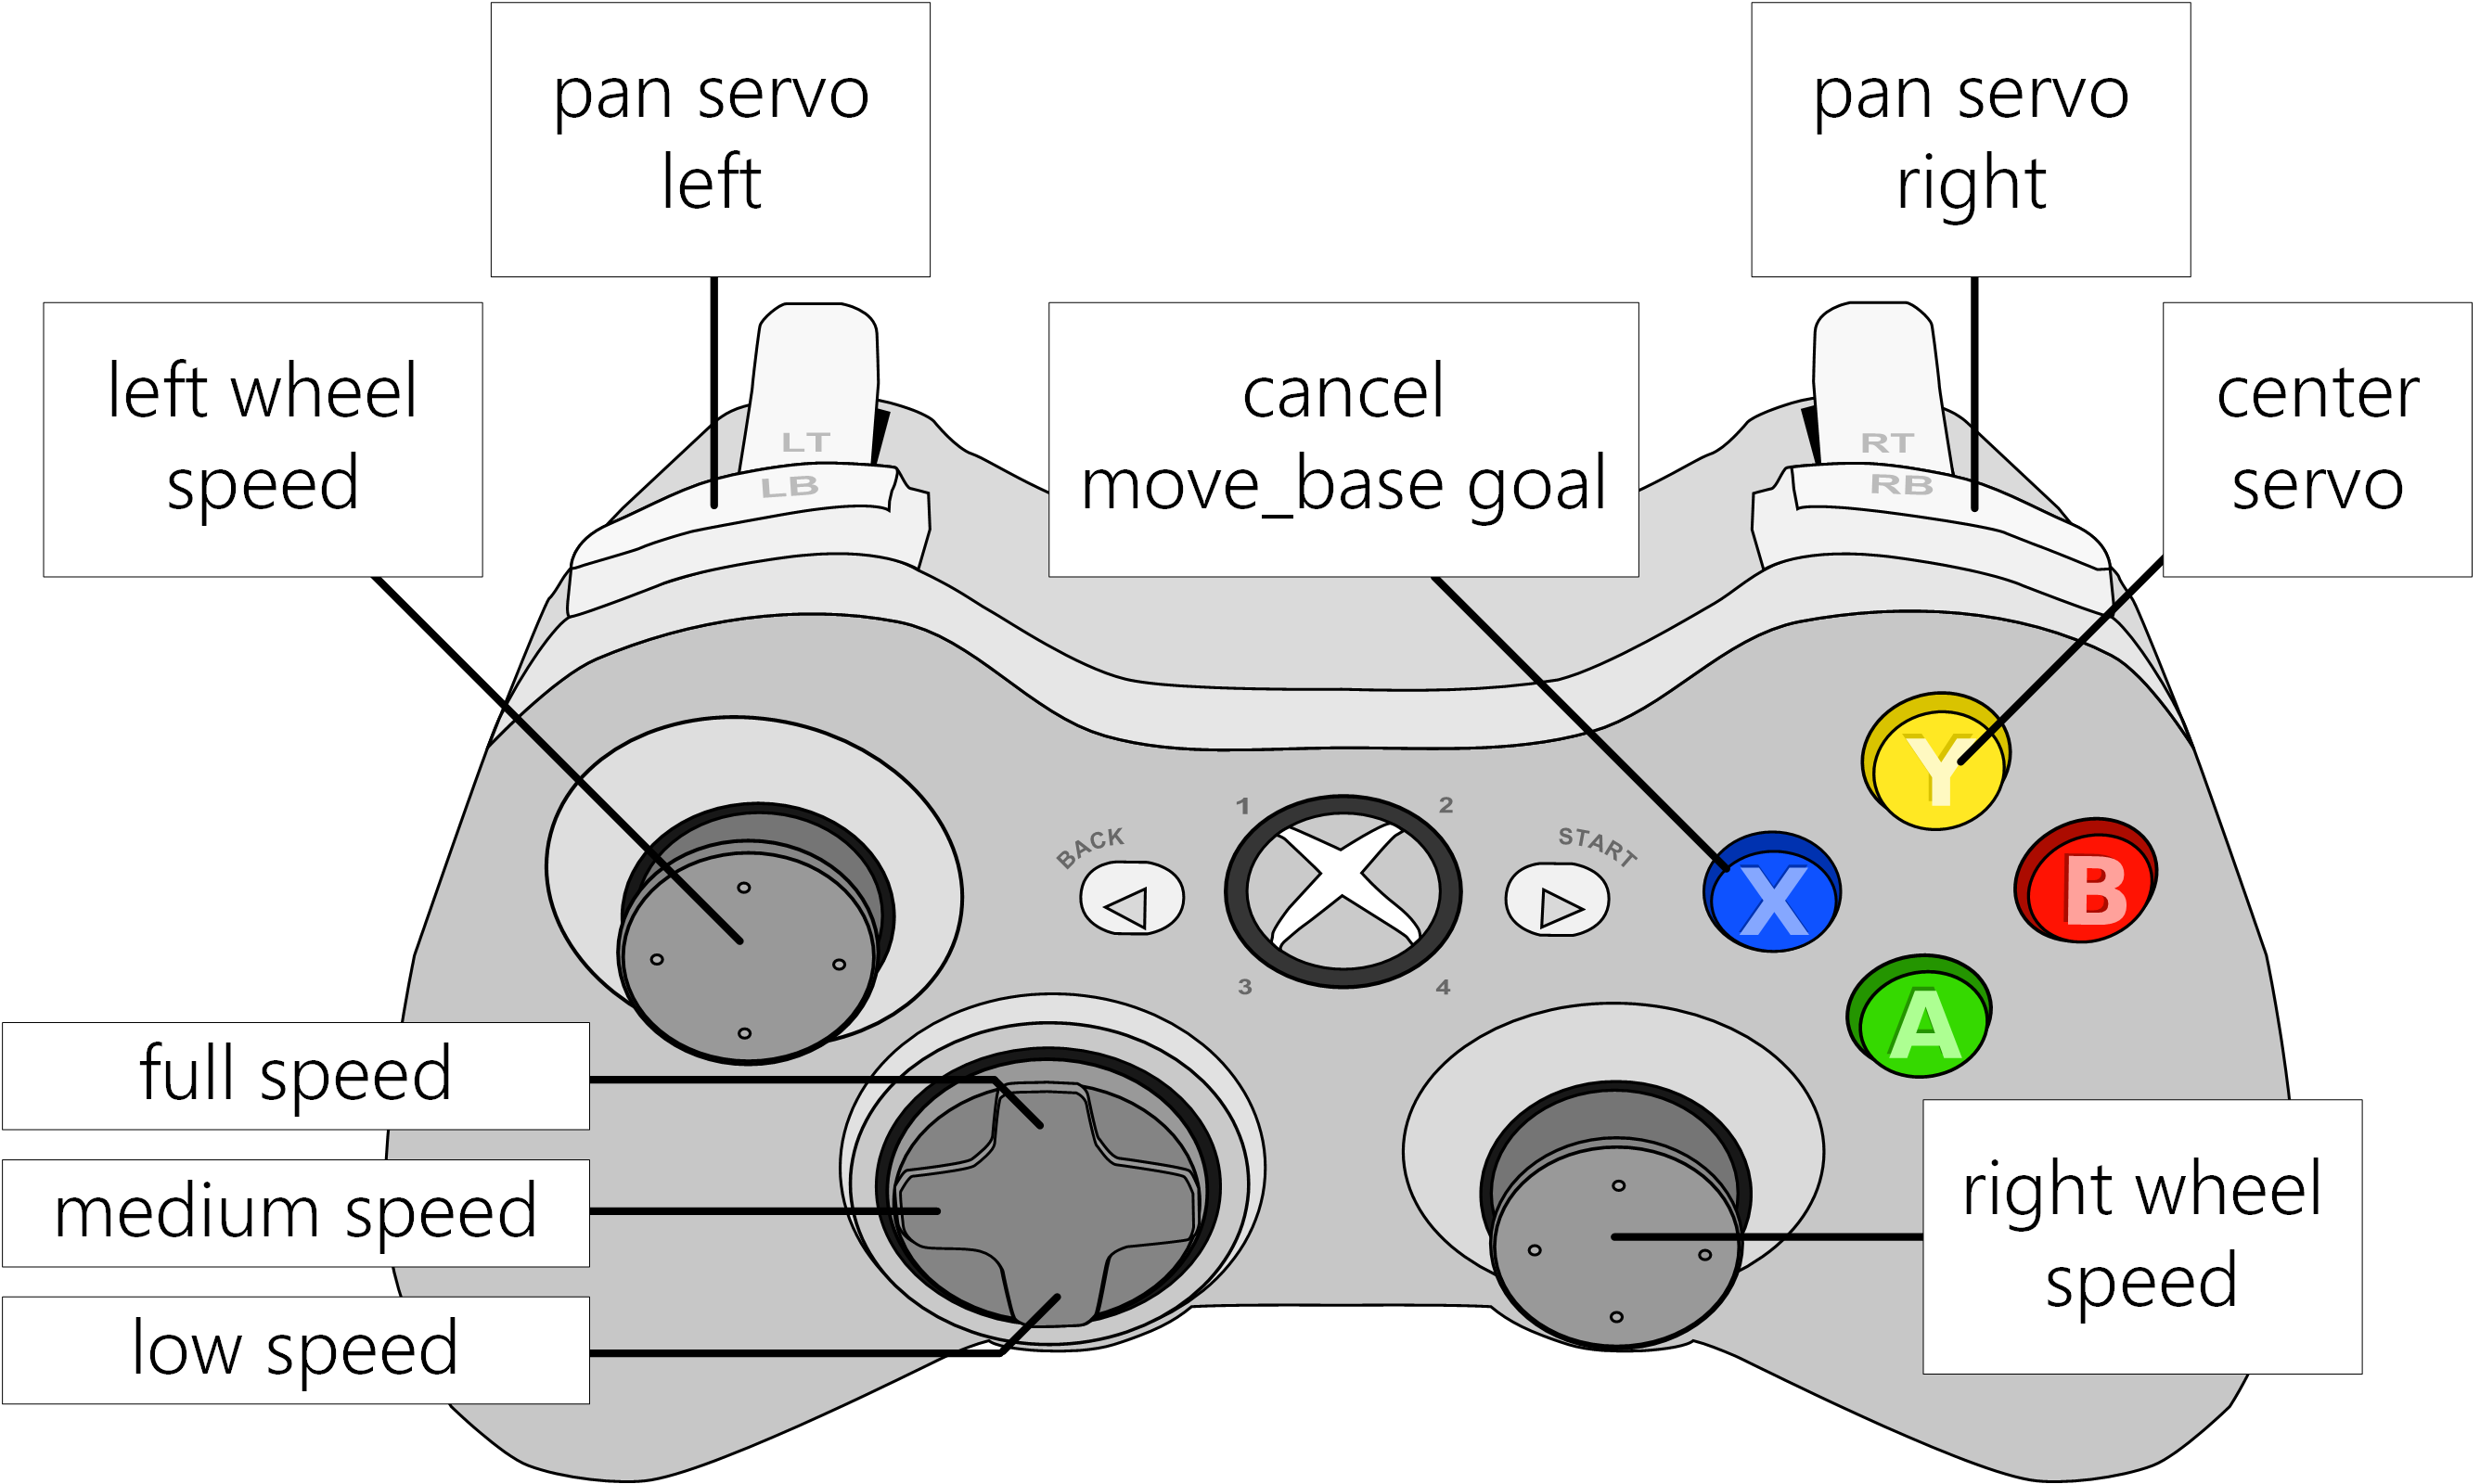
This node converts sensor_msgs/Joy messages from the joy node into a variety of commands to drive the robot at low, medium, and high speed, look around with a servo, and cancel move_base goals at any moment. This node simply sends commands to other nodes. Typically the servo is used to move a camera so that the teleoperator can look around the robot.
The button mapping was tested on an Xbox 360 controller and should require little or no modification for similar controllers.
Launch example
$ roslaunch simple_drive drive_teleop.launch joy_dev:=/dev/input/js0
Subscribed Topics
joy (sensor_msgs/Joy)- Controller joystick button presses are received on this topic. See joy node for more info.
Published Topics
teleop/cmd_vel (geometry_msgs/Twist)- Output motion commands that drive the robot.
- Output servo commands that control the angle of a servo.
Parameters
~servo_pan_speed (int, default: 5)- The degrees of servo motion per button press.
- The maximum angle of servo rotation in degrees.
- The minimum angle of servo rotation in degrees.
cmd_vel_mux
The cmd_vel_mux node receives movement commands on two sensor_msgs/Twist topics, one for teleoperation and one for autonomous control, typically move_base. Movement commands are multiplexed to a final topic for robot consumption. If any teleoperation command is received autonomous commands are blocked for a set time defined by the block_duration parameter.
Launch example
$ roslaunch simple_drive cmd_vel_mux.launch
Subscribed Topics
teleop/cmd_vel (geometry_msgs/Twist)- Human generated movement commands from a teleoperation node such as the drive_teleop node.
- Computer generated movement commands from an autonomous system such as move_base or rtabmap_ros.
Published Topics
cmd_vel (geometry_msgs/Twist)- Movement commands for consumption by the robot. Autonomous movement commands will be blocked for block_duration seconds if any teleoperation command is received.
Parameters
~block_duration (int, default: 5)- The amount of time autonomous movement is blocked after any human movement is received.
simple_drive
This node communicates with the drive_firmware using a custom serial protocol described below. An example serial data packet could be 0,0.5,0.5 which would mean drive motors forward at half speed and rotate at half speed.
Serial Protocol
Action |
Serial data packet |
Twist motor command |
(BYTE) 0, (FLOAT) LINEAR_VELOCITY, (FLOAT) ANGULAR_VELOCITY |
Servo position command |
(BYTE) 2, (FLOAT) SERVO_ANGLE |
![]() If your microcontroller supports subscribing to ROS twist messages (Arduinos can use rosserial_arduino) then it would be simpler to do that and skip this node. However, this node is written in python so you could more easily add complex functionality in python and then in your microcontroller do the minimum amount of work necessary.
If your microcontroller supports subscribing to ROS twist messages (Arduinos can use rosserial_arduino) then it would be simpler to do that and skip this node. However, this node is written in python so you could more easily add complex functionality in python and then in your microcontroller do the minimum amount of work necessary.
Launch example
$ roslaunch simple_drive simple_drive.launch serial_dev:=/dev/ttyACM0
Subscribed Topics
cmd_vel (geometry_msgs/Twist)- Motor commands received on this topic are encoded and sent over serial to the drive_firmware.
- Servo position commands received on this topic are encoded and sent over serial to the drive_firmware.
Parameters
~serial_dev (string, default: /dev/ttyACM0)- The microcontroller, often an Arduino, as seen in linux, that this node will send motor commands to.
- Sets the serial device data transmission rate in bits per second (baud).
drive_firmware
The drive_firmware microcontroller code does the minimum amount of work possible to receive motor commands from a USB serial connection and output voltages to digital PWM output to be received by motor controllers.
We connected an Arduino by USB serial to our main robot computer. We tested on a Arduino Mega 2560 and Arduino Due, however many other boards should work with the same code and setup steps thanks to PlatformIO. You may need to change to change the pin numbers.
![]() Caution! This software does not stop moving the robot if no messages are received for certain period of time. A pull request for this is very welcome.
Caution! This software does not stop moving the robot if no messages are received for certain period of time. A pull request for this is very welcome.
PlatformIO
We deploy the drive_firmware to an Arduino microcontroller using PlatformIO.
![]() We like PlatformIO: "Single source code. Multiple platforms." PlatformIO supports approximately 200Embedded Boards and all majorDevelopment Platforms. Learn more onplatformio.org.
We like PlatformIO: "Single source code. Multiple platforms." PlatformIO supports approximately 200Embedded Boards and all majorDevelopment Platforms. Learn more onplatformio.org.
Install and configure drive_firmware
This steps were tested on Ubuntu 16.04.
1. Install PlatformIO
$ sudo python -c "$(curl -fsSL https://raw.githubusercontent.com/platformio/platformio/master/scripts/get-platformio.py)"

# Enable Access to Serial Ports (USB/UART)
$ sudo usermod -a -G dialout <your username here>
$ curl https://raw.githubusercontent.com/platformio/platformio/develop/scripts/99-platformio-udev.rules  > /etc/udev/rules.d/99-platformio-udev.rules
# After this file is installed, physically unplug and reconnect your board.
$ sudo service udev restart
More PlatformIO install info: http://docs.platformio.org/en/latest/installation.html#super-quick-mac-linux
2. Create a PlatformIO project
$ roscd simple_drive
$ cd ./drive_firmware/
# Find the microcontroller that you have in the list of PlatformIO boards
$ pio boards | grep -i mega2560
# Use the name of your board to initialize your project
$ pio init --board megaatmega2560
More PlatformIO info: http://docs.platformio.org/en/latest/quickstart.html
3. Modify wiring if necessary
$ vim src/main.cpp +4
Depending on how you want to wire your microcontroller this wiring could be changed:
4. Modify PWM Settings
$ vim src/main.cpp +17
Edit the following section to match your motor controller PWM specs:
5. Deploy Code to Arduino
$ pio run --target upload
6. Drive your robot! ![]()
Have fun!
Other Implementation Details
Tank to Twist Calculation
When a left and right joystick inputs are received by the drive_teleop node, representing left and right wheel velocities (ie. skid steering or differential drive), a geometry_msgs/Twist with linear and rotational velocities is calculated as:
- Linear velocity (m/s) =
(left_speed + right_speed) / 2.0
- Angular velocity (rad/s) =
(right_speed - left_speed) / 2.0
Twist to Tank Calculation
When a geometry_msgs/Twist containing linear and rotational velocities is received by the drive_firmware, wheel velocities are calculated as:
- Left wheel velocity (m/s) =
linear_speed + angular_speed
- Right wheel velocity (m/s) =
linear_speed - angular_speed
Related Packages
Similar to simple_drive:
http://wiki.ros.org/differential_drive - Differential drive software with support for a velocity PID target, a small GUI to control the robot, and more.
http://wiki.ros.org/diff_drive_controller - Differential drive software that is real-time safe, integrates with ros_control, and more.
Similar to drive_teleop:
http://wiki.ros.org/teleop_twist_joy - This teleop node converts joy messages to twist messages.
http://wiki.ros.org/joy_teleop - This teleop node takes joy messages and publishes topics or calls actions according a configuration file.
Similar to cmd_vel_mux:
http://wiki.ros.org/twist_mux - Multiplex several velocity command topics with prioritization or disabling according to a configuration file.
Feedback
Feature requests, bug reports, and contributions are welcome at https://github.com/danielsnider/simple_drive.
Special thanks to anyone who sends a picture of this package in action on their robot!


