New in Electric
| Note: This tutorial assumes that you have completed the previous tutorials: ROS Tutorials. |
| |
インタラクティブマーカ: シンプルなインタラクティブマーカサーバを書く
Description: このチュートリアルは、単一のインタラクティブマーカを管理する最も単純なサーバをどのように作るかを説明しますTutorial Level: BEGINNER
Next Tutorial: Interactive Markers: Basic Controls
Contents
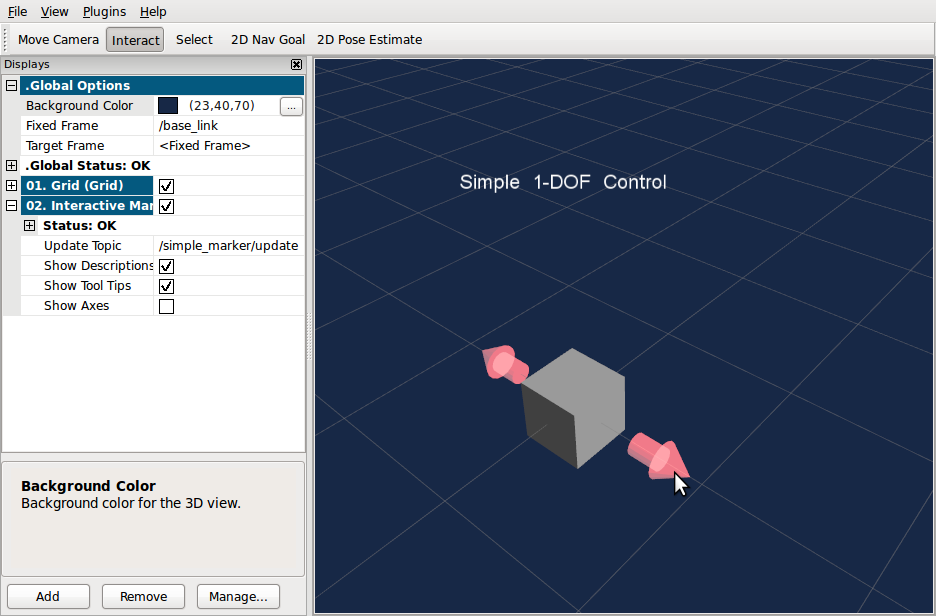
もし、previous tutorialに書いてあるようにinteractive_marker_tutorialsからのsimple_markerのサンプルを実行すると、RVizで以下のようなものが見えます。:

サーバノードによって提供された単一のインタラクティブマーカを表示します。矢印をクリックして、箱を動かします。他には、サーバノードがRVizのマーカの位置を変えるたびにマーカの現在位置を表示します。
これは、サーバノードのコードです。:
  96 #include <ros/ros.h>
  97
  98 #include <interactive_markers/interactive_marker_server.h>
  99
 100 void processFeedback(
 101     const visualization_msgs::InteractiveMarkerFeedbackConstPtr &feedback )
 102 {
 103   ROS_INFO_STREAM( feedback->marker_name << " is now at "
 104       << feedback->pose.position.x << ", " << feedback->pose.position.y
 105       << ", " << feedback->pose.position.z );
 106 }
 107
 108 int main(int argc, char** argv)
 109 {
 110   ros::init(argc, argv, "simple_marker");
 111
 112   // create an interactive marker server on the topic namespace simple_marker
 113   interactive_markers::InteractiveMarkerServer server("simple_marker");
 114
 115   // create an interactive marker for our server
 116   visualization_msgs::InteractiveMarker int_marker;
 117   int_marker.header.frame_id = "/base_link";
 118   int_marker.name = "my_marker";
 119   int_marker.description = "Simple 1-DOF Control";
 120
 121   // create a grey box marker
 122   visualization_msgs::Marker box_marker;
 123   box_marker.type = visualization_msgs::Marker::CUBE;
 124   box_marker.scale.x = 0.45;
 125   box_marker.scale.y = 0.45;
 126   box_marker.scale.z = 0.45;
 127   box_marker.color.r = 0.5;
 128   box_marker.color.g = 0.5;
 129   box_marker.color.b = 0.5;
 130   box_marker.color.a = 1.0;
 131
 132   // create a non-interactive control which contains the box
 133   visualization_msgs::InteractiveMarkerControl box_control;
 134   box_control.always_visible = true;
 135   box_control.markers.push_back( box_marker );
 136
 137   // add the control to the interactive marker
 138   int_marker.controls.push_back( box_control );
 139
 140   // create a control which will move the box
 141   // this control does not contain any markers,
 142   // which will cause RViz to insert two arrows
 143   visualization_msgs::InteractiveMarkerControl rotate_control;
 144   rotate_control.name = "move_x";
 145   rotate_control.interaction_mode =
 146       visualization_msgs::InteractiveMarkerControl::MOVE_AXIS;
 147
 148   // add the control to the interactive marker
 149   int_marker.controls.push_back(rotate_control);
 150
 151   // add the interactive marker to our collection &
 152   // tell the server to call processFeedback() when feedback arrives for it
 153   server.insert(int_marker, &processFeedback);
 154
 155   // 'commit' changes and send to all clients
 156   server.applyChanges();
 157
 158   // start the ROS main loop
 159   ros::spin();
 160 }
ここで行われているのは以下のことです:
位置を表示することでRVizからのフィードバックメッセージを管理するprocessFeedbackを定義します。
- roscppを初期化します。
- インタラクティブマーカサーバオブジェクトを作成します。
- インタラクティブマーカを準備し、サーバコレクションに追加します。
- ROSのメッセージループに入ります。
insertを呼ぶときは、サーバオブジェクトが内部で、待機リストに新しいマーカをプッシュするだけであることに注意してください。applyChangesをいったん呼ぶと、インタラクティブマーカの見ることのできるセットに追加し、すべての接続されたクライアントに送ります。
これですべてです。あなたはこれで次のチュートリアルに行く準備ができています。: Interactive Markers: Basic Controls.


