Show EOL distros:
Package Summary
Face detection in images.
- Author: Caroline Pantofaru
- License: BSD
- Repository: wg-ros-pkg
- Source: svn https://code.ros.org/svn/wg-ros-pkg/stacks/people/tags/people-0.1.3
Package Summary
Face detection in images.
- Author: Caroline Pantofaru
- License: BSD
- Source: git https://github.com/wg-perception/people.git (branch: fuerte_trunk)
Package Summary
Face detection in images.
- Author: Caroline Pantofaru
- License: BSD
- Source: git https://github.com/wg-perception/people.git (branch: groovy-devel)
Package Summary
Face detection in images.
- Maintainer status: maintained
- Maintainer: Dan Lazewatsky <dan AT lazewatsky DOT com>
- Author: Caroline Pantofaru
- License: BSD
- Source: git https://github.com/wg-perception/people.git (branch: hydro-devel)
Package Summary
Face detection in images.
- Maintainer status: maintained
- Maintainer: Dan Lazewatsky <dan AT lazewatsky DOT com>
- Author: Caroline Pantofaru
- License: BSD
- Source: git https://github.com/wg-perception/people.git (branch: indigo-devel)
Package Summary
Face detection in images.
- Maintainer status: maintained
- Maintainer: Dan Lazewatsky <dan AT lazewatsky DOT com>
- Author: Caroline Pantofaru
- License: BSD
- Source: git https://github.com/wg-perception/people.git (branch: indigo-devel)
Package Summary
Face detection in images.
- Maintainer status: maintained
- Maintainer: Dan Lazewatsky <dan AT lazewatsky DOT com>
- Author: Caroline Pantofaru
- License: BSD
- Source: git https://github.com/wg-perception/people.git (branch: kinetic)
Package Summary
Face detection in images.
- Maintainer status: maintained
- Maintainer: Dan Lazewatsky <dan AT lazewatsky DOT com>
- Author: Caroline Pantofaru
- License: BSD
- Source: git https://github.com/wg-perception/people.git (branch: kinetic)
Package Summary
Face detection in images.
- Maintainer status: maintained
- Maintainer: Dan Lazewatsky <dan AT lazewatsky DOT com>
- Author: Caroline Pantofaru
- License: BSD
- Source: git https://github.com/wg-perception/people.git (branch: melodic)
Package Summary
Face detection in images.
- Maintainer status: maintained
- Maintainer: Dan Lazewatsky <dan AT lazewatsky DOT com>
- Author: Caroline Pantofaru
- License: BSD
- Source: git https://github.com/wg-perception/people.git (branch: noetic)
Contents
Overview
Provides detections of faces in stereo camera data. The face detector employs the OpenCV face detector (based on a cascade of Haar-like features) to obtain an initial set of detections. It then prunes false positives using stereo depth information. The depth information is used to predict the real-world size of the detected face, which is then preserved as a true face detection only if the size is realistic for a human face. This removes the majority of false positives given by the OpenCV detector.
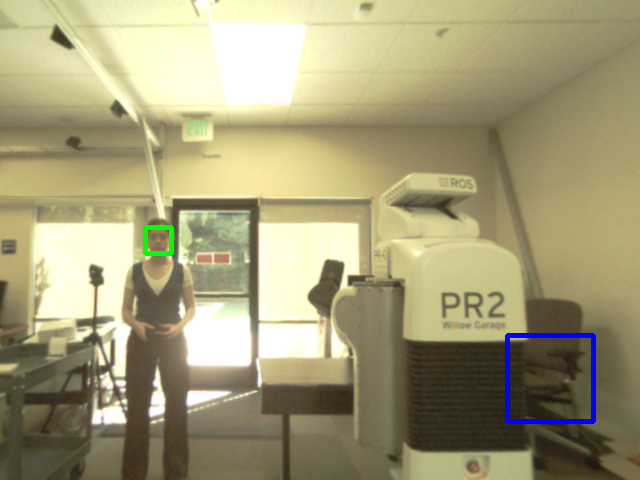
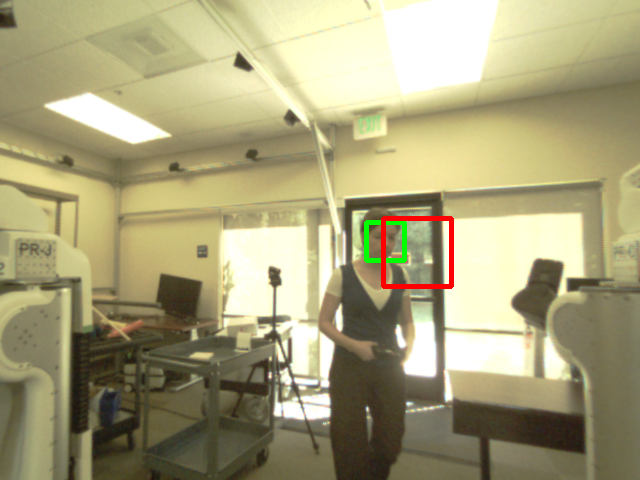
In the two images below, all of the bounding boxes are detections from the OpenCV frontal face detector. The blue detection does not have sufficient depth information (due to low illumination) and hence will be considered a false positive by the face_detector node. The red detection has an unrealistic real-world size, and will be considered a false positive. Only the green detections are returned as true face detections.


Node
face_detector
The face_detector node can be used in two ways, continuously or as an action. Continuous mode: detect faces in the entire image stream. Action mode: an action is used to start face detection and the detector processes images until it has found at least one face.Action Result
face_positions (people_msgs/PositionMeasurement)- A list of found faces.
Subscribed Topics
<camera>/left/<image> (sensor_msgs/Image)- The image from the left camera in the stereo pair. Should be de-bayered and rectified. Can be color or grayscale.
- The disparity image.
- The camera parameters from the left camera.
- The camera parameters from the right camera.
- The image from the color camera. Should be de-bayered and rectified. Can be color or grayscale.
- The registered depth image. 'image' should be image_rect.
- The camera parameters from the color camera.
- The camera parameters from the depth camera.
Published Topics
face_detector/people_tracker_measurements (people_msgs/PositionMeasurement)- The 3D position of the center of the face. Fields are available for reliability and covariance measurements if desired. Axis of pos aligns to that of fixed_frame argument passed in the launch file.
- A point cloud of face centers, intended for visualization.
Parameters
~classifier_name (string)- A readable string for the classifier. Will be published with the result.
- Full path to the trained haar cascade. Provided classifiers are in opencv2. We recommend using the haar_frontalface_alt.xml
- Some notion of the classifier's reliability for use in a larger system.
- true=run continuously, false=wait for action call
- true = If depth info is not available, just make pos.x and pos.y in the resulting people_msgs/PositionMeasurement messaging the 2D image center of the face. false = Don't publish faces if stereo information isn't available.
- false = don't display anything, true = display detections in an OpenCV window.
- The minimum width of a face, in meters. Defaults to 0.1m.
- The maximum width of a face, in meters. Defaults to 0.5m.
- The maximum distance of a face from the camera, in meters. (In the camera frame, depth is along the z-axis.) Defaults to 8.0m.
- Only used for tracking. The maximum distance between two face detections before they are considered different faces. Defaults to 1.0m.
- true = use data from an RGBD camera (Kinect), false = use stereo data
- true = use data from unsynchronized cameras (the Kinect or the stereo cameras in Gazebo), false = use data from synchronized cameras
Example Usage
See face_detector/launch/face_detector.<camera>.launch to see how to run the face detector continuously, or face_detector/launch/face_detector_action.<camera>.launch to run it as an action. launch files above are stored in the repository.
Possible pitfall may be the argument names (in face_detector.rgbd.launch for example):
  <arg name="camera" default="camera" />
  <arg name="depth_ns" default="depth_registered" />
  <arg name="image_topic" default="image_rect_color" />
  <arg name="depth_topic" default="image_rect_raw" />
  <arg name="fixed_frame" default="camera_rgb_optical_frame" />
camera and depth_ns together consists the namespace prefix, and *_topic makes the body of the topic to subscribe. In the example above, you're looking for:
- /camera/rgb/image_rect_color
- /camera/depth_ns/image_rect_raw
See this answer for the name of the topics you need to correct.
Config example with Xtion
<launch>
  <arg name="camera" default="camera" />
  <arg name="image_topic" default="image_raw" />
  <arg name="depth_topic" default="image_raw" />
  <arg name="fixed_frame" default="camera_rgb_optical_frame" />
  <arg name="depth_ns" default="depth_registered" />
:
</launch>
Example with robots
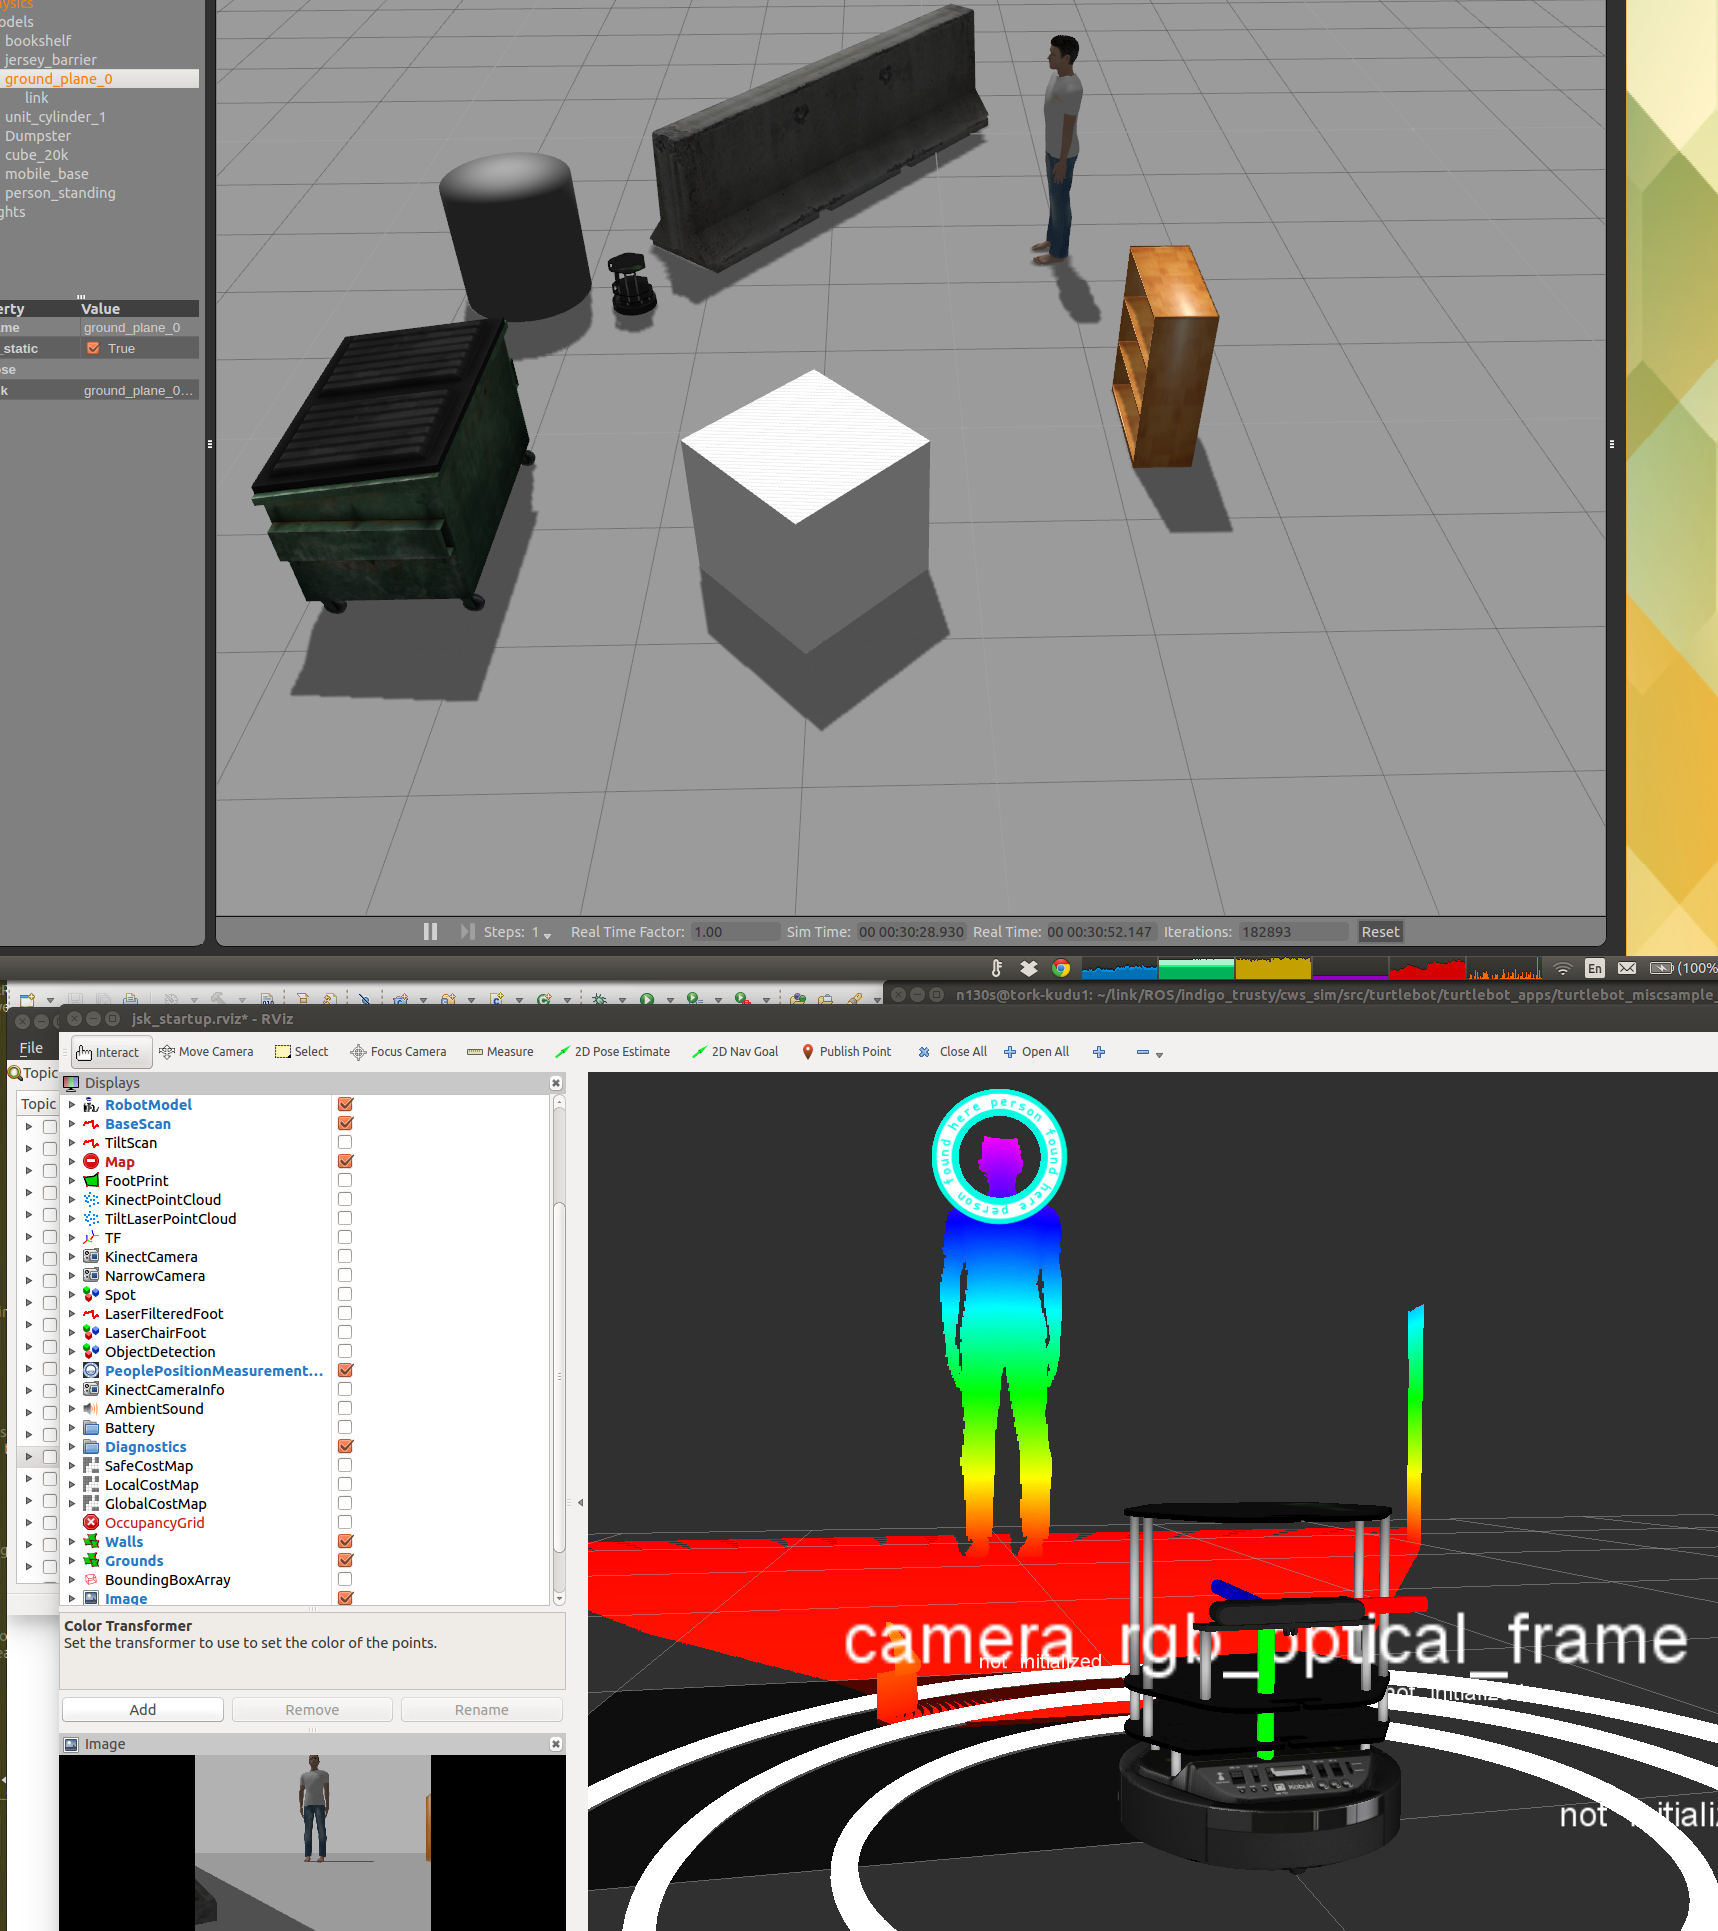
No doubt face_detector works on the robots on simulator. Examples below show how you can run this package using stereo camera on PR2 and Turtlebot. Additionally, using some other useful packages, you can visualize face detection result on RViz.
Install some useful packages (jsk_pr2_startup that depends on jsk_rviz_plugins, which provides a feature to show the result of face_detector on RViz) :
apt-get install jsk_pr2_startup
- Run the robot's launch files:
For PR2:
roslaunch pr2_gazebo pr2_empty_world.launch
roslaunch face_detector facedetector_rgb_pr2.launch  (*a)
For Turtlebot:
roslaunch turtlebot_gazebo turtlebot_world.launch
roslaunch turtlebot_miscsample_cpp facedetector_rgb.launch (*b)
Then run RViz using jsk_pr2_startup package:
roslaunch jsk_pr2_startup rviz.launch
(Simulation only) Add a standing person model on Gazebo; On Gazebo, Insert -> Standing person then place him at certain location.
You may want to open Image plugin on RViz then specify /head_mount_kinect/rgb/image_raw on Image Topic row, to make sure that the robot is seeing the person's face.
- You may want to move the robot` so that the human is in the sight.
(*a)...Requires this pull request merged and released. (*b)...Requires (pull request TBA)
PR2:

Turtlebot:


